English Русский
Български
Беларускі
Український
Српски
Hrvatski
Română
Polski
Slovenský
Magyar
Bookmark Contacts Articles Sitemap
Company vehicles Peugeot Company vehicles Opel Company vehicles Skoda Company vehicles Land Rover Company vehicles Mitsubishi Company vehicles Volkswagen Company vehicles Honda
RenaultBook.ru


Duster   Fluence   Kangoo   Laguna   Logan   Megane   Sandero   Scenic   Symbol   Clio   Other
Logan 1 (2004-2012, petrol) Logan 2 (2012-2020)

Disassembling the cylinder head (Renault Logan 2)

  • Main
  • Logan
  • Logan 2 (2012-2020)
  • Power unit
  • Diesel engines 1.5 l
  • Disassembling the cylinder head
0
1. Remove the cylinder head from the engine.

2. Install the cylinder head on the disassembly stand (Mot. 1573).

3. Loosen the nuts (1) securing the fuel rail guard
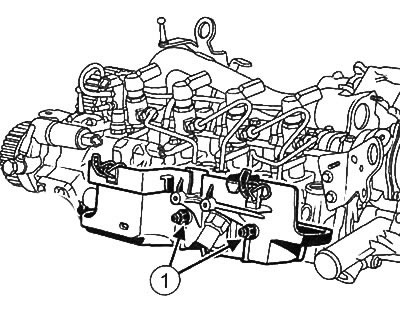
3. Loosen the nuts (1) securing the fuel rail guard


4. Remove the fuel rail protection.

5. Clean the high pressure fuel line connections.

6. Remove the high-pressure fuel lines between the high-pressure fuel pump and the fuel rail (see chapter "Power supply system").

7. Remove the high-pressure fuel pump (see chapter "Power supply system").

8. Remove the fuel rail (see chapter "Power supply system").

9. Remove the glow plugs (see chapter "Engine electrical equipment").

10. Remove the vacuum pump.

11. Remove the cooling system chamber (see chapter "Cooling system").

12. Remove the exhaust gas temperature sensor.

13. Remove the EGR components.

14. Remove the exhaust manifold.

15. Remove the camshaft oil seal from the drive side (see below).

16. Remove the camshaft (see below).

Note: It is necessary to mark the valve lifters relative to the cylinders with a marker.


17. Remove the valve lifters.
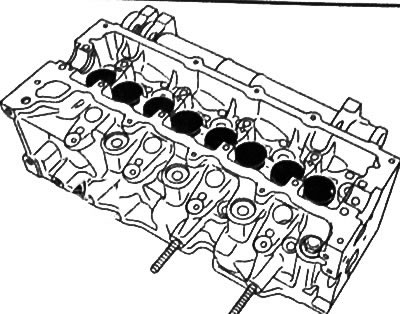
17. Remove the valve lifters.


18. Remove the valves from the cylinder head:


  • Place the valve spring compressor (Mot. 1849) on the valve as shown in the figure.
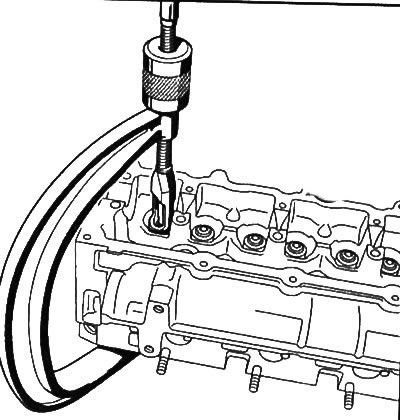
Place the valve spring compressor (Mot. 1849) on the valve as shown in the figure.

  • Compress the valve spring.

Compress the valve spring.

  • Using a magnetized rod or tweezers, remove the valve crackers (4)
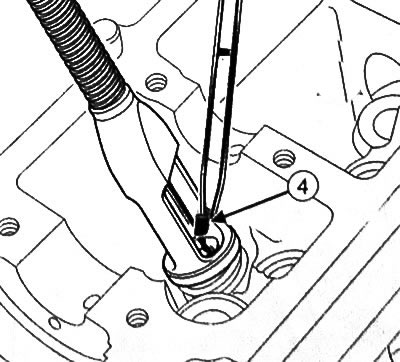
.
Using a magnetized rod or tweezers, remove the valve crackers (4).

  • Release the valve spring and remove the valve spring compressor from the cylinder head.
  • Remove the valve plate and valve spring.
  • Remove the valve from the cylinder head
  • Remove the remaining valves from the cylinder head in a similar manner.

19. Remove the valve stem seals:


Note: Before removing the valve stem seal, it is important to mark the dimension (H) of the old valve stem seals on the intake and exhaust sides (the installation size of the inlet and outlet caps may differ).
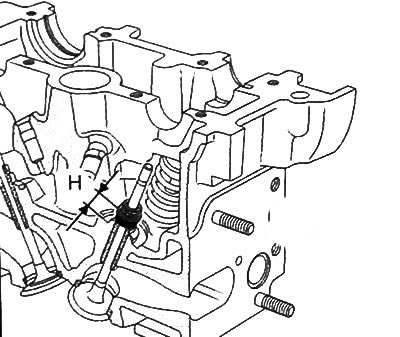

Note: Before removing the valve stem seal, it is important to mark the dimension (H) of the old…

  • Install the valve to mark the installation dimension (H) of the old valve stem seal with the lower spring retaining washer using the valve stem seal installation tool (Mot. 1759) or valve stem seal installation kit.

Note: It is recommended to use a pressing tool to measure the installation dimension (H) of the oil seal (Mot. 1511-01) (5).
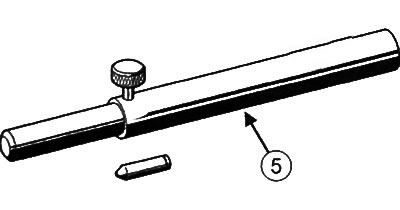

Note: It is recommended to use a pressing tool to measure the installation dimension (H) of the oil…

  • Install the mandrel (7) onto the oil deflector cap.
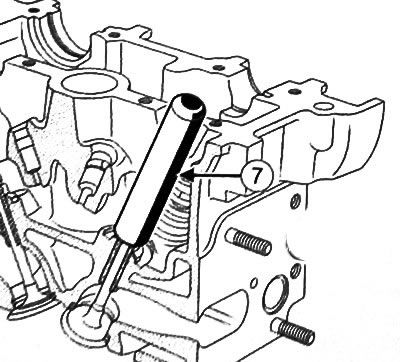
Install the mandrel (7) onto the oil deflector cap.


Note: The inside diameter of the mandrel must be identical to the valve diameter so that the bottom of the mandrel covers the metal top section of the valve stem seal.


  • Install the guide tube (9) over the mandrel so that the tube touches the cylinder head.
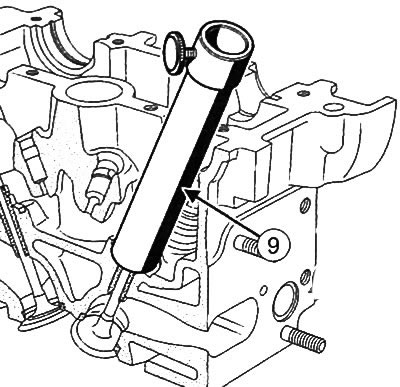
Install the guide tube (9) over the mandrel so that the tube touches the cylinder head.

  • Insert the sleeve (10) into the guide tube until it contacts the mandrel.
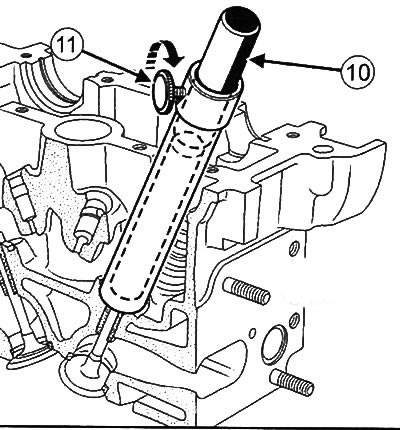
Insert the sleeve (10) into the guide tube until it contacts the mandrel.

  • Secure the sleeve with the fixing screw (11).
  • Remove the guide tube and bushing assembly, being careful not to loosen the retaining screw.
  • Remove the valve.
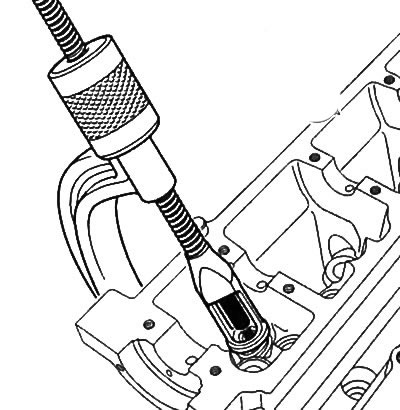
  • Remove the valve stem seals using special pliers (Mot. 1335) (12).
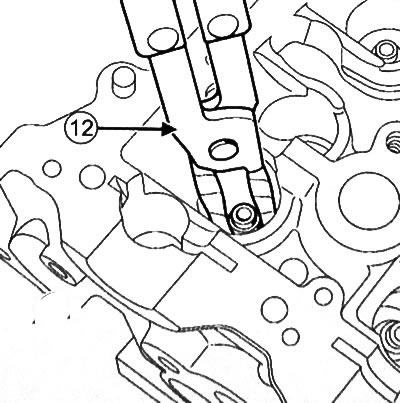
Remove the valve stem seals using special pliers (Mot. 1335) (12).


Note: The following operation is only performed if the cylinder head is replaced.


20. Loosen the bolts (4) and remove the lifting eye (5) from the cylinder head.
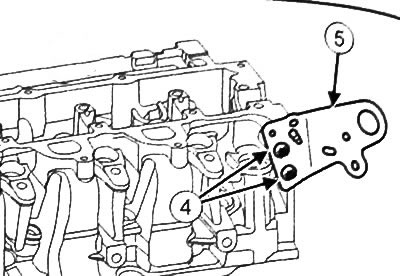
20. Loosen the bolts (4) and remove the lifting eye (5) from the cylinder head.
This article is available on: russian, bulgarian, belarusian, ukrainian, serbian, croatian, romanian, polish, slovak, hungarian
Article has been reviewed by editor: Petrovsky Roman
Share with friends:
Previous
Logan 2: Diesel engines 1.5 l
Next

Removal the cylinder head
Rocker cover
Adjusting valve clearance
Installing the timing belt of the gas distribution mechanism drive
Removal the timing belt of the gas distribution mechanism drive
Cleaning the cylinder head
Checking the valves
Checking valve springs
Cylinder head assembly
Installing the cylinder head
Other articles on other Renault models

➽ Disassembling the cylinder head Renault Megane 1 (1995-2002)
➽ Cylinder head cover Renault Duster 1 (2009-2017)
➽ Cylinder head gasket for K4M engine Renault Fluence 1 (2009-2020, petrol)
➽ Tightening the cylinder head bolts Renault Kangoo 1 (1997-2007)
➽ Removal the cylinder head gasket (K4M engines) Renault Laguna 2 (2001-2007)
Link to this article in different formats
Reviews and comments of visitors
No comments yet


Add two numbers 33 + 40


Logan 2 (2012-2020) 
  • General information
  • Faults en route
  • Daily checks
  • Governing bodies
  • Maintenance
  • Power unit
  • Petrol engines 1.2 l
  • Petrol engines 1.6 l
  • Diesel engines 1.5 l
  • Cooling system
  • Lubrication system
  • Power and control system
  • Intake and exhaust system
  • Engine electrical equipment
  • Transmission
  • Clutch
  • Car gearbox
  • Drive shafts
  • Chassis, running gear
  • Suspension and wheels
  • Brake system
  • Steering
  • Body and interior
  • Exterior (external elements)
  • Interior (internal elements)
  • Safety system
  • Heating and air conditioning
  • Electrical equipment
  • Equipment and devices
  • Wiring diagrams (sedan)
  • Wiring diagrams (wagon)
Logan 1 (2004-2012, petrol) 
  • General information
  • Vehicle device
  • User manual
  • Faults en route
  • Daily maintenance
  • First maintenance
  • Second maintenance
  • Driver tips
  • Power unit
  • Engine repair
  • Lubrication system
  • Cooling system
  • Power and exhaust system
  • Transmission
  • Clutch
  • Car gearbox
  • Drive shafts
  • Chassis, running gear
  • Front suspension
  • Rear suspension
  • Steering
  • Brake system
  • Wheels and tires
  • Body and interior
  • Exterior (external elements)
  • Interior (internal elements)
  • Doors, locks and windows
  • Body Care
  • Electrical equipment
  • Equipment and devices
  • Headlights and lighting
  • Power devices
  • Electrical circuits
RenaultBook.ru © 2018–2026 | Mobile version | News and articles | Sitemap: EN BG BY UA RS HR RO PL SK HU | Administration | Site search | Bookmark
Duster 1 (2009-2017) | Fluence 1 (2009-2020, petrol) | Kangoo 1 (1997-2007) | Laguna 2 (2001-2007) | Logan 1 (2004-2012, petrol) | Logan 2 (2012-2020) | Megane 1 (1995-2002) | Megan 2 (2002-2009, petrol) | Sandero 1 (2007-2012, petrol) | Scenic 1 (1996-2003) | Symbol 1 (1999-2008, petrol) | Symbol 2 (2008-2013, petrol) | Renault 19 (1988-1996) | Espace I and II (1984-1996) | Espace III (1996-2002) | Clio 1 (1990-1998) |
We want your visit to be comfortable 😌 and use cookies 🍪 to do so.