



Share with friends:
Car front suspension Renault Logan 1
Knocking noises on uneven roads and uneven tire wear often point to a problem with the front suspension. For the Renault Logan 1, this guide describes the design and possible suspension faults, shock absorber strut repair, and upper mount replacement. Next comes replacement of the ball joint, control arm, stabilizer bar components, and front wheel bearing. Removing the steering knuckle and subframe is covered separately. After any repair, check and adjust the wheel alignment. This page will help the mechanic organize the procedure without unnecessary disassembly. For the owner, this guide determines which symptoms require an immediate visit to the workshop and which allow for a more relaxed repair plan.
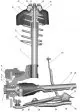
Description of the front suspension design
7.1. Front suspension: 1 – hub nut; 2 – hub; 3 – hub bearing; 4 – brake disc; 5 – steering knuckle; 6 – brake caliper; 7 – shock absorber strut; 8 – lower spring cup; 9 – spring; 10 – car body; 11 – upper spring cup; 12...
7.1. Front suspension: 1 – hub nut; 2 – hub; 3 – hub bearing; 4 – brake disc; 5 – steering knuckle; 6 – brake caliper; 7 – shock absorber strut; 8 – lower spring cup; 9 – spring; 10 – car body; 11 – upper spring cup; 12...
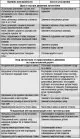
Possible faults of the front suspension
Possible faults of the front suspension, their causes and methods of elimination
Possible faults of the front suspension, their causes and methods of elimination

Removal and installation the shock absorber strut
You will need: keys "13", "17", "18", "21", Allen key "6", key for wheel bolts. 1. Brake the vehicle with the parking brake and install the anti-rollback stops ("shoes") under the rear wheels. 2. Loosen the wheel...
You will need: keys "13", "17", "18", "21", Allen key "6", key for wheel bolts. 1. Brake the vehicle with the parking brake and install the anti-rollback stops ("shoes") under the rear wheels. 2. Loosen the wheel...

Shock absorber strut repair
7.2. Shock absorber strut parts: 1 – shock absorber; 2 – compression buffer with protective cover; 3 – spring; 4 – upper spring plate; 5 – support bearing; 6 – upper support of the rack; 7 – shock absorber rod nut; 8 –...
7.2. Shock absorber strut parts: 1 – shock absorber; 2 – compression buffer with protective cover; 3 – spring; 4 – upper spring plate; 5 – support bearing; 6 – upper support of the rack; 7 – shock absorber rod nut; 8 –...

Replacing the upper shock absorber strut support
To replace the upper shock absorber strut support, you must remove the strut from the vehicle (see "Removing and installing the shock absorber strut" ). For the process of replacing the support, see the subsection...
To replace the upper shock absorber strut support, you must remove the strut from the vehicle (see "Removing and installing the shock absorber strut" ). For the process of replacing the support, see the subsection...

Replacing the ball joint
If the check has confirmed the failure of the ball joint (see "Checking the technical condition of the front suspension parts on the car" ), replace it. You will need: two 16 mm wrenches, a flat-blade screwdriver. 1....
If the check has confirmed the failure of the ball joint (see "Checking the technical condition of the front suspension parts on the car" ), replace it. You will need: two 16 mm wrenches, a flat-blade screwdriver. 1....

Replacing the front suspension arm
You will need: keys "13", "18", TORX T30. 1. Loosen the wheel mounting bolts, lift the front of the car and place it on supports. Remove the wheel. Attention! Brake the car with the parking brake and install the...
You will need: keys "13", "18", TORX T30. 1. Loosen the wheel mounting bolts, lift the front of the car and place it on supports. Remove the wheel. Attention! Brake the car with the parking brake and install the...

Replacement of anti-roll bar components
You will need: keys "10", "13", TORX T40, socket head "18". 1. Loosen the nut of the stabilizer bar mounting bolt, holding the bolt from turning. 2. Remove the lower silent block. 3. Remove the rubber bushing and take...
You will need: keys "10", "13", TORX T40, socket head "18". 1. Loosen the nut of the stabilizer bar mounting bolt, holding the bolt from turning. 2. Remove the lower silent block. 3. Remove the rubber bushing and take...

Removal and installation the steering knuckle
You will need: two 18 mm wrenches, a 30 mm socket head, TORX T30 and T40, a ratchet, and a wheel bolt wrench. 1. Brake the vehicle with the parking brake and install the anti-rollback stops ("shoes") under the rear...
You will need: two 18 mm wrenches, a 30 mm socket head, TORX T30 and T40, a ratchet, and a wheel bolt wrench. 1. Brake the vehicle with the parking brake and install the anti-rollback stops ("shoes") under the rear...

Replacing the front hub bearing
You will need: a bearing puller, a snap ring puller, a punch, a hammer. Note: To replace the bearing, it is convenient to use a commercially available hub bearing press-in/press-out tool. Note: It is easier to replace...
You will need: a bearing puller, a snap ring puller, a punch, a hammer. Note: To replace the bearing, it is convenient to use a commercially available hub bearing press-in/press-out tool. Note: It is easier to replace...

Removal and installation the subframe
It is more convenient to remove and install the subframe on a lift. You will need: keys "10", "13", "16", "18", TORX T30, socket head "18", screwdriver with a flat blade. 1. Remove the mudguards and engine crankcase...
It is more convenient to remove and install the subframe on a lift. You will need: keys "10", "13", "16", "18", TORX T30, socket head "18", screwdriver with a flat blade. 1. Remove the mudguards and engine crankcase...
Checking and adjusting wheel alignment angles
Checking and adjusting the wheel alignment angles is necessary to ensure good stability and control of the vehicle, as well as uniform wear of the tires during its operation. Checking and adjusting the wheel alignment...
Checking and adjusting the wheel alignment angles is necessary to ensure good stability and control of the vehicle, as well as uniform wear of the tires during its operation. Checking and adjusting the wheel alignment...
This section is available on: russian, bulgarian, belarusian, ukrainian, serbian, croatian, romanian, polish, slovak, hungarian
Other sections on other Renault models
➽ Chassis, running gear: Front suspension Renault Symbol 2 (2008-2013, petrol)
➽ Chassis, running gear: Front suspension Renault Fluence 1 (2009-2020, petrol)
➽ Chassis, running gear: Front suspension Renault Sandero 1 (2007-2012, petrol)
➽ Chassis, running gear: Front suspension Renault Espace I and II (1984-1996)
Link to this section in different formats
TEXTHTMLBB Code
- General information
- Faults en route
- Daily checks
- Governing bodies
- Maintenance
- Power unit
- Petrol engines 1.2 l
- Petrol engines 1.6 l
- Diesel engines 1.5 l
- Cooling system
- Lubrication system
- Power and control system
- Intake and exhaust system
- Engine electrical equipment
- Transmission
- Clutch
- Car gearbox
- Drive shafts
- Chassis, running gear
- Suspension and wheels
- Brake system
- Steering
- Body and interior
- Exterior (external elements)
- Interior (internal elements)
- Safety system
- Heating and air conditioning
- Electrical equipment
- Equipment and devices
- Wiring diagrams (sedan)
- Wiring diagrams (wagon)
- General information
- Vehicle device
- User manual
- Faults en route
- Daily maintenance
- First maintenance
- Second maintenance
- Driver tips
- Power unit
- Engine repair
- Lubrication system
- Cooling system
- Power and exhaust system
- Transmission
- Clutch
- Car gearbox
- Drive shafts
- Chassis, running gear
- Front suspension
- Rear suspension
- Steering
- Brake system
- Wheels and tires
- Body and interior
- Exterior (external elements)
- Interior (internal elements)
- Doors, locks and windows
- Body Care
- Electrical equipment
- Equipment and devices
- Headlights and lighting
- Power devices
- Electrical circuits