
English Русский
Български
Беларускі
Український
Српски
Hrvatski
Română
Polski
Slovenský
Magyar
Bookmark Contacts Articles Sitemap
Company vehicles Peugeot Company vehicles Opel Company vehicles Skoda Company vehicles Land Rover Company vehicles Mitsubishi Company vehicles Volkswagen Company vehicles Honda
RenaultBook.ru


Duster   Fluence   Kangoo   Laguna   Logan   Megane   Sandero   Scenic   Symbol   Clio   Other
Logan 1 (2004-2012, petrol) Logan 2 (2012-2020)

Installing the timing belt of the gas distribution mechanism drive (Renault Logan 2)

  • Main
  • Logan
  • Logan 2 (2012-2020)
  • Power unit
  • Diesel engines 1.5 l
  • Installing the timing belt of the gas distribution mechanism drive
0
Note: Be sure to replace the timing belt, timing belt tension roller with bolt and crankshaft pulley bolt with new ones.


1. Install a new timing belt tensioner roller.
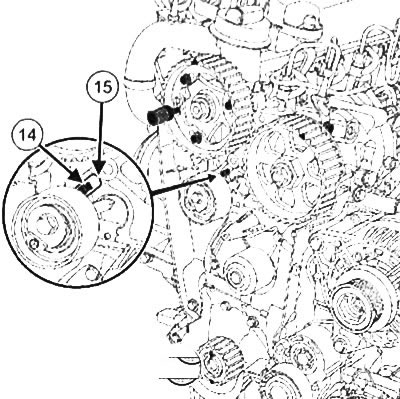
1. Install a new timing belt tensioner roller.


2. Insert the tab (14) of the timing belt tension roller into the groove of the cylinder head (15).
2. Insert the tab (14) of the timing belt tension roller into the groove of the cylinder head (15).


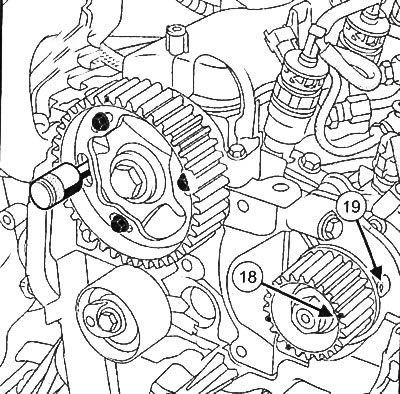
3. Make sure that the mark (18) of the high pressure fuel pump toothed pulley is opposite the installation hole (19).

4. Make sure that the crankshaft rests against the TDC alignment pin (Mot. 1489) (the key (20) of the timing sprocket must be facing upwards).
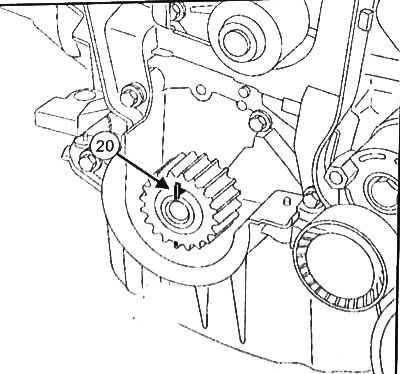
4. Make sure that the crankshaft rests against the TDC alignment pin (Mot. 1489) (the key (20) of…


5. Make sure that the crankshaft rests against the TDC pin (Mot. 1489) (21) by trying to turn it using the old crankshaft pulley bolt.
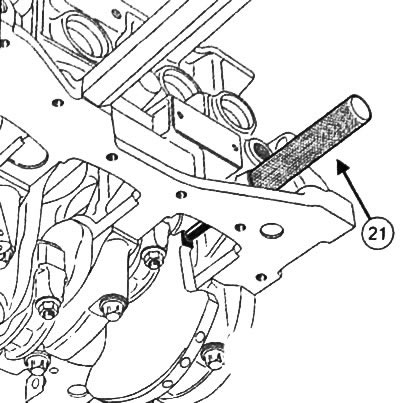


5. Make sure that the crankshaft rests against the TDC pin (Mot. 1489) (21) by trying to turn it…


6. Unscrew the bolt (22) from the camshaft pulley hub.
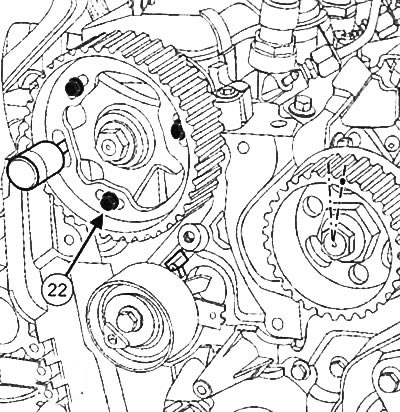
6. Unscrew the bolt (22) from the camshaft pulley hub.


7. Loosen the remaining camshaft pulley bolts by one turn.

8. Install the new timing belt, starting from the crankshaft sprocket:
  • Align the crankshaft sprocket mark with the mark on the inside of the timing belt.
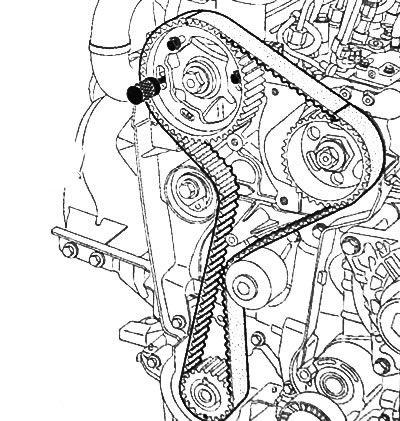
Align the crankshaft sprocket mark with the mark on the inside of the timing belt.

  • Align the outer marks on the timing belt with the marks on the camshaft pulleys and the high pressure fuel pump.

9. Using a 6mm Allen key (allen key) place the adjuster pointer (23) of the tension roller opposite the groove (24), turning the tension roller counterclockwise. Tighten the tension roller bolt to a tightening torque of 27 Nm.
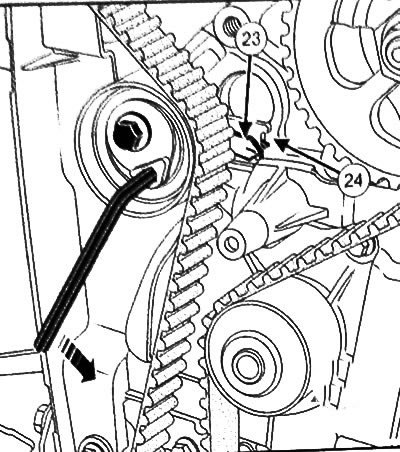


9. Using a 6mm Allen key (allen key) place the adjuster pointer (23) of the tension roller opposite…


Note: Make sure that the camshaft pulley hub bolts do not rest against the edges of the pulley grooves.
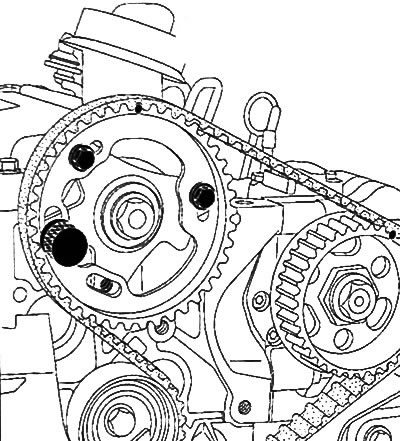

Note: Make sure that the camshaft pulley hub bolts do not rest against the edges of the pulley…


10. Install the lower bolt (25) of the camshaft pulley hub.
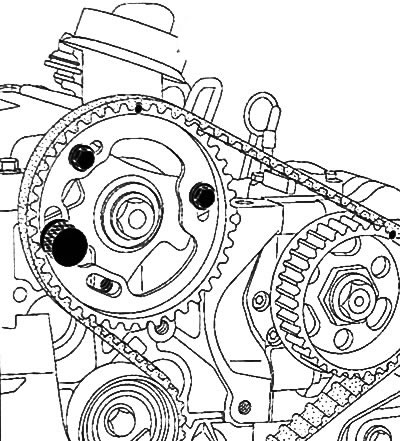
10. Install the lower bolt (25) of the camshaft pulley hub.


11. Tighten the camshaft pulley hub bolts.

12. Remove the TDC locating pin (Mot. 1489) and the pin from the camshaft and crankshaft pulley locating pin kit (Mot. 1430).


13. Turn the crankshaft two turns clockwise (from the timing drive side) for the old crankshaft pulley bolt so that the hole (26) in the camshaft pulley hub is positioned opposite the hole (27) in the cylinder head.
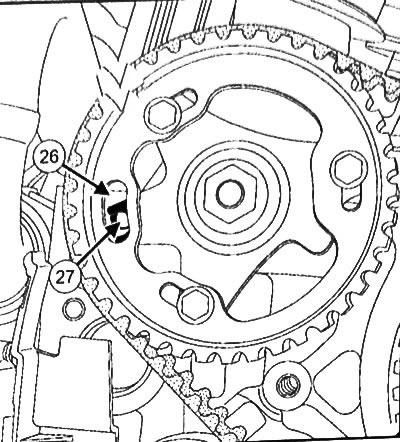
13. Turn the crankshaft two turns clockwise (from the timing drive side) for the old crankshaft…


14. Screw the TDC setting pin (Mot. 1489) into the cylinder head.

15. Slowly turn the crankshaft clockwise (from the timing drive side) for the old crankshaft pulley bolt so that the crankshaft rests against the TDC pin (Mot. 1489).

16. Install the camshaft pulley hub using the pin (28) from the camshaft and crankshaft pulley dowel kit (Mot. 1430).
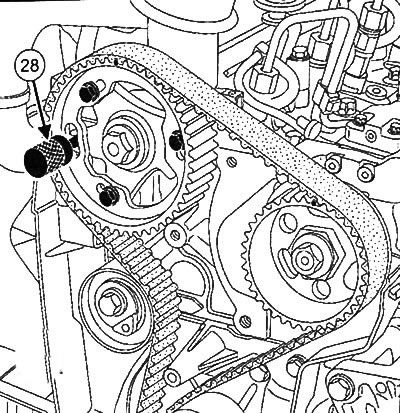
16. Install the camshaft pulley hub using the pin (28) from the camshaft and crankshaft pulley…


Note:

If the dowel pin from the dowel pin kit for camshaft and crankshaft pulleys (Mot. 1430) does not fit:
  • loosen the camshaft pulley hub bolts by one turn,
  • using an 18 mm open-end wrench, turn the camshaft pulley hub to ensure the pulley is correctly installed,
  • do not tighten the camshaft pulley hub bolts.

Original publication on the website: www.renaultbook.ru


17. Loosen the camshaft pulley hub bolts by one turn.

Note: After two crankshaft revolutions, the tension roller adjuster pointer may be in two different positions. The rotation of the tension roller eccentric depends on the position of the pointer.


First position of the tension roller adjuster pointer


18. Loosen the tension roller bolt and - one turn, holding the gullet pointer mountain with a 6 mm Allen key (allen key).
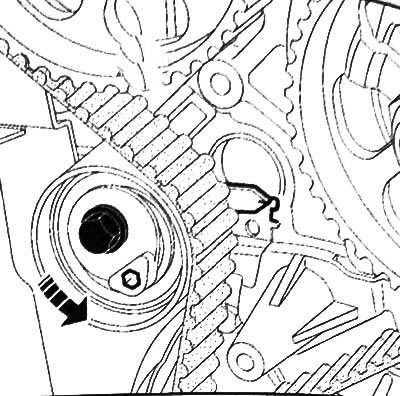
18. Loosen the tension roller bolt and - one turn, holding the gullet pointer mountain with a 6 mm…


19. Gradually align the timing belt tension roller adjuster pointer with the center of the adjustment window by turning the key counterclockwise.
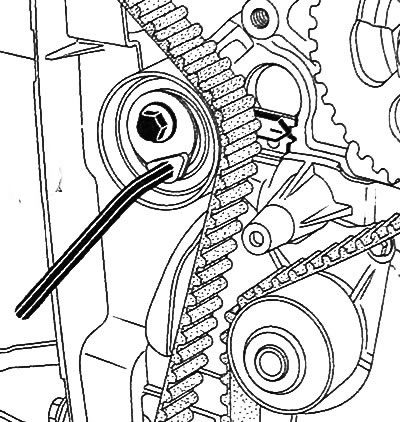
19. Gradually align the timing belt tension roller adjuster pointer with the center of the…


Second position of the tension roller adjuster pointer


20. Loosen the tension roller bolt one turn while holding the adjuster pointer with a 6mm Allen key (allen key).
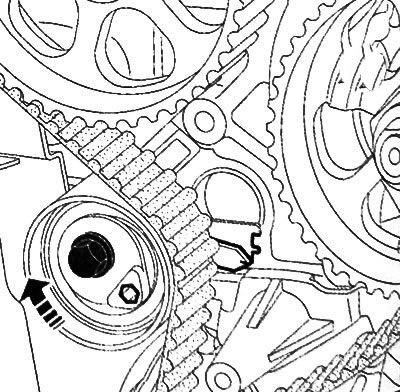


20. Loosen the tension roller bolt one turn while holding the adjuster pointer with a 6mm Allen key…


21. Gradually align the timing belt tension roller adjuster pointer with the center of the setting window by turning the key clockwise.

General continuation


22. Tighten the timing belt tension roller bolt to 27 Nm

23. Tighten the camshaft pulley hub bolts to 14 Nm

24. Remove the TDC pin (Mot. 1489) and a pin from the set of dowel pins for the camshaft and crankshaft pulleys (Mot. 1430).

25. Turn the crankshaft two turns clockwise (from the timing drive side) for the old crankshaft pulley bolt so that the hole/bolt of the camshaft pulley is positioned opposite the hole 6 of the cylinder head.

26. Screw the TDC setting pin (Mot. 1489) into the cylinder block.

27. Slowly turn the crankshaft clockwise (from the timing drive side) for the old crankshaft pulley bolt so that the crankshaft rests against the TDC pin (Mot. 1489).

28. Install the camshaft pulley hub using the pin from the camshaft and crankshaft pulley dowel kit (Mot. 1430).

29. If the pin from the set of camshaft and crankshaft pulley mounting pins (Mot. 1430) is not inserted, repeat the procedure for installing the timing belt of the gas distribution mechanism drive from the very beginning.


30. Apply a drop of silicone sealant to the thread of the TDC pin hole and tighten the plug to 25 Nm.

31. Install the lower timing cover by placing the bar (29) into the hole (30) inside the cover.
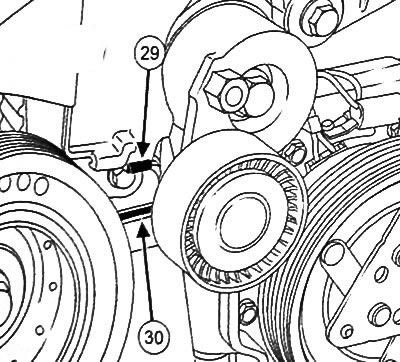
31. Install the lower timing cover by placing the bar (29) into the hole (30) inside the cover.


32. Hook the lower timing drive cover.

33. Install the upper timing drive cover.

34. Tighten the upper timing cover bolt.

35. Attach the upper timing drive cover.

36. Install the crankshaft pulley and accessory drive belt.

37. Install the right engine mounting support.

38. Install the front right fender liner.

39. Install the engine protective pan.

40. Install the front right wheel.

41. Connect the battery.
This article is available on: russian, bulgarian, belarusian, ukrainian, serbian, croatian, romanian, polish, slovak, hungarian
Article has been reviewed by editor: Petrovsky Roman
Share with friends:
Previous
Logan 2: Diesel engines 1.5 l
Next

Removal the timing belt of the gas distribution mechanism drive
Engine components that can be reused when replacing an engine
Preparing engine parts for assembly
Repair of an engine removed from a car
Installation of the power unit
Adjusting valve clearance
Rocker cover
Removal the cylinder head
Disassembling the cylinder head
Cleaning the cylinder head
Other articles on other Renault models

➽ Timing belt for gas distribution mechanism drive Renault Espace III (1996-2002)
➽ Gas distribution mechanism drive belt Renault Kangoo 1 (1997-2007)
➽ Timing belt of the gas distribution mechanism Renault Scenic 1 (1996-2003)
➽ Removal, inspection and installation of the drive belt toothed… Renault Megane 1 (1995-2002)
➽ Replacement and adjustment of belt tension, replacement of the… Renault Sandero 1 (2007-2012, petrol)
Link to this article in different formats
Reviews and comments of visitors
No comments yet


Add two numbers 24 + 44


Logan 2 (2012-2020) 
  • General information
  • Faults en route
  • Daily checks
  • Governing bodies
  • Maintenance
  • Power unit
  • Petrol engines 1.2 l
  • Petrol engines 1.6 l
  • Diesel engines 1.5 l
  • Cooling system
  • Lubrication system
  • Power and control system
  • Intake and exhaust system
  • Engine electrical equipment
  • Transmission
  • Clutch
  • Car gearbox
  • Drive shafts
  • Chassis, running gear
  • Suspension and wheels
  • Brake system
  • Steering
  • Body and interior
  • Exterior (external elements)
  • Interior (internal elements)
  • Safety system
  • Heating and air conditioning
  • Electrical equipment
  • Equipment and devices
  • Wiring diagrams (sedan)
  • Wiring diagrams (wagon)
Logan 1 (2004-2012, petrol) 
  • General information
  • Vehicle device
  • User manual
  • Faults en route
  • Daily maintenance
  • First maintenance
  • Second maintenance
  • Driver tips
  • Power unit
  • Engine repair
  • Lubrication system
  • Cooling system
  • Power and exhaust system
  • Transmission
  • Clutch
  • Car gearbox
  • Drive shafts
  • Chassis, running gear
  • Front suspension
  • Rear suspension
  • Steering
  • Brake system
  • Wheels and tires
  • Body and interior
  • Exterior (external elements)
  • Interior (internal elements)
  • Doors, locks and windows
  • Body Care
  • Electrical equipment
  • Equipment and devices
  • Headlights and lighting
  • Power devices
  • Electrical circuits
RenaultBook.ru © 2018–2026 | Mobile version | News and articles | Sitemap: EN BG BY UA RS HR RO PL SK HU | Administration | Site search | Bookmark
Duster 1 (2009-2017) | Fluence 1 (2009-2020, petrol) | Kangoo 1 (1997-2007) | Laguna 2 (2001-2007) | Logan 1 (2004-2012, petrol) | Logan 2 (2012-2020) | Megane 1 (1995-2002) | Megan 2 (2002-2009, petrol) | Sandero 1 (2007-2012, petrol) | Scenic 1 (1996-2003) | Symbol 1 (1999-2008, petrol) | Symbol 2 (2008-2013, petrol) | Renault 19 (1988-1996) | Espace I and II (1984-1996) | Espace III (1996-2002) | Clio 1 (1990-1998) |
We want your visit to be comfortable 😌 and use cookies 🍪 to do so.