English Русский
Български
Беларускі
Український
Српски
Hrvatski
Română
Polski
Slovenský
Magyar
Bookmark Contacts Articles Sitemap
Company vehicles Peugeot Company vehicles Opel Company vehicles Skoda Company vehicles Land Rover Company vehicles Mitsubishi Company vehicles Volkswagen Company vehicles Honda
RenaultBook.ru


Duster   Fluence   Kangoo   Laguna   Logan   Megane   Sandero   Scenic   Symbol   Clio   Other
Logan 1 (2004-2012, petrol) Logan 2 (2012-2020)

Checking the valves (Renault Logan 2)

  • Main
  • Logan
  • Logan 2 (2012-2020)
  • Power unit
  • Diesel engines 1.5 l
  • Checking the valves
0
Contents: Measuring the clearance between the…🠛 Measuring the clearance between the…🠛
1. Remove the cylinder head from the engine.

2. Remove the valves from the cylinder head.

3. Before testing, clean all parts to be tested with a cleaning agent and dry with compressed air.

4. Make sure that the parts are not scratched or have any signs of impact or abnormal wear. If any defects are found, replace the parts with new ones.

5. Make sure that the valves move freely in the guide bushings.

6. Using a micrometer, measure the valve head diameter (D) and valve length (L).
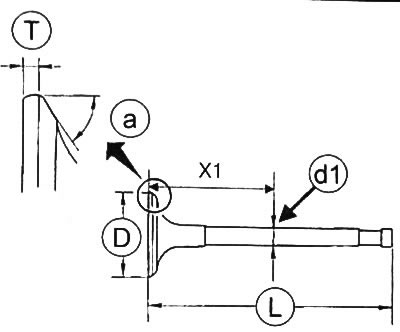
6. Using a micrometer, measure the valve head diameter (D) and valve length (L).


7. Using a micrometer, measure the diameter of the valve stem (d1) at a distance (X1) equal to 41 mm for the inlet valve or 31 mm for the outlet valve.
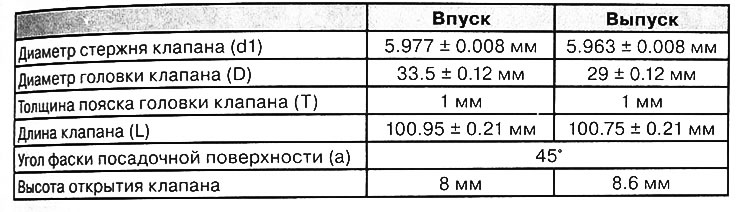
7. Using a micrometer, measure the diameter of the valve stem (d1) at a distance (X1) equal to 41…

8. Check the clearance between the valve stem and the valve guide:


Note:

The clearance between the valve stem and the guide bushing can be measured in two ways.

The clearance between the valve stem and the guide bushing should be:
  • for inlet valve: 0.02 -0.05 mm;
  • for exhaust valve: 0.03~0.06mm.

Measuring the clearance between the valve stem and the guide bushing using a dial indicator


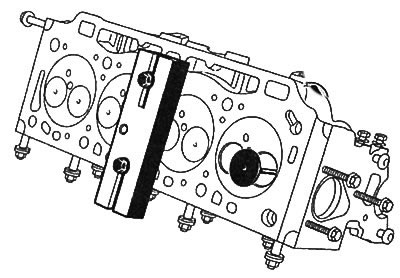
  • Install the clamping plate to measure the cylinder liner protrusion (Mot. 252-01) on the cylinder head.
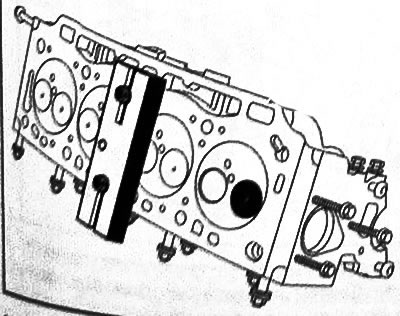
Install the clamping plate to measure the cylinder liner protrusion (Mot. 252-01) on the cylinder…

  • Remove the valve by 25 mm.

Remove the valve by 25 mm.

  • Install a dial indicator with a support.
  • Place the dial indicator feeler gauge against the valve head at right angles to the valve stem.
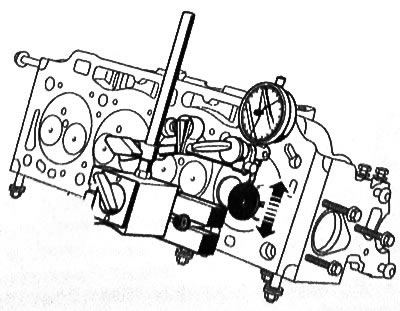
Place the dial indicator feeler gauge against the valve head at right angles to the valve stem.

  • Push the valve head towards the dial indicator.
  • Reset the hour indicator.
  • Push the valve head in the direction opposite to the dial indicator.
  • Record the value displayed on the dial indicator.
  • Calculate the actual valve stem to guide clearance by dividing the dial indicator reading in half.


Measuring the clearance between the valve stem and the guide bushing using a micrometer and bore gauge


  • Using a bore gauge, measure the inner diameter (2) of the valve guide bushing.
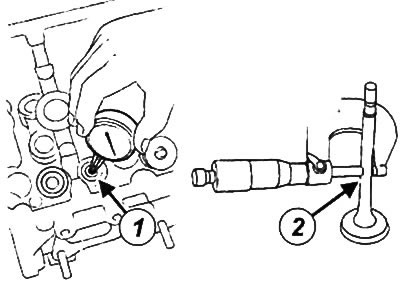
Using a bore gauge, measure the inner diameter (2) of the valve guide bushing.


(This article is taken from the website: «RenaultBook.ru»)
  • Use a micrometer to measure the diameter of the valve stem (3).
  • Calculate the actual clearance value by subtracting the valve stem diameter (2) from the inner diameter of the guide bushing (1) and dividing in half.

9. Check the valve seat depth:

Note: This check is performed when replacing a valve. It is necessary to ensure that the position of the valve head relative to the contact surface of the cylinder head is within the allowable range to ensure normal engine operation. If the position of the valve head is not within the normal range, the engine may be damaged.

  • Install the dial indicator (5) with the dial indicator support (Mot. 251-01) (4) on the cylinder head, placing them on the pressure plate to measure the cylinder liner protrusion (Mot. 252-01) (3).
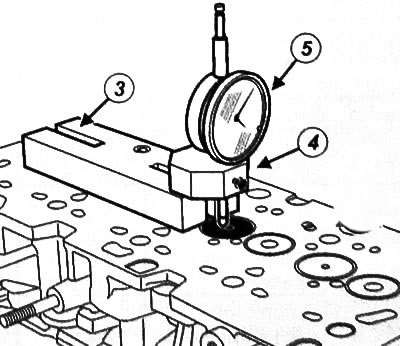
Install the dial indicator (5) with the dial indicator support (Mot. 251-01) (4) on the cylinder…

  • Place the dial indicator probe on the contact surface of the cylinder head.
  • Reset the hour indicator.
  • Measure and record the seat depth values of each valve in the seats.

Note: The valve seating depth should be +0.07 mm (performance) up to -0.07 mm (deepening) for intake and exhaust valves.

  • Remove the dial indicator with supports from the cylinder head.
This article is available on: russian, bulgarian, belarusian, ukrainian, serbian, croatian, romanian, polish, slovak, hungarian
Article has been reviewed by editor: Petrovsky Roman
Share with friends:
Previous
Logan 2: Diesel engines 1.5 l
Next

Cleaning the cylinder head
Disassembling the cylinder head
Removal the cylinder head
Rocker cover
Adjusting valve clearance
Checking valve springs
Cylinder head assembly
Installing the cylinder head
Replacing the front camshaft oil seal
Removal and installation the camshaft
Other articles on other Renault models

➽ Checking the valves of the K4M engine Renault Fluence 1 (2009-2020, petrol)
➽ Checking the valves Renault Megan 2 (2002-2009, petrol)
➽ Checking oil pressure Renault Duster 1 (2009-2017)
➽ Checking the engine oil level Renault Kangoo 1 (1997-2007)
➽ Checking, draining and filling oil Renault Laguna 2 (2001-2007)
Link to this article in different formats
Reviews and comments of visitors
No comments yet


Add two numbers 21 + 20


Logan 2 (2012-2020) 
  • General information
  • Faults en route
  • Daily checks
  • Governing bodies
  • Maintenance
  • Power unit
  • Petrol engines 1.2 l
  • Petrol engines 1.6 l
  • Diesel engines 1.5 l
  • Cooling system
  • Lubrication system
  • Power and control system
  • Intake and exhaust system
  • Engine electrical equipment
  • Transmission
  • Clutch
  • Car gearbox
  • Drive shafts
  • Chassis, running gear
  • Suspension and wheels
  • Brake system
  • Steering
  • Body and interior
  • Exterior (external elements)
  • Interior (internal elements)
  • Safety system
  • Heating and air conditioning
  • Electrical equipment
  • Equipment and devices
  • Wiring diagrams (sedan)
  • Wiring diagrams (wagon)
Logan 1 (2004-2012, petrol) 
  • General information
  • Vehicle device
  • User manual
  • Faults en route
  • Daily maintenance
  • First maintenance
  • Second maintenance
  • Driver tips
  • Power unit
  • Engine repair
  • Lubrication system
  • Cooling system
  • Power and exhaust system
  • Transmission
  • Clutch
  • Car gearbox
  • Drive shafts
  • Chassis, running gear
  • Front suspension
  • Rear suspension
  • Steering
  • Brake system
  • Wheels and tires
  • Body and interior
  • Exterior (external elements)
  • Interior (internal elements)
  • Doors, locks and windows
  • Body Care
  • Electrical equipment
  • Equipment and devices
  • Headlights and lighting
  • Power devices
  • Electrical circuits
RenaultBook.ru © 2018–2026 | Mobile version | News and articles | Sitemap: EN BG BY UA RS HR RO PL SK HU | Administration | Site search | Bookmark
Duster 1 (2009-2017) | Fluence 1 (2009-2020, petrol) | Kangoo 1 (1997-2007) | Laguna 2 (2001-2007) | Logan 1 (2004-2012, petrol) | Logan 2 (2012-2020) | Megane 1 (1995-2002) | Megan 2 (2002-2009, petrol) | Sandero 1 (2007-2012, petrol) | Scenic 1 (1996-2003) | Symbol 1 (1999-2008, petrol) | Symbol 2 (2008-2013, petrol) | Renault 19 (1988-1996) | Espace I and II (1984-1996) | Espace III (1996-2002) | Clio 1 (1990-1998) |
We want your visit to be comfortable 😌 and use cookies 🍪 to do so.