
Cleaning
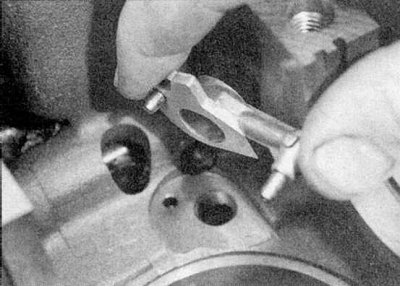
1. For complete cleaning, the cork plugs must be removed. Drill a small hole in them, then screw in a self-tapping screw and pry out the plugs using pliers or a slide hammer. Also remove external components and sensors (if you haven't already), remembering their location. Where available, remove the drive belt tensioner bracket, coolant pipe and oil cooler from the cylinder block. On diesel engines, remove the piston cooling oil nozzles at the base of each cylinder by unscrewing the mounting bolts (refer to accompanying illustration).
2. Clean the cylinder block of any gasket or sealant residue, being careful not to damage the surfaces.
3. If the unit is very dirty, it must be steam cleaned.
4. After steam cleaning, all oil holes and passages in the crankcase should be flushed. Run warm water through the internal channels until the water that comes out is clear. Dry the channels thoroughly with compressed air and apply a thin film of oil to all contact surfaces to prevent corrosion. Also lubricate the cylinder walls with oil.
5. If the crankcase is not very dirty, clean it with hot soapy water using a stiff brush. Regardless of the cleaning method used, be sure to thoroughly clean all oil holes and passages, and then dry all components thoroughly. Protect cylinder walls from corrosion.
6. All tapped holes must be clean and dry so that accurate tightening torques can be achieved during assembly. To clean the threads of each of the holes from rust, deposits or traces of sealant and restore it, run a tap of the appropriate size through it. When finished, blow out the holes again with compressed air to clear them of dirt particles resulting from this action. Also at the same time clean the threads of the cylinder head bolts and the main bearing cap bolts.
7. Install the main bearing caps and hand tighten the bolts.
8. Cover the contact surfaces of the new cork plugs with sealant and install them in the cylinder block.
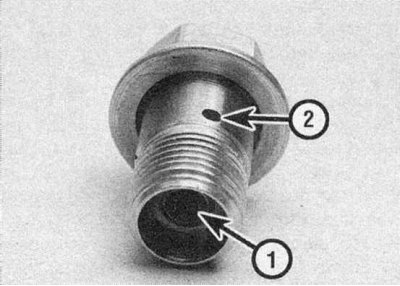
9a. On diesel engines, check the strainer (1).
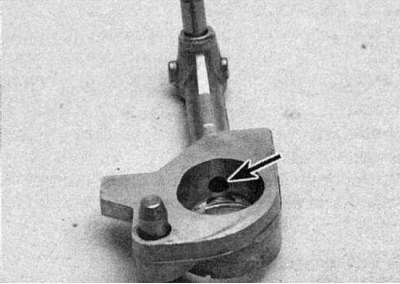
9b. Check oil holes (2) in the nozzles themselves (refer to illustrations). If necessary, clean them, then install the nozzles and tighten and tighten the mounting bolts to the torque given in the Specifications. The protrusion on the nozzle must fit into the corresponding hole in the cylinder block.
10. If the engine will not be assembled immediately, cover it with a large plastic bag.
Inspection
1. Inspect crankcase parts for cracks and corrosion. Check the integrity of the threads in the holes. If there are signs of an internal coolant leak, have a technician diagnose the unit using special equipment. If defects are found, repair (if it is possible) or replace the block.
2. Check the cylinder/liner walls for nicks and notches. Cylinder wear usually shows up as a step at the top of the cylinder that marks the end of the piston's stroke.
3. Measure the diameter of each cylinder at the top (just below the wear step), in the central and lower part of the cylinder, parallel to the axis of the crankshaft.
4. Then measure the diameter of each cylinder in those three places, but perpendicular to the axis of the crankshaft. If the difference between any measurements is greater than 0.20mm (those. there is an ovality or taper), then it is necessary to consider the issue of regrinding.
5. Repeat this procedure on the remaining cylinders.
6. If the cylinder walls are heavily worn out or in case of ovality or taper, it is necessary to purchase new cylinder liners (E7J engine) or bore the cylinder block (all other engines). Also, when assembling, new pistons will be required (repair dimensions in case of cylinder bore).
7. If the cylinders are in good condition, it may only be necessary to replace the piston rings.
8. Before assembling the engine, it is necessary to honing the cylinders. This will require a special tool. As a result of this, the bearing surface of the piston rings is increased, and the tightness between the piston and cylinder is accordingly improved. There are two types of hones designed to work with a drill. "bottle-shaped hone" - a rigid, cylindrical brush with hard stones glued to the bristles. And the usual hone with hard stones mounted on spring-loaded supports. For the inexperienced mechanic, satisfactory results can be obtained using "bottle-shaped hon". Honing is done as follows; You will need the tool described above, a wrench, a drill, a clean rag, oil, and safety glasses. Install the tool in the drill. Lubricate the mirror of the cylinder with oil, insert the tool into the hole, squeezing the stones. Turn on the drill and move it up and down in the cylinder. Ideally, the honing lines should cross at a 60°angle, although some piston ring manufacturers may specify a different angle. Use oil. Do not remove more material than necessary. At the end of the work, do not remove the tool from the hole while it is rotating; slide it down until the tool stops, then remove the tool by turning it by hand in the normal direction.
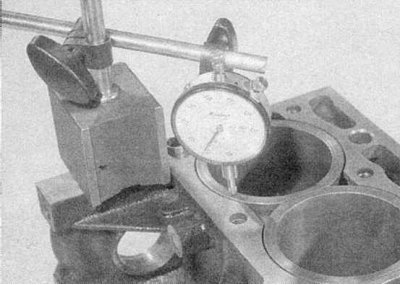
9a. Before installing the cylinder liner in the E7J engine, it is necessary to check their protrusion and install a new lower sealing ring. Insert the sleeve without the bottom O-ring into the cylinder block and press it down. Using a micrometer, check that the protrusion of the liner above the upper surface of the cylinder block complies with the data given in the Specifications (refer to illustrations).
9b. Testing can be done with probes (for E7J engine). Note that there is also a limit (refer to the Specifications at the beginning of this Chapter) protrusion difference between two adjacent sleeves. If new sleeves are installed, they may be selected in such a way that all values are within the specified limits.
10. Reinstall all external components and sensors as noted prior to removal.