
English Русский
Български
Беларускі
Український
Српски
Hrvatski
Română
Polski
Slovenský
Magyar
Bookmark Contacts Articles Sitemap
Company vehicles Peugeot Company vehicles Opel Company vehicles Skoda Company vehicles Land Rover Company vehicles Mitsubishi Company vehicles Volkswagen Company vehicles Honda
RenaultBook.ru


Duster   Fluence   Kangoo   Laguna   Logan   Megane   Sandero   Scenic   Symbol   Clio   Other
Megane 1 (1995-2002) Megan 2 (2002-2009, petrol)

Removal and installation the intermediate shaft (Renault Megane 1)

  • Main
  • Megane
  • Megane 1 (1995-2002)
  • Power unit
  • Overhaul of engines
  • Removal and installation the intermediate shaft
0
Contents: Removal 🠛 Inspection 🠛 Installation 🠛
Note: The following procedure applies only to F3R 750, F3R 751, F3R 710 gasoline engines and F8Q 620, F8Q 784 F9Q 730 diesel engines.


Note: Installation will require a new timing belt, intermediate shaft seal, and housing gasket (or a suitable sealant) and the sealing ring of the protective cover of the oil pump drive gear.


Intermediate shaft components
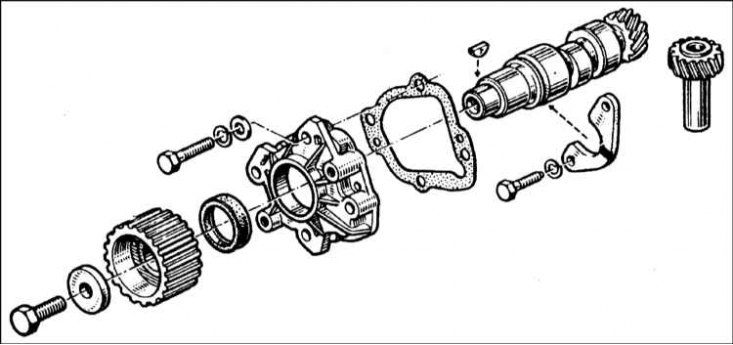


Intermediate shaft components


Removal


1. After removing the engine from the vehicle, proceed as follows.

2. Remove the toothed drive belt.

3. Remove the intermediate shaft toothed pulley.

4. Unscrew and remove the lower inner timing belt cover.
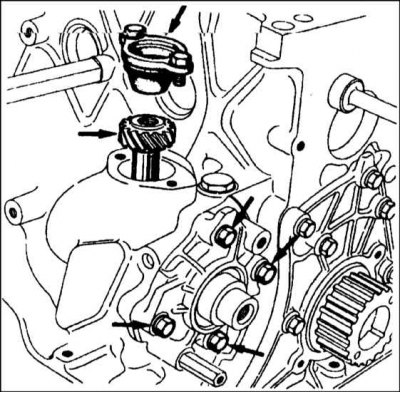
4. Unscrew and remove the lower inner timing belt cover.


5a. Unscrew the four bolts and remove the intermediate shaft casing (refer to the illustrations), then remove the gasket (if any). Note that the casing is located on two pins.


5a. Unscrew the four bolts and remove the intermediate shaft casing (refer to the illustrations),…


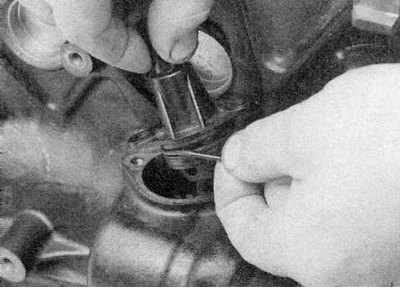
6a. Remove the two bolts and remove the oil pump drive gear protective cover, noting the location of the sealing ring.
6a. Remove the two bolts and remove the oil pump drive gear protective cover, noting the location…


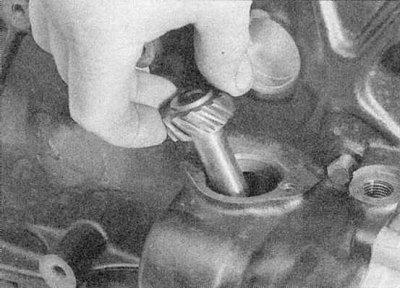
6b. Remove the pinion gear. Use a screwdriver or suitable hook to remove the pinion gear (refer to the illustrations).
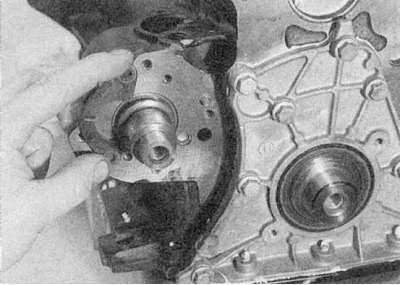
6b. Remove the pinion gear. Use a screwdriver or suitable hook to remove the pinion gear (refer to…


7a. Remove the two bolts and washers and lift the support plate
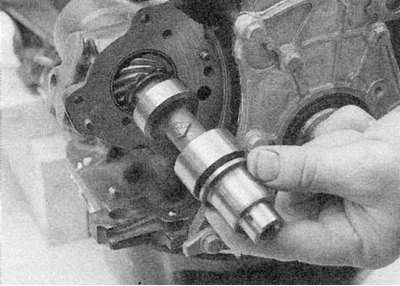
7a. Remove the two bolts and washers and lift the support plate


7b. Unscrew the intermediate shaft (refer to the illustrations).


Inspection


1. Inspect the intermediate shaft and oil pump drive shaft for corrosion, scratches or wear ridges on the bearing journals and gear teeth. Replace components as necessary. Check the intermediate shaft bearings in the cylinder block for wear and, if worn, contact a Renault workshop for replacement.
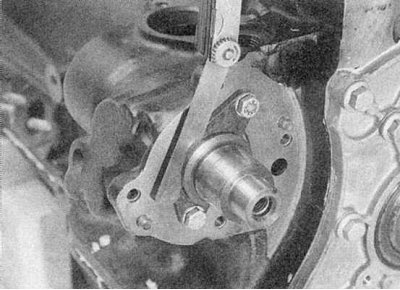
1. Inspect the intermediate shaft and oil pump drive shaft for corrosion, scratches or wear ridges…


2. Temporarily install the support plate on the intermediate shaft and use a feeler gauge to check that the axial clearance corresponds to the data given in the Specifications (refer to the accompanying illustration). If it is greater than the maximum allowable deviation, a new support plate must be installed, but first check the thrust surface on the shaft.

Installation


Installation


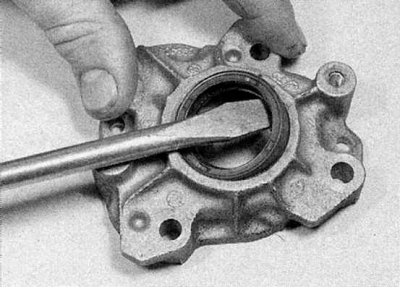
1. Clean the intermediate shaft housing and remove the oil seal using a screwdriver.
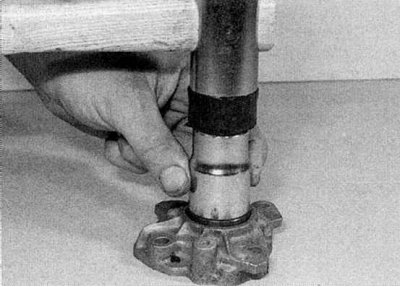


1. Clean the intermediate shaft housing and remove the oil seal using a screwdriver.


2. Install the new seal in place with the open side facing the engine so that it is flush with the outer surface of the housing (refer to the illustrations).

3. Generously lubricate the intermediate shaft and insert it into place.

4. Position the support plate with the curved edge away from the crankshaft and install the two mounting bolts.
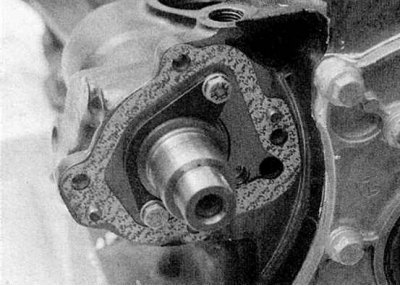
4. Position the support plate with the curved edge away from the crankshaft and install the two…


5. Place the new gasket on the pins in the cylinder block (refer to the accompanying illustration). If the gasket has not yet been used, apply CAF 4/6Q THIXO sealant to the housing mating surface.
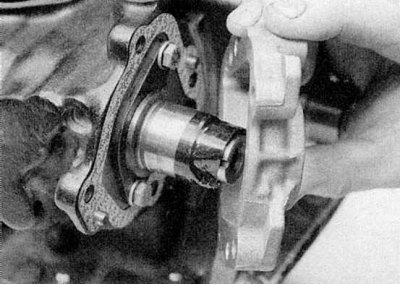
5. Place the new gasket on the pins in the cylinder block (refer to the accompanying illustration).…


(You can find the original at this link: www.RenaultBook.ru)


6. Wrap the end of the intermediate shaft with adhesive tape to prevent damage to the oil seal. Generously lubricate the sealing lips of the oil seal, then install the housing into place by sliding it onto the pins (refer to the accompanying illustration). Install and tighten the mounting bolts. Remove the tape from the end of the shaft.

7. Lubricate the oil pump drive gear and insert it into place. Check that the grooves on the oil pump drive gear are correct and replace it if necessary. Replace the cover and secure it with two bolts.

8. Install the lower inner timing belt cover.

9. Install the intermediate shaft toothed pulley.

10. Install the new timing belt.
This article is available on: russian, bulgarian, belarusian, ukrainian, serbian, croatian, romanian, polish, slovak, hungarian
Article has been reviewed by editor: Fedoseev Denis
Share with friends:
Previous
Megane 1: Overhaul of engines
Next

Removal and installation the oil pan (K7M with aluminum pan)
Replacing the left (flywheel side) crankshaft oil seal
Removal, condition check and installation of the flywheel and drive…
Cylinder head assembly
Cleaning, inspection and maintenance of the cylinder head and valves
Removal the piston and connecting rod assembly
Removal the crankshaft
Cleaning and inspection of the cylinder block/crankcase and cylinders
Inspection and assembly of piston and connecting rod assemblies
Inspection of the crankshaft
Other articles on other Renault models

➽ Intermediate shaft bearing Renault Duster 1 (2009-2017)
➽ Steering column — intermediate shaft of the steering column Renault Fluence 1 (2009-2020, petrol)
➽ Replacing the intermediate shaft support bearing Renault Espace III (1996-2002)
➽ Intermediate shaft seal — replacement Renault Clio 1 (1990-1998)
➽ Removal and installation the left front wheel drive shaft (K4M) Renault Laguna 2 (2001-2007)
Link to this article in different formats
Reviews and comments of visitors
No comments yet


Add two numbers 13 + 46


Megan 2 (2002-2009, petrol) 
  • User manual
  • Introduction to manual
  • Controls and instruments
  • Salon equipment
  • Operation and driving
  • Maintenance and care
  • Power unit
  • Engine repair
  • Fuel system
  • Injection system
  • Intake and exhaust system
  • Starting and charging system
  • Cooling system
  • Decreased toxicity
  • Transmission
  • Clutch
  • Mechanical gearbox
  • Automatic gearbox
  • Wheel drive mechanism
  • Chassis, running gear
  • Suspension and wheels
  • Steering
  • Brake system
  • Body and interior
  • Exterior (external elements)
  • Interior (internal elements)
  • Doors, locks and windows
  • Heating and air conditioning
  • Electrical equipment
  • Equipment and devices
  • Headlights and lighting
  • Electrical circuits
Megane 1 (1995-2002) 
  • General information
  • User manual
  • Maintenance
  • Power unit
  • Petrol engines 1.4/1.6 l
  • Petrol engines 2.0 l
  • Diesel engines 1.9 l
  • Overhaul of engines
  • Cooling system
  • Fuel system (petrol)
  • Fuel system (diesel)
  • Decreased toxicity
  • Charge and launch systems
  • Ignition system (petrol)
  • Preheat system (diesel)
  • Transmission
  • Clutch
  • Mechanical gearbox
  • Automatic gearbox
  • Drive shafts
  • Chassis, running gear
  • Brake system
  • Car suspension
  • Steering
  • Body and interior
  • Exterior (external elements)
  • Interior (internal elements)
  • Doors, locks and windows
  • Electrical equipment
  • Equipment and devices
  • Electrical circuits
RenaultBook.ru © 2018–2026 | Mobile version | News and articles | Sitemap: EN BG BY UA RS HR RO PL SK HU | Administration | Site search | Bookmark
Duster 1 (2009-2017) | Fluence 1 (2009-2020, petrol) | Kangoo 1 (1997-2007) | Laguna 2 (2001-2007) | Logan 1 (2004-2012, petrol) | Logan 2 (2012-2020) | Megane 1 (1995-2002) | Megan 2 (2002-2009, petrol) | Sandero 1 (2007-2012, petrol) | Scenic 1 (1996-2003) | Symbol 1 (1999-2008, petrol) | Symbol 2 (2008-2013, petrol) | Renault 19 (1988-1996) | Espace I and II (1984-1996) | Espace III (1996-2002) | Clio 1 (1990-1998) |
We want your visit to be comfortable 😌 and use cookies 🍪 to do so.