
Installing the engine on the assembly stand
Attention:
It is strictly forbidden to apply any pressure to the engine oil pan. Damage to the sump can also cause various damage to the engine itself due to:
- blocking the oil intake;
- increasing the engine oil level above the maximum mark, which can cause the engine to run wild.
1. Remove the power unit assembly (engine with gearbox) from the car.
2. Disconnect the gearbox from the engine (see chapter "Transmission").
3. Remove the attachment drive belt.
4. Install flywheel locking tool (Mot 582-01) (1) to the cylinder block.
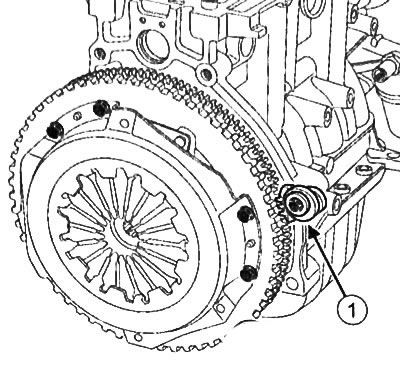
5. Remove the attachment drive pulley from the crankshaft.
6. Remove clutch discs (see chapter "Clutch").
7. Remove flywheel (see chapter "Clutch").
8. Remove flywheel locking tool (Mot. 582-01).
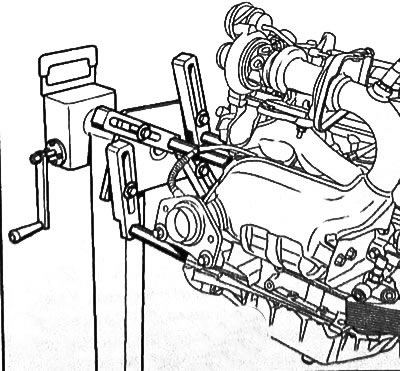
Attention: For safe work with the engine, it is necessary to use a special assembly stand for the engine.
9. Place the engine on the assembly stand:
- Insert the support pins of the assembly stand into the engine block.
- Install retaining brackets (4) on the support pins.
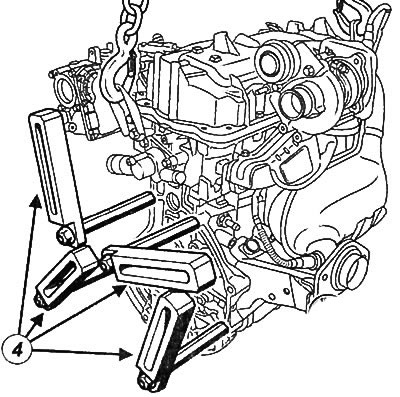
- Raise the engine with a garage winch, placing it against the engine assembly stand.
- Fix the support pins on the engine assembly stand.
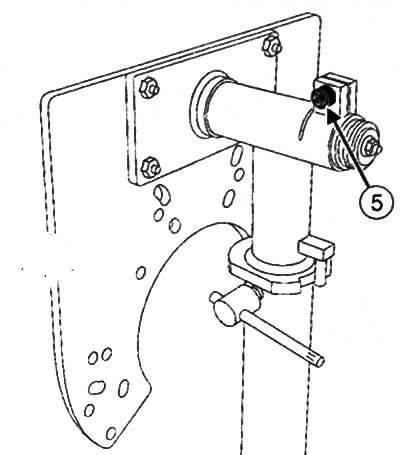
- Tighten fixing bolt (5) torque of 120 Nm to prevent engine overturning.
- Install stops to ensure the immobility of the assembly stand.
- Unhook the garage winch from the engine.
10. Drain the engine oil from the engine.
Removing components from the top of the engine
1. Remove the timing belt.
2. Remove ignition coils.
3. Remove intake manifold.
4. Remove rocker cover.
5. Remove the cylinder head.
6. Remove the exhaust manifold.
7. Remove the throttle valve.
8. Remove the cooling chamber.
9. Remove the spark plugs.
10. Remove the camshaft from the cylinder head.
11. To remove valves from a head of the block of cylinders.
Checking the technical condition and repair of the components of the upper part of the engine
1. Clean the cylinder head.
2. Check the technical condition of the cylinder head, camshaft, valves and valve springs.
Note: Replace with new parts that are out of specification.
Removing components from the bottom of the engine
1. Remove the generator.
2. Remove the air conditioning compressor.
3. Remove the power steering pump.
4. Remove the multifunction support.
5. Remove the water pump inlet.
6. Remove knock sensor (3).
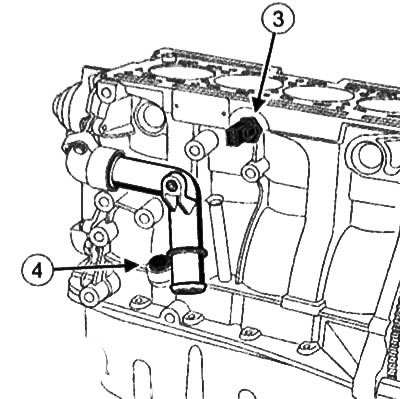
7. Remove the engine oil level sensor or plug (4) (depending on version).
8. Remove the engine oil pan.
9. Remove the crankshaft oil seal from the gearbox side.
10. Remove the crankshaft seal from the timing drive side.
11. Remove the engine oil filter.
12. Remove the oil pump.
13. Remove the water pump.
14. Remove pistons with connecting rods from all engine cylinders.
15. Remove the crankshaft from the engine block.
Checking the technical condition and repair of the components of the lower part of the engine
1. Clean the engine block.
2. Check the condition of the cylinder block, pistons, connecting rods and crankshaft.
Note: Replace with new parts that are out of specification.
Preparing engine parts for assembly
Parts that must be replaced with new ones:
- all seals,
- damaged cooling system hoses,
- drive belts,
- drive belt tensioners and rollers,
- crankshaft pulley bolt,
- camshaft sprocket bolt,
- exhaust manifold nuts
- exhaust manifold studs (if extracted),
- oil filter,
- flywheel bolts,
- connecting rod bolts,
- bolts of the main caps under the crankshaft tires,
- set "piston-piston pins" for each cylinder.
Attention:
- Gasket surfaces must be clean, dry and free from grease (prevent fingerprints).
- Excess applied sealant may be squeezed out when tightening threaded connections. Sealant entering the coolant may cause damage to some components (engine, radiator, etc.).
Installing the components of the lower part of the engine
1. Install the cylinder block.
Note: When replacing the cylinder block, crankshaft, or main bearing shells, a thickness class must be determined for each bearing shell for each crankshaft bearing journal to ensure bearing clearance is within tolerance. Any deviation of the clearance values in the bearings from the norm can cause damage to the engine.
2. Install the crankshaft.
3. Install the piston and connecting rod assemblies in each cylinder.
4. Install the water pump.
5. Install the oil pump.
6. Install the oil filter.
7. Install the crankshaft seals.
8. Install the engine oil pan.
9. Install the oil level sensor in the engine.
10. Install knock sensor.
11. Install the water pump inlet.
12. Install the multifunction support.
13. Install the power steering pump.
14. Install the air conditioning compressor.
15. Install the generator.
Installing Top Engine Components
1. Check the technical condition of the valves and install the valves on the cylinder head.
Note: When replacing valves, be sure to select new valves with the same parts catalog numbers as previously installed. Failure to do so may damage the valves or their seats.
2. Install the distributor fia / i on the cylinder head
3. Check the technical parameters of the distribution board
4.Check the technical parameters of the cylinder head
5. Install the cylinder head.
6. Install spark plugs.
7. Install the cooling system chamber.
8. Install throttle valve.
9. Install the exhaust manifold.
10. Install rocker cover.
11. Install intake manifold.
12. Install ignition coils.
13. Install the belt led, and the gas distribution mechanism.
Completion of engine repair
1. Remove the engine from the assembly stand.
2. Install the flywheel (see chapter "Clutch").
3. Install clutch discs (see chapter "Clutch").
4. Install flywheel locking tool (Mot 582-01) to the cylinder block.
5. Install the attachment drive pulley on the crankshaft.
6. Remove flywheel locking tool (Mot. 582-01).
7. Install implement drive belt.
8. Fill in engine oil in the engine?
9. Install the gearbox on the engine (see chapter "Transmission").
10. Install the power unit assembly (engine with gearbox) on the car.
Engine components that can be reused when replacing an engine
Preparing the old engine for return to the factory for further restoration
1. Clean the engine.
2. Drain engine oil and coolant.
3. Fix the old engine on the stand.
4. Install plastic plugs and caps.
5. Put the whole engine in cardboard
Parts that must remain on the old engine or must be included in a return kit
Leave the following on the old engine or include the following in the return kit:
- oil dipstick
- butter fila r.
- oil pump housing
- oil level sensor,
- rocker cover,
- water pump,
- fuel rail,
- fuel injectors,
- spark plug,
- timing belt drive,
- crankshaft sprocket,
- tension roller,
- camshaft sprocket,
- cover of the gas distribution mechanism,
- crankshaft pulley,
- lashing eyes,
- cylinder head mounting support.
Parts that are removed from the old engine and installed on the new one
Parts that are removed from the old engine and installed on the new one:
- all cooling system hoses,
- oil pressure sensor,
- knock sensor,
- coolant temperature sensor,
- intake manifold,
- an exhaust manifold,
- coolant inlet hose,
- cooling chamber,
- generator,
- multifunctional base,
- clutch discs and flywheel.
Remove the A/C compressor from the old engine and replace it with the new one.
Remove the power steering pump from the old engine and replace it with the new one.
Parts that must be replaced
Be sure to replace with new:
- gasket of the cooling system chamber on the cylinder head,
- intake manifold gasket
- exhaust manifold gasket
- attachment drive belt,
- attachment drive belt tensioner,
- attachment belt tensioner bolt,
- cooling system hoses if they are damaged.