
Attention: To avoid residual air in the brake system, the parking brake must be released before starting the bleeding procedure.
The procedure for bleeding the brake system must be performed after removing or replacing the following components:
- master brake cylinder
- brake fluid,
- hydroelectronic control unit,
- brake lines,
- brake hoses,
- brake reservoir,
- brake caliper,
- rear working brake cylinder.
Attention:
- When bleeding the brake system, the ignition must be turned off to deactivate the hydroelectronic control unit solenoids.
- The brake fluid level in the reservoir must always be between the marks "MIN" And "MAX".
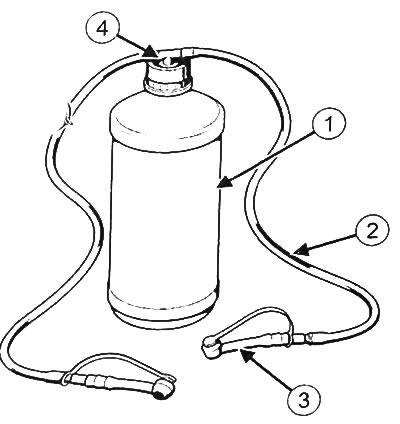
Use a self-made container to collect used brake fluid: 1. Washer fluid container (1 liter, 2 pcs.). 2. Transparent hoses with a diameter of 4 mm. 3. Pipettes (4 things.). 4. T-terminal (2 pcs.).
Note:
- The new hydroelectronic control unit is pre-filled with brake fluid.
- When working on one of the following components, place a spacer on the brake pedal to limit the amount of brake fluid escaping and prevent air from entering the brake master cylinder and brake hydraulic circuit:
- hydroelectronic control unit;
- pipelines between hydro-electronic unit and brake calipers:
- brake hoses;
- stopping support.
Before performing the bleeding procedure, the spacer must be removed from the brake pedal.
1. Place the vehicle on a two post lift.
2. Turn off the ignition.
3. Connect the device for pumping the hydraulic circuit of the brake system to the reservoir of the main brake cylinder (see instructions for use of the bleeder).
4. Pressurize the brake circuit.
5. Within three minutes, stabilize the pressure in the hydraulic circuit of the brake system to a range of 1.5-2.0 bar.
6. Without relieving pressure, close the circuit between the air bleeder and the brake fluid reservoir.
Note: The circuit between the bleed valve and the brake fluid reservoir can be closed in various ways, depending on the equipment used (valve, switch).
7. Connect the bleed tanks to the six fittings to remove air on the brake mechanisms.
Note: Some calipers are equipped with multiple vents. In this case, to perform the bleeding procedure, it is necessary to unscrew the fittings one by one.
8. Unscrew the bleed fittings:
- front left;
- front right;
- rear left;
- rear right.
9. Open the circuit between the bleed valve and the brake fluid reservoir and allow the brake fluid to drain to release any air bubbles.
10. Tighten the air bleed fittings in the following sequence:
- front left;
- front right;
- rear left;
- rear right.
11. Unscrew the front left bleed screw and allow the brake fluid to drain to release any air bubbles, then tighten the bleed screw again.
12. Perform the described procedure on the remaining brake mechanisms:
- front right;
- back left;
- back right.
13. Close the air vents, depressurizing the brake circuit.
14. Remove the bleeder from the master cylinder reservoir.
15. Check the stroke and resistance of the brake pedal. If these parameters are not correct, complete the bleeding of the brake system with the help of a second person. Start the bleeding procedure by removing air from the fitting farthest from the master brake cylinder:
- press the brake pedal;
- open the bleed valve to bleed air from the brake system;
- close the air vent;
- release the brake pedal.
16. If necessary, fill the reservoir with brake fluid to the required level. Check the tightness of the front and rear bleed fittings and make sure the caps are in place.
17. During a road test, apply heavy braking to ensure proper brake pedal travel.
18. Remove traces of brake fluid from the vehicle.