



Air is removed from the brake system by bleeding it using the brake pedal. An assistant is required for this operation.
If you need to bleed the entire system, you need to remove air from each brake mechanism separately. This happens when air has entered all the working brake cylinders. If only one brake caliper or only one working brake cylinder was replaced or overhauled, then, as a rule, it is enough to remove air only from the corresponding working brake cylinder.
Pumping sequence (cars without ABS):
- 1. Rear right wheel brake caliper.
- 2. Front left wheel brake caliper.
- 3. Rear left wheel brake caliper.
- 4. Front right wheel brake caliper.
Attention! The procedure for bleeding the brake system in vehicles with ABS may be different and depends on the type of ABS.
TEVES: Pumping sequence:
- 1. Front left wheel brake caliper.
- 2. Rear right wheel brake support.
- 3. Front right wheel brake caliper.
- 4. Rear left wheel brake support.
BOSCH: Bleeding sequence:
- 1. Rear right wheel brake caliper.
- 2. Rear left wheel brake support.
- 3. Front left wheel brake caliper.
- 4. Front right wheel brake caliper.
Attention! During bleeding, check the brake fluid level in the expansion tank from time to time. Do not allow the brake fluid level in the tank to drop to the limit or for the tank to be completely "empty". In this case, air will be pumped into the system. Replenish the amount of brake fluid in the expansion tank, adding only fresh fluid! If the expansion tank has been emptied, you should contact a workshop for qualified bleeding of the master brake cylinder and ABS.
1. Spray the bleed nipples with rust converter and let it work to make the nipple easier to unscrew.
2. Remove the cap from nipple 1 on the rear wheel brake caliper and install a flat-type wrench on the nipple (see illustration).
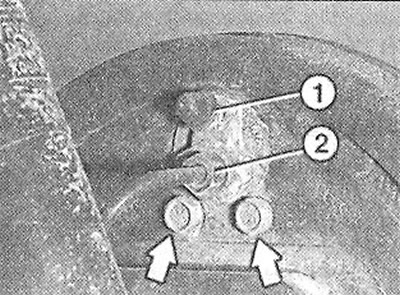
11.2 Remove the cap from the nipple 1 on the rear wheel brake caliper and install the pad wrench on the nipple
2 - brake pipe union nut (do not unscrew the nut)
[Original publication on the portal: renaultbook]
Attention! When bleeding the brake mechanisms of the rear wheels with disc brakes, the car must stand on its wheels. This ensures the functioning of the brake force regulator on the rear axle.
3. Clean the bleed nipple, put a clean hose on it, and lower the other end of the hose into a container half filled with brake fluid. The container for collecting the leaking brake fluid should be at least 30 cm above the bleed nipple. This prevents air from entering the brake system through the threaded connection of the nipple (see illustration).
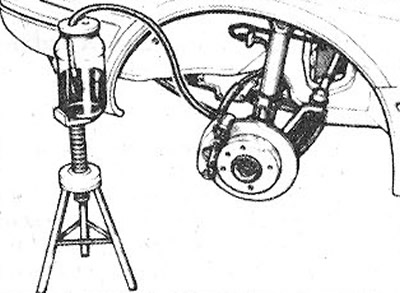
11.3 Clean the nipple, put a clean hose on it, and lower the other end of the hose into a container half filled with brake fluid.
4. Ask an assistant to press the brake pedal all the way ("pump") several times until the pressure in the brake system increases. This is felt by the increase in resistance when pressing the pedal.
Once sufficient pressure has been generated, the pedal should be pressed all the way down and held in this position.
5. Use a wrench to loosen the bleed nipple by about half a turn. Collect the leaking brake fluid in a container. Make sure that the end of the hose in the container for collecting the leaking brake fluid is always below the fluid level.
6. Close the bleed screw as soon as the brake fluid pressure in the fluid system decreases.
Caution! Tighten the fitting with a small force of approximately 8 Nm to avoid damaging the thread.
7. Repeat the pressure build-up in the brake system using the brake pedal. Then press the brake pedal down as far as it will go and hold it with your foot. Open the bleed nipple and, as soon as the brake fluid flows out and the pressure in the system drops, close the nipple.
8. Repeat bleeding the system on one wheel cylinder until air bubbles no longer appear in the fluid flowing into the container.
9. After removing the air, remove the hose from the bleed nipple and close the nipple with a dust cap.
Remove air from the remaining wheel cylinders in the same manner, while observing the bleeding sequence.
After bleeding is complete, add brake fluid to the expansion tank up to the MAXI mark.
Attention! Make sure that:
- a) the brake hoses are securely connected;
- b) brake hoses are secured in holders;
- c) the brake drive bleed nipples are screwed in;
- d) there is a sufficient volume of brake fluid in the expansion tank.
10. Perform a leak test of the brake system by starting the engine. To do this, press the brake pedal with a force of 200-300 N (20-30 kg) and hold it for about 10 seconds. The pressure in the system and, accordingly, the resistance of the brake pedal, should not decrease. Check all connections for leaks.
11. Perform several braking maneuvers on a road with light traffic.