
Warning! Brake fluid is poisonous. Rinse the affected parts with copious amounts of cold running water and seek immediate medical attention if the liquid gets into the mouth or eyes. Some types of brake fluid are flammable and may ignite on contact with hot components. Take appropriate fire safety measures. Brake fluid is aggressive to paint and plastics - if it comes into contact with such surfaces, immediately wash off the fluid with plenty of water. In addition, the liquid is hygroscopic (absorbs moisture from the air) - old fluid may be contaminated with water and unusable. When topping up or replacing fluid in the system, use the recommended type of fluid from a freshly opened sealed container.
Models not equipped with ABS
The correct functioning of the hydraulic brake system is only possible if its components are free from air. Bleed the system to remove air.
During the bleeding procedure, add only clean, fresh brake fluid specified in Specifications type. Never reuse liquid.
If there is any doubt about the type of fluid filled into the system, flush the system with clean fluid and replace all seals.
If the brake fluid level in the master cylinder has dropped, locate and repair the cause of the leak before proceeding.
Park your car on level ground (not slanted), turn off the ignition and select 1st gear or reverse. Block the wheels and release the handbrake.
Make sure all tubing and hoses are securely attached, couplers are tight, and bleeders are closed. Remove dust caps and clean dirt from bleeder fittings.
Loosen the brake fluid reservoir cap and top up the fluid level to the line "MAX". Screw on the cap and be sure to keep the fluid level above the line "MIN" throughout the procedure, otherwise air will again enter the system.
On sale there is a number of devices for pumping the brake system by one person. It is recommended to use one of these kits, as they greatly simplify the work and also reduce the risk of air and fluid escaping from the system being pulled back into the system. If such a device is not available, use the basic bleeding method (for two people), detailed below.
If a tool is used, prepare the vehicle as described above and follow the kit manufacturer's instructions. The procedure can vary considerably depending on the type of device used, its main course is also described below.
Whichever method is used, follow the correct bleeding sequence.
Pumping sequence
If components of only one of the circuits have been disconnected or removed (e.g. caliper or brake master cylinder), only this circuit needs pumping.
If the entire system is to be bled, proceed in the following sequence:
- a) Rear right brake.
- b) Front left brake.
- With) Rear left brake.
- d) Front right brake.
Pumping - the main method (for two people)
1. Prepare a clean glass reservoir, a suitable length of plastic or rubber tube that fits tightly on the bleeder fitting. You will need the help of a second person.
2. If not already done, remove the dust cap from the bleeder fitting and fit a tube prepared for bleeding onto the bleeder. Immerse the other end of the tube in the brake fluid previously poured into the reservoir.
3. Make sure the master cylinder reservoir is full and keep the fluid level in it above the line "MIN" throughout the entire procedure.
4. Ask an assistant to press the brake pedal to the stop several times, and then keep it pressed.
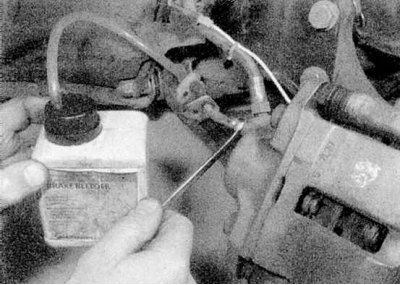
5. Open the bleed screw approximately one turn (refer to accompanying illustration). When fluid stops flowing from the fitting, tighten it and have an assistant slowly release the pedal and check the fluid level in the master cylinder reservoir.
6. Repeat this procedure (paragraphs 4 and 5), until the escaping brake fluid is free of air bubbles. If all fluid has drained from the master cylinder when bleeding the first brake, fill the master cylinder and bleed the brake again, taking approximately five seconds between cycles.
7. Tighten the bleeder screw, remove the plastic tube and install the dust cap.
8. Repeat procedure on other brake mechanisms in the sequence specified above.
Bleeding with non-return valve tool
1. These devices are a tube with a non-return valve that prevents air and fluid that have left it from being drawn back into the system. Some kits also include a transparent container.
2. Place a tube on the bleeder valve and open it. Depress the brake pedal slowly and smoothly, then release it slowly. Repeat this action until the fluid coming out of the fitting is free of air bubbles.
3. Remember to keep the liquid level in the tank above the line "MIN".
Pumping under pressure
1. These devices are powered by compressed air contained in the spare tire chamber. However, note that the air pressure must be reduced (see the instructions supplied with the tool).
2. Attach the container filled with brake fluid to the master cylinder reservoir and spare wheel. Perform pumping by opening the fittings one by one (in the specified sequence) and draining the liquid until it is free of air bubbles.
3. This method has advantages because a large amount of liquid in the installed reservoir prevents air from entering the main cylinder during pumping.
4. Pumping under pressure is especially effective when pumping "problematic" systems (airlock is stuck in a place where it is difficult to expel it) or when completely bleeding the system during the next fluid change.
All Methods
1. After bleeding is complete, rinse off spilled fluid, tighten bleeder fittings as shown in Specifications force and install their dust caps.
2. Check the brake fluid level in the master cylinder reservoir and top up if necessary (refer to section Schedule of ongoing maintenance).
3. Pour out the brake fluid released during pumping, it is not suitable for reuse.
4. Check up elasticity of a brake pedal. If dips are felt during its movement, there is still air in the system and further pumping is required. If re-priming is not satisfactory, the master cylinder seals may be worn.
Models equipped with ABS
Attention! On models equipped with ABS, before disconnecting the brake pipes, disconnect the ground cable from the battery and do not connect it until you finish bleeding. If this is not done, air may enter the hydraulic unit, which is very difficult to (in some cases not possible) pump. When disconnecting the battery on Scenic models, refer to Section Charge and launch systems.
Attention! Do not use a bleed kit on these models.
Before bleeding the brake hydraulic system on models with ABS, it is necessary to perform preparatory procedures and take special precautions. These procedures vary depending on which part of the system has been disconnected.
Information regarding the conventional braking system (other than pressurized) applicable to models equipped with ABS. However, on these models, a different bleeding sequence is used:
- a) Left front brake
- b) Right rear brake
- With) Right front brake
- d) Left rear brake
In addition to this, the following bleeding procedures are used.
Bleeding after disconnecting the wheel cylinder/caliper coupler
Note. If more than one caliper/wheel cylinder has been removed, perform this procedure on each brake, working in the sequence shown above.
1. Connect a container to the bleeder port and top up the fluid level in the master cylinder reservoir. Don't forget to keep it above the mark "MIN" throughout the entire procedure.
2. Open the bleed valve, then ask an assistant to depress the brake pedal all the way and hold it in this position. Tighten the fitting and have an assistant release the pedal slowly and wait approximately 3 seconds. Repeat this procedure at least ten times until the liquid flowing from the bleeder is free of air bubbles.
3. Again, ask the assistant to press the brake pedal several times and keep it pressed. Open the bleed valve and let the pedal drop to the floor. Tighten the fitting and ask an assistant to slowly release the pedal and wait at least 3 seconds. Repeat this procedure and make sure that the fluid that flows out is free of bubbles.
4. Check the elasticity of the brake pedal, then remove the container and bring the fluid level to normal (refer to section Schedule of ongoing maintenance). Make sure the bleeder screw is tightened to the specified torque, then install the dust cap.
Bleeding the separation field of pressure regulating couplings
1. Bleed both rear brakes as described above.
Bleeding After Disconnecting the Master Cylinder Coupling
2. If the master cylinder has been disconnected, it must be bled before connecting to the hydraulic line to prevent air from entering the hydraulic unit. This will require two plugs that are screwed into the holes of the master cylinder.
3. Screw the plugs into the master cylinder ports and tighten them.
4. Fill the cylinder reservoir, then open the rear plug/fitting (first circuit) and ask an assistant to press the brake pedal and hold it in this position. Tighten the plug, then have an assistant release the brake pedal slowly and wait approximately 3 seconds. Repeat this procedure 5-6 times.
5. Repeat the procedure for the front of the master cylinder (second circuit).
6. To prevent fluid from escaping from the cylinder and, therefore, the penetration of air into it, before removing the plugs, ask the assistant to lightly depress the brake pedal (approximately 30 mm) and hold it in that position.
7. Remove the plugs from the brake pipes and make sure both pipes are filled with fluid; if not, add liquid to them. Quickly remove one of the master cylinder plugs (the brake pedal is held as described in the previous paragraph), connect the brake pipe and tighten the union nut to the Specifications effort. Repeat the procedure on the second channel of the master cylinder, then wash off the spilled liquid.
8. Refer to the paragraphs above and completely bleed the brake hydraulic system in the above sequence.
Bleeding After Disconnecting the Hydraulic Unit Coupling
1. Before connecting tubing to the hydraulic block, make sure all ports on the block and the tubing themselves are filled with fluid. Tighten all union nuts to the specifications Specifications force, and wash off the spilled liquid.
2. Refer to the paragraphs above and completely bleed the brake hydraulic system in the above sequence.