
Note. If one of the discs needs to be replaced, replace BOTH discs at the same time to ensure equal and effective braking. It is also recommended to replace the pads.
Inspection
1. Apply the handbrake, then jack up the front of the vehicle and place it securely on axle stands. Remove the front wheel.
2. Slowly rotate the brake disc and carefully inspect it on both sides. If better access is required to the inside, remove the brake pads. The presence of shallow scratches in the area covered by the brake pads is quite acceptable - the surface can be sanded with sandpaper. If deep grooves are found in this area, the disc needs to be replaced.
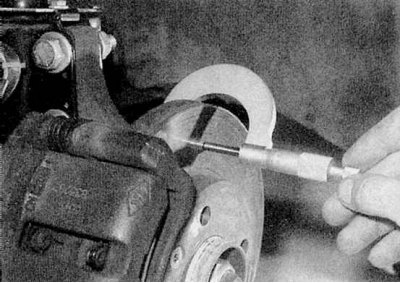
3. The presence of a protrusion formed by rust or adhering dust on the periphery of the disk is quite acceptable. This seal can be scraped off. If, however, a difference in thickness has formed due to wear in the area covered by the pads, measure the thickness of the disc with a micrometer (refer to accompanying illustration). Take measurements in several places, in and out of the pad contact area. If at least one of the dimensions is equal to or less than the specified in Specifications minimum thickness, replace the disc.
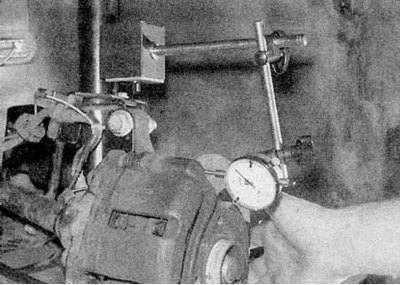
4. If the disc is suspected to be warped, check for runout with a dial micrometer (refer to accompanying illustration). Alternatively, rotate the disc slowly and use a feeler gauge to take several measurements of the clearance between the disc and a fixed point, such as the caliper mounting bracket. If the measurements obtained are equal to or greater than those specified in Specifications at most, the disk is warped and must be replaced. However, first check the condition of the wheel bearings (Chapter Maintenance and Chapter Suspension and steering). To be sure, remove the disc, turn it 180°and reinstall it on the hub, if the disc runout is still excessive, replace the disc.
5. Check the disk for cracks (especially around the wheel bolt holes), other damage and signs of wear. Replace disk if necessary.
Removing
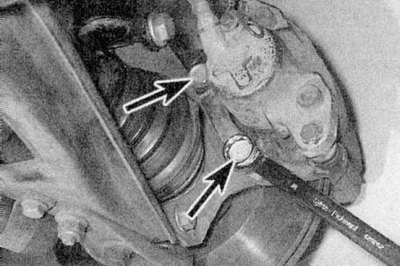
1. Remove the two bolts securing the caliper bracket to the steering knuckle and pull the caliper assembly with pads off the disc (refer to accompanying illustration). Tie the caliper to the front suspension spring with a piece of wire and twine so as not to damage the brake hose or the brake pad wear sensor wiring.
2. If the disc is not replaceable, mark the disc and hub. Loosen the screws securing the disc to the hub and remove the disc. If this fails, tap lightly on the back of the disk with a mallet.
Installation
1. Install in the reverse order of removal paying attention to the following:
- a) Clean and dry the contact surfaces of the disc and hub.
- b) Align the marks made prior to removal and tighten the drive mounting screws to the specifications in Specifications effort.
- With) If a new drive is being installed, use a suitable solvent to remove the protective coating from the drive.
- d) Before installation, clean the threads of the caliper bracket mounting bolts and coat them with tack compound (Renault recommends Lostite Frenbloc). Place the caliper in working position and tighten its bracket bolts to the values given in Specifications effort.
- e) Install the wheel, then lower the vehicle to the ground and tighten the wheel bolts to Specifications effort. Depress the brake pedal several times to move the pads close to the disc.