
English Русский
Български
Беларускі
Український
Српски
Hrvatski
Română
Polski
Slovenský
Magyar
Bookmark Contacts Articles Sitemap
Company vehicles Peugeot Company vehicles Opel Company vehicles Skoda Company vehicles Land Rover Company vehicles Mitsubishi Company vehicles Volkswagen Company vehicles Honda
RenaultBook.ru


Duster   Fluence   Kangoo   Laguna   Logan   Megane   Sandero   Scenic   Symbol   Clio   Other
Megane 1 (1995-2002) Megan 2 (2002-2009, petrol)

Adjusting the handbrake (Renault Megane 1)

  • Main
  • Megane
  • Megane 1 (1995-2002)
  • Chassis, running gear
  • Brake system
  • Adjusting the handbrake
0
Caution! If the handbrake rod length is not adjusted correctly, the automatic rear brake clearance compensator mechanism will not work. This will result in excessive free play of the brake pedal.


1. The adjustment of the length of the handbrake rod is supported by the action of automatic drum brake clearance compensators. Sometimes it is necessary to compensate for the cable stretching, but most often the adjustment is necessary after removing the brake shoes, drums, cables or handbrake lever. The adjustment is performed as follows.

2. Remove both rear brake drums as described in Section Removal, inspection and installation of rear brake drums.

3. Make sure the left and right brake caliper adjuster wheels rotate freely, then turn each wheel back 5-6 notches.

4. Have an assistant move the handbrake lever and check that the handbrake operating levers of both brakes move smoothly and easily. If not, check the cables/pads for damage and signs of wear before starting work.
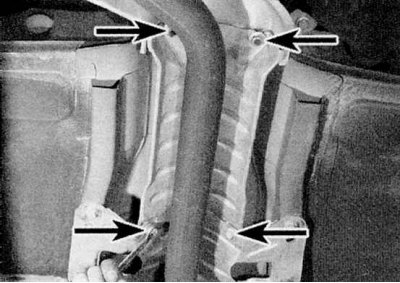
4. Have an assistant move the handbrake lever and check that the handbrake operating levers of both…


5a. Release the handbrake lever completely and check that the stops on the working levers rest against the edges of the shoes. If this is not the case, adjust the length of the cable using the adjuster located on the back of the handbrake lever. To access the adjuster, disconnect and remove the exhaust system insulation, which is located at the back of the handbrake lever.
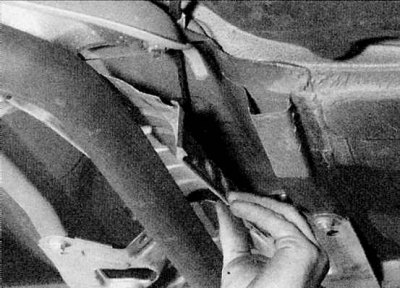


5a. Release the handbrake lever completely and check that the stops on the working levers rest…


5b. Loosen the locknut (where is available).
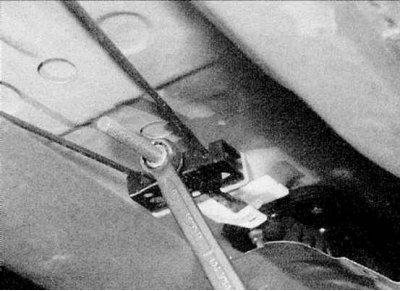
5b. Loosen the locknut (where is available).


5c. Loosen the adjusting nut until the cable has a slight amount of play (refer to the illustrations).

6. Ask an assistant to slowly move the handbrake lever and observe the movement of the operating levers on the shoes. The levers should begin to move when the handbrake lever is between the first and second notches of the ratchet, i.e. when the handbrake is on the first notch, the stops should still be in contact with the shoes. If adjustment is necessary, loosen the lock nut (where is available) and turn the adjusting nut.

7. After completing the adjustment, tighten the lock nut securely. Install the brake system insulation and tighten the mounting bolts/nuts securely.


8. Install the brake drums as described in Section Removal, inspection and installation of rear brake drums. Check the operation of the automatic clearance compensator mechanism by pressing the brake pedal. Ask an assistant to approach the drums and listen for clicks indicating that the mechanism is working correctly.

9. Install the wheels, then lower the vehicle to the ground and tighten the wheel bolts to the specified Specifications effort.
This article is available on: russian, bulgarian, belarusian, ukrainian, serbian, croatian, romanian, polish, slovak, hungarian
Article has been reviewed by editor: Fedoseev Denis
Share with friends:
Previous
Megane 1: Brake system
Next

Removal, checking and installation the one-way valve of the vacuum…
Checking, removing and installing the vacuum booster unit
Removal and installation the brake pedal
Removal, overhaul and installation of the master cylinder
Removal and installation the rear brake cylinder
Removal and installation the handbrake lever
Removal and installation handbrake cables
Checking, removing and installing the rear brake pressure control…
Removal, installation and adjusting the headlight switch
General description of the anti-lock braking system (ABS)
Other articles on other Renault models

➽ Adjusting the handbrake Renault Symbol 2 (2008-2013, petrol)
➽ Adjusting the headlights in the vertical plane Renault Duster 1 (2009-2017)
➽ Checking the thickness of the adjusting half rings of the… Renault Fluence 1 (2009-2020, petrol)
➽ Adjusting clearances in the valve drive mechanism Renault Kangoo 1 (1997-2007)
➽ Adjusting the composition of the working mixture (L7X) Renault Laguna 2 (2001-2007)
Link to this article in different formats
Reviews and comments of visitors
No comments yet


Add two numbers 34 + 47


Megan 2 (2002-2009, petrol) 
  • User manual
  • Introduction to manual
  • Controls and instruments
  • Salon equipment
  • Operation and driving
  • Maintenance and care
  • Power unit
  • Engine repair
  • Fuel system
  • Injection system
  • Intake and exhaust system
  • Starting and charging system
  • Cooling system
  • Decreased toxicity
  • Transmission
  • Clutch
  • Mechanical gearbox
  • Automatic gearbox
  • Wheel drive mechanism
  • Chassis, running gear
  • Suspension and wheels
  • Steering
  • Brake system
  • Body and interior
  • Exterior (external elements)
  • Interior (internal elements)
  • Doors, locks and windows
  • Heating and air conditioning
  • Electrical equipment
  • Equipment and devices
  • Headlights and lighting
  • Electrical circuits
Megane 1 (1995-2002) 
  • General information
  • User manual
  • Maintenance
  • Power unit
  • Petrol engines 1.4/1.6 l
  • Petrol engines 2.0 l
  • Diesel engines 1.9 l
  • Overhaul of engines
  • Cooling system
  • Fuel system (petrol)
  • Fuel system (diesel)
  • Decreased toxicity
  • Charge and launch systems
  • Ignition system (petrol)
  • Preheat system (diesel)
  • Transmission
  • Clutch
  • Mechanical gearbox
  • Automatic gearbox
  • Drive shafts
  • Chassis, running gear
  • Brake system
  • Car suspension
  • Steering
  • Body and interior
  • Exterior (external elements)
  • Interior (internal elements)
  • Doors, locks and windows
  • Electrical equipment
  • Equipment and devices
  • Electrical circuits
RenaultBook.ru © 2018–2026 | Mobile version | News and articles | Sitemap: EN BG BY UA RS HR RO PL SK HU | Administration | Site search | Bookmark
Duster 1 (2009-2017) | Fluence 1 (2009-2020, petrol) | Kangoo 1 (1997-2007) | Laguna 2 (2001-2007) | Logan 1 (2004-2012, petrol) | Logan 2 (2012-2020) | Megane 1 (1995-2002) | Megan 2 (2002-2009, petrol) | Sandero 1 (2007-2012, petrol) | Scenic 1 (1996-2003) | Symbol 1 (1999-2008, petrol) | Symbol 2 (2008-2013, petrol) | Renault 19 (1988-1996) | Espace I and II (1984-1996) | Espace III (1996-2002) | Clio 1 (1990-1998) |
We want your visit to be comfortable 😌 and use cookies 🍪 to do so.