English Русский
Български
Беларускі
Український
Српски
Hrvatski
Română
Polski
Slovenský
Magyar
Bookmark Contacts Articles Sitemap
Company vehicles Peugeot Company vehicles Opel Company vehicles Skoda Company vehicles Land Rover Company vehicles Mitsubishi Company vehicles Volkswagen Company vehicles Honda
RenaultBook.ru


Duster   Fluence   Kangoo   Laguna   Logan   Megane   Sandero   Scenic   Symbol   Clio   Other
Megane 1 (1995-2002) Megan 2 (2002-2009, petrol)

Checking, removing and installing the rear brake pressure control valve (Renault Megane 1)

  • Main
  • Megane
  • Megane 1 (1995-2002)
  • Chassis, running gear
  • Brake system
  • Checking, removing and installing the rear brake pressure control valve
0
Contents: Checking the serviceability 🠛 Removal 🠛 Installation 🠛

Checking the serviceability


1. A load-sensitive pressure control valve is embedded in the hydraulic line of each rear brake. The valve is attached to the bottom of the car and connected to the rear axle. The valve senses the load received by the rear axle by its displacement and prevents the rear brakes from locking during sudden braking.

2. To check the valve for proper operation, special equipment is required, so this work should be entrusted to a Renault service station. The valve cannot be repaired, and if it is faulty, it must be replaced.

Caution! On models equipped with ABS, before unscrewing the brake pipe couplings, disconnect the ground cable from the battery and do not reconnect it until the system has been bled. Failure to do so may result in air entering the hydraulic unit, which is very difficult to bleed (in some cases it is impossible) pump up.


Removal


1. Minimize fluid loss by placing a piece of polyethylene under the master cylinder reservoir cap.

2. Block the front wheels, then jack up the rear of the vehicle and place it on axle stands.

3. Wipe the area around the brake pipe connectors on the valve and place a rag under the connectors to catch any fluid that is released. To avoid mixing up the valve ports during installation, mark them relative to the pipes.

4. Loosen the union nuts and separate the brake pipes from the valve. Plug the ends of the pipes and the valve openings to minimize the loss of brake fluid and prevent dirt from entering the system. Wash off any spilled fluid with cold water.


4. Loosen the union nuts and separate the brake pipes from the valve. Plug the ends of the pipes…


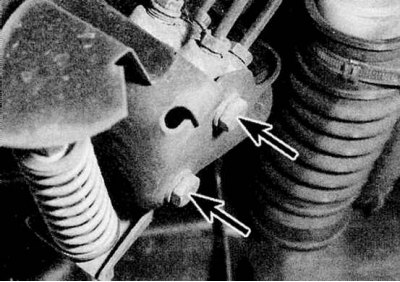
5a. Loosen the mounting bolts.

5a. Loosen the mounting bolts.


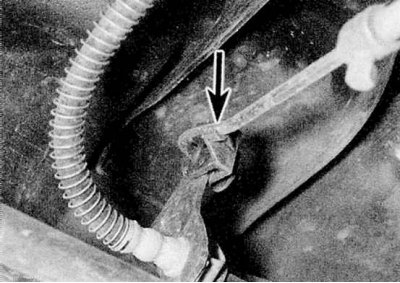
5b. Then disconnect the valve linkage and remove the assembly from under the vehicle (refer to the illustrations).

Note: Do not loosen the rod clamp bolt - this will change the rod length and will require valve adjustment during installation.


Installation


1. Bring the valve assembly into working position and tighten the mounting bolts.

2. Install the brake pipes into the couplings on the valve and tighten the union nuts to the specifications shown Specifications effort.

3. Secure the valve linkage with brackets and lower the vehicle to the ground.

4. If a new valve assembly is installed, note that it is equipped with a special spacer shim designed to adjust the length of the rod. Achieve the rated rear axle load (the car rests on its wheels, the fuel tank is full and a person is sitting in the driver's seat), loosen the rod clamp bolt and allow the valve spring to set the rod length. Tighten the clamp bolt securely and remove the spacer from the rod.

5. Remove the polyethylene from under the master cylinder reservoir cap and bleed the entire brake system as described in Section Bleeding the brake hydraulic system.
This article is available on: russian, bulgarian, belarusian, ukrainian, serbian, croatian, romanian, polish, slovak, hungarian
Article has been reviewed by editor: Fedoseev Denis
Share with friends:
Previous
Megane 1: Brake system
Next

Removal and installation handbrake cables
Removal and installation the handbrake lever
Adjusting the handbrake
Removal, checking and installation the one-way valve of the vacuum…
Checking, removing and installing the vacuum booster unit
Removal, installation and adjusting the headlight switch
General description of the anti-lock braking system (ABS)
Removal and installation of ABS system components
Removal and installation a vacuum pump (diesel engines)
Checking the serviceability and overhauling the vacuum pump (diesel…
Other articles on other Renault models

➽ Rear wheel brakes — removing and installing the brake drum Renault Sandero 1 (2007-2012, petrol)
➽ Load-sensing brake pressure control valve — general description Renault Clio 1 (1990-1998)
➽ Checking the operation of the brake booster check valve Renault Fluence 1 (2009-2020, petrol)
➽ Checking the valve opening pressure Renault Laguna 2 (2001-2007)
➽ Checking, removing and installing fuel injectors Renault Logan 1 (2004-2012, petrol)
Link to this article in different formats
Reviews and comments of visitors
No comments yet


Add two numbers 39 + 29


Megan 2 (2002-2009, petrol) 
  • User manual
  • Introduction to manual
  • Controls and instruments
  • Salon equipment
  • Operation and driving
  • Maintenance and care
  • Power unit
  • Engine repair
  • Fuel system
  • Injection system
  • Intake and exhaust system
  • Starting and charging system
  • Cooling system
  • Decreased toxicity
  • Transmission
  • Clutch
  • Mechanical gearbox
  • Automatic gearbox
  • Wheel drive mechanism
  • Chassis, running gear
  • Suspension and wheels
  • Steering
  • Brake system
  • Body and interior
  • Exterior (external elements)
  • Interior (internal elements)
  • Doors, locks and windows
  • Heating and air conditioning
  • Electrical equipment
  • Equipment and devices
  • Headlights and lighting
  • Electrical circuits
Megane 1 (1995-2002) 
  • General information
  • User manual
  • Maintenance
  • Power unit
  • Petrol engines 1.4/1.6 l
  • Petrol engines 2.0 l
  • Diesel engines 1.9 l
  • Overhaul of engines
  • Cooling system
  • Fuel system (petrol)
  • Fuel system (diesel)
  • Decreased toxicity
  • Charge and launch systems
  • Ignition system (petrol)
  • Preheat system (diesel)
  • Transmission
  • Clutch
  • Mechanical gearbox
  • Automatic gearbox
  • Drive shafts
  • Chassis, running gear
  • Brake system
  • Car suspension
  • Steering
  • Body and interior
  • Exterior (external elements)
  • Interior (internal elements)
  • Doors, locks and windows
  • Electrical equipment
  • Equipment and devices
  • Electrical circuits
RenaultBook.ru © 2018–2026 | Mobile version | News and articles | Sitemap: EN BG BY UA RS HR RO PL SK HU | Administration | Site search | Bookmark
Duster 1 (2009-2017) | Fluence 1 (2009-2020, petrol) | Kangoo 1 (1997-2007) | Laguna 2 (2001-2007) | Logan 1 (2004-2012, petrol) | Logan 2 (2012-2020) | Megane 1 (1995-2002) | Megan 2 (2002-2009, petrol) | Sandero 1 (2007-2012, petrol) | Scenic 1 (1996-2003) | Symbol 1 (1999-2008, petrol) | Symbol 2 (2008-2013, petrol) | Renault 19 (1988-1996) | Espace I and II (1984-1996) | Espace III (1996-2002) | Clio 1 (1990-1998) |
We want your visit to be comfortable 😌 and use cookies 🍪 to do so.