
Examination
1. To check if the booster is working, depress the brake pedal several times to release the vacuum, then start the engine while holding the pedal down. When starting the engine, the pedal should move down noticeably. Let the engine run for two minutes, then turn it off. Press the brake pedal again several times - the pedal travel should now decrease with each press.
2. If the amplifier does not operate as described, inspect the one-way valve (refer to section Removal, check and installation of the one-way valve of the block of the vacuum amplifier). If the valve is functioning properly, replace the booster air filter (refer to paragraph 6 below).
3. If the amplifier continues to malfunction, the unit itself is damaged. The unit cannot be repaired and must be replaced.
Removing
1. Remove the main cylinder as described in Section Removal, reassembly and installation of the master cylinder.
2. Disconnect the vacuum hose from the booster one-way valve.
3. Working in the cabin, release the mounting brackets and remove the bottom cover from the dashboard (where available) on the driver's side.

4. Pull out the mounting bracket and remove the pusher fork pin (refer to accompanying illustration).

5. Loosen and remove the four fixing nuts, then return to the engine compartment and remove the amplifier with the gasket from the working position (refer to accompanying illustration). The gasket must be replaced if it is worn or damaged.
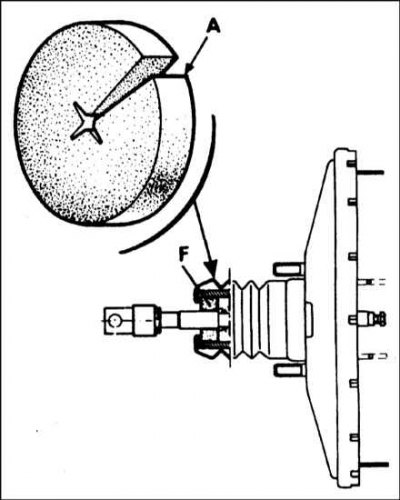
6. If the amplifier is defective, replace it - the bulkhead of the unit is not possible. The only component sold separately is the amplifier air filter. To replace the filter, separate the rubber protective boot from the back of the amplifier, slide it over the push rod, then carefully unhook it from the amplifier. Make a slot on the new filter (A) (refer to accompanying illustration). Place the filter on the push rod (F), slide it to the working position, then install the rubber boot.
Installation
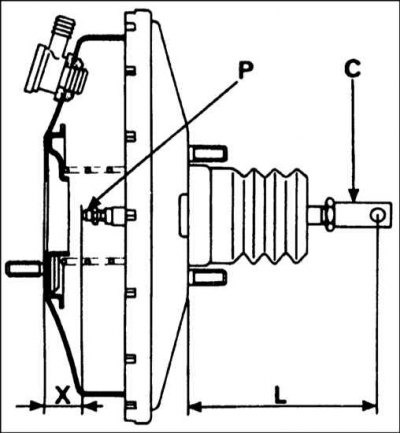
1. Before installing the amplifier, make sure that the end of the drive rod is 223 mm from the front end of the amplifier (X), and the pusher fork pin (C) from the rear end of the block - by 133 mm (L) (refer to accompanying illustration). To adjust the length of the end of the push rod facing the brake pedal, loosen the fork locknut (P) and rotate the fork until you get the desired result. Tighten locknut. To adjust the distance between the end of the push rod and the master cylinder, simply turn the nut on the end of the push rod.
2. Clean and dry all contact surfaces and install the gasket on the back of the amplifier. Bring the amplifier into working position and install it in the bulkhead.
3. While working in the cabin, make sure the booster is level with the brake pedal, then install the fixing nuts and tighten them as shown in Specifications effort.
4. Align the push rod fork with the brake pedal and insert the pin. Attach the pin with a bracket. Install the bottom cover on the dashboard.
5. Working in an impellent compartment, connect a vacuum hose to the amplifier.
6. Install the master cylinder as described in Section Removal, reassembly and installation of the master cylinder and bleed the entire brake system (refer to section Bleeding the hydraulic system of the brakes).