
Vehicles with 1.4-/1.6-liter petrol engines (E7J/K7M) air conditioned, with 1.9 liter diesel engine and 2.0 liter petrol engine.
brook (polyclinic) the belt is wider than the V-belt and has ribs on the working surface. With its help, all auxiliary units are driven. Due to the fact that the tension of the ribbed belt is controlled and maintained constant by the automatic tensioner roller, there is no need to tighten the belt, as well as its maintenance.
The ribbed belt must be replaced if it has the following defects:
- swelling and cracks;
- noise during operation (e.g. due to oil);
- for damage such as transverse cracks in the ribs, broken ribs, deposits and small stones between the ribs, fringe and side wear of the rubber of the ribs.
Attention! A removed ribbed belt cannot be reinstalled. It must be replaced with a new one.
Removing
1. Mark with paint the position of the right front wheel on the hub. This will allow the assembly to set the balanced wheel in its original position.
2. Loosen the wheel bolts. In this case, the car must be on the ground.
3. Install the front of the car on the goats and remove the front wheel.
4. Remove the fender liner of the right mudguard, see the relevant chapter.
5. Vehicles with a diesel engine. Unscrew and remove the fuel hose holder (see illustration).
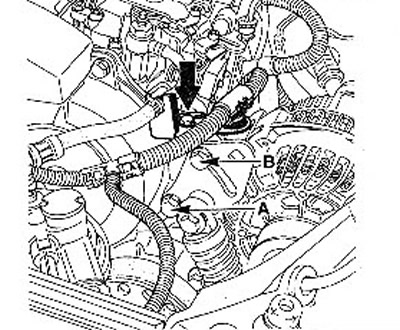
14.5 Unscrew and remove the fuel hose holder. Diesel vehicles
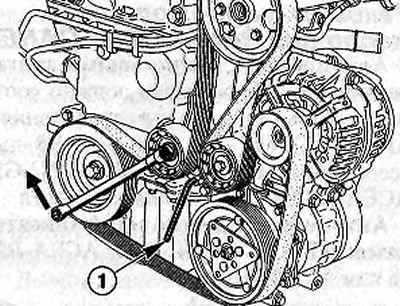
6. Insert a 9 mm square wrench into the square hole in the tensioner board.
7. Loosen bolts A and B, holding the board from turning, until the bolt collars protrude (see illustration 14.5).
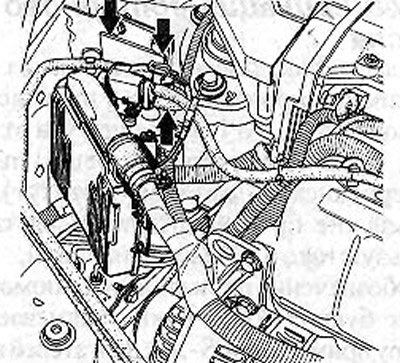
8. Turn the key in the direction of the arrow in the illustration and thus loosen the belt tension (see illustration).
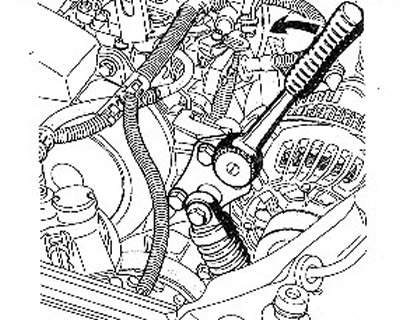
14.8 Turn the key in the direction of the arrow in the illustration and thus loosen the belt tension
9. Cars with a diesel engine. Remove the lower part of the ribbed/timing belt cover.
10. Remove the ribbed belt.
Installation
11. Lay the ribbed belt over the belt pulleys.
12. Tighten the ribbed belt auto-tensioner board with bolt B to the stop using a 9 mm square wrench (see illustration).
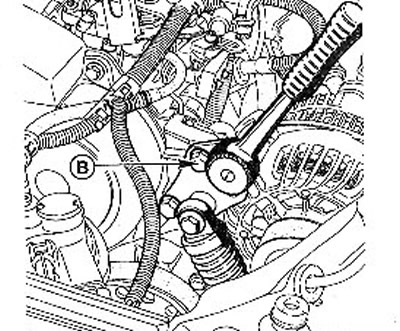
14.12 Tighten the thread of the new belt with the bolt B on the automatic tensioner board to the stop using a 9 mm square wrench
13. Check the belt tension and adjust it with a square wrench. Once the belt tension is correct, tighten both belt tensioner board bolts.
Belt tension check
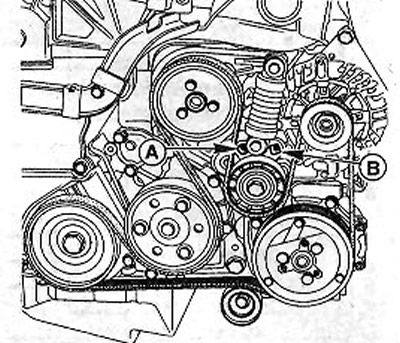
14. Check the tension of the ribbed belt at the points marked with arrows in the illustration (see illustration).
- A = belt pulley on crankshaft;
- B = alternator drive belt pulley;
- C = power steering pump pulley;
- D = A/C compressor pulley;
- E = water pump pulley;
- G = guide roller;
- T = tension roller.
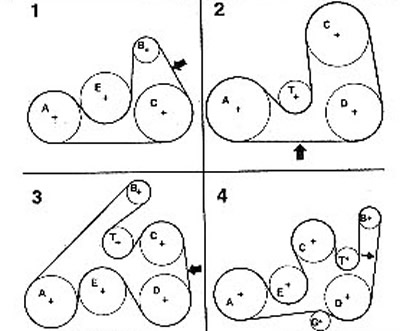
14.14 Check the tension of the ribbed belt at the points marked with arrows in the illustration
In workshops, RENAULT Mot. is used to check the tension of the ribbed belt. 1273, which is also used to check the tension of the toothed belt.
Attention! When checking an already run-in ribbed belt, its tension must be increased if it is less than the nominal value.
In the absence of the indicated measuring device, the tension of the ribbed belt is checked at the points indicated in illustration 14.14 by pressing the belt and measuring the amount of deflection. The nominal deflection should be about 3 mm.
Attention! When installing a new ribbed belt, check its tension after approximately 10 minutes of engine operation.
Attention! When checking the tension of a long-installed ribbed belt, tightening it is only necessary if the deflection exceeds 6 mm.
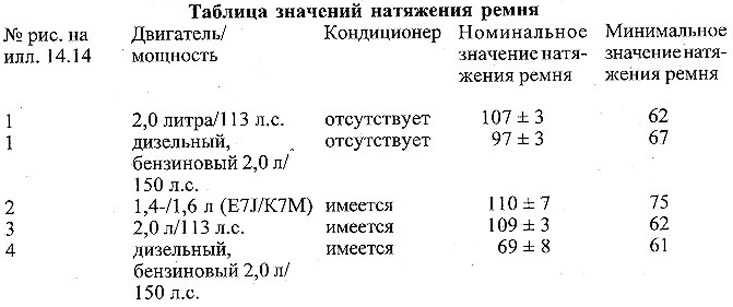
Nominal ribbed belt tension for vehicles with air conditioning:
- belt deflection with a cold engine - approximately 2 mm;
- belt deflection when the engine is warmed up to operating temperature - about 3 mm. Tightening the belt is necessary if the deflection exceeds 3.5 mm.
15. Establish a fender liner on a mudguard of the right wheel, the corresponding chapter see.
16. Establish a forward wheel according to the marks put at removal. Before doing this, lubricate the wheel disc seat on the hub with a thin layer of bearing grease. Do not lubricate the threads of the wheel bolts. Bolt the wheel and lower the car.
17. Tighten the wheel bolts in a cross pattern to 90 Nm.
Only vehicles with 113 hp engine.
18. Disconnect the engine control unit bracket and place the unit on the engine.
Releasing tension on the ribbed belt
19. Unscrew the clamping bolt of the tension roller 4 with a 7 mm socket wrench 1/4 turn. At the same time, keep the outer nut from turning with a 22 mm wrench (see illustration).
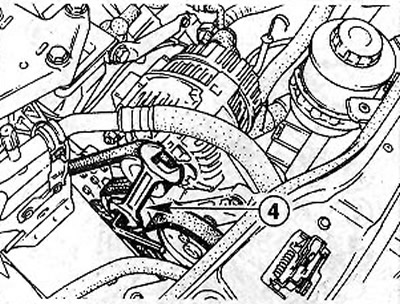
14.19 Loosen the tensioner pulley clamping bolt 4 with a 7 mm socket wrench 1/4 turn
Attention! Due to limited access, the socket wrench will need to be shortened by about 12 mm.
20. Loosen the tension of the ribbed belt by turning the tension roller with a wrench.
Attention! Loosening the belt tensioner with a wrench will break out the adjusting teeth and damage the mounting of the A/C compressor or power steering pump.
21. Reinstall and secure the engine control unit bracket.
Only vehicles with 150 hp engine.
22. Disconnect the engine control unit bracket and place the unit on the engine (see illustration).
14.22 Disconnect the engine control unit bracket and place the unit on the engine
23. Disconnect the hose from the canister purge valve.
24. Insert a pin or punch of a suitable diameter (e.g. bolt Mot.l318 for fixing the crankshaft) into hole A (see illustration).
14.24 Insert a pin or punch of suitable diameter (e.g. bolt Mot.1318 for fixing the crankshaft) into hole A
25. Insert into the hole B with a 10 mm square key (see illustration 14.24).
26. The weakening of the tension of the ribbed belt. Turn the key to the right and tighten the belt tensioner. Then turn the tensioner board to the left and push the pin out of the way as far as possible so that it rests on the attachment bracket.
27. Tension ribbed belt. Turn the key slightly to the left and remove the pin. After that, slowly turn to the right until the tension force of the belt tensioner spring equalizes.
28. Connect a hose to the canister purge valve.
29. Reinstall and secure the bracket with the engine control unit.
Only vehicles with 1.4-/1.6-litre petrol engines (E7J/K7M) air conditioned
30. Move the automatic tensioner pulley with a 13 mm socket wrench to the left so that the tensioner can be fixed with a 6 mm socket wrench (see illustration).
14.30 Move the automatic tensioning roller with a 13 mm socket wrench to the left until the tensioner can be locked with a 6 mm socket wrench
The tension of the ribbed belt does not need to be adjusted. It is automatically set by the automatic roller.
Only vehicles with 1.4-/1.6-litre petrol engines (E7J/K7M) without air conditioning
31. Unscrew both bolts of fastening of a v-belt tensioner. Bolts are located below bolt 1 (see illustration).
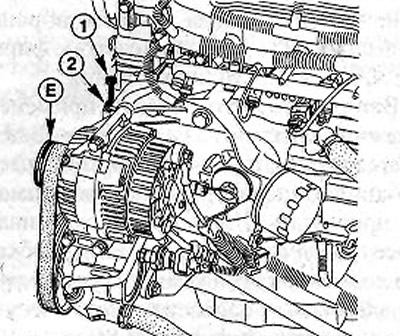
14.31 Unscrew both bolts securing the V-belt tensioner. Bolts are located below bolt 1
The V-belt tension measuring point is located at the bottom between the pulley on the crankshaft and the power steering pump pulley.
To check the tension of the V-belt, use the tool RENAULT Mot. 1273, which is also used to check the tension of the toothed belt. The nominal value of the new belt tension is 108±6 units. A worn-in belt must be tightened if its tension is less than 60 units.
The belt tension is adjusted using bolt 1. Before doing this, loosen the lock nut, and then tighten it again (see illustration 14.31).
Attention! The ribbed belt has five longitudinal ribs. The belt pulleys of the generator and the power steering pump have 6 grooves for the belt ribs. When laying the belt, make sure that the groove E at the end of the pulleys of the generator and the power steering pump remains free (see illustration 14.31).