
Note. F8Q 620 and early F8Q engines are fitted with a toothed drive belt "HTD", and later F8Q and all F9Q - a belt with a different tooth profile "HTD2". Whenever you replace a toothed drive belt, ALWAYS make sure you get the correct type of belt for the gears - the same goes for any gear that will be replaced.
Note. When installing, use a new toothed drive belt.
Crankshaft gear
Note. A suitable puller may be required for the job.
Removing
1. Remove the toothed drive belt as described in Section Removal, inspection and installation of a toothed drive belt.
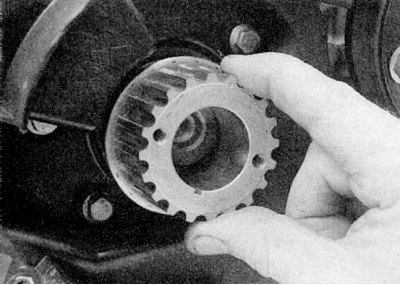
2. Usually the gear wheel can be easily removed from the crankshaft (refer to accompanying illustration). But in some cases, a puller may be required.
3. Remove the segment key if it is loose. Inspect the oil seal for oil leaks and, if necessary, replace as described in Section Replacement of crankshaft oil seals.
Installation
1. Install in reverse order. Insert the key, install the gear wheel.
2. Install a new toothed drive belt as described in Section Removal, inspection and installation of a toothed drive belt.
Countershaft gear/roller
Removing
1. Remove the toothed drive belt as described in Section Removal, inspection and installation of a toothed drive belt.
2. On engines with an intermediate shaft (talk to Specifications), hold the gear with the special tool. You can also use an old timing belt for this, wrapping it around the pulley and grabbing it with pliers.
3. Remove the mounting bolt, then pull the pulley off the end of the shaft (refer to accompanying illustration). If necessary, use two levers or screwdrivers to release the pulley (if necessary, a puller can be used as described above for the crankshaft gear). Note that on some engines the key is part of the gear. On engines without an intermediate shaft, unscrew the bolt and remove the intermediate roller.
Installation
1. On engines with an intermediate shaft, install the slotted key (where available) and put the gear on the shaft. Tighten the pulley mounting bolt to Specifications effort. On engines without an intermediate shaft, install the roller and securely tighten the mounting bolt.
2. Install a new toothed drive belt as described in Section Removal, inspection and installation of a toothed drive belt.
Injection pump gear
Note. On F8Q 620 engines, a suitable puller will be required. On early versions of F8Q engines with a turbocharger (predominantly F8Q 784) fuel pump gear type "IAA" must be removed using Renault Mot. 1359 and Mot. 1357, and installation will require a torque wrench to tighten left hand threaded fasteners. On later versions of these engines (especially on F8Q 786 and F8Q 788) and on all F9Q engines, the fuel pump gear type "IAA" fixed with a non-ferrous metal nut with a built-in washer.
Removing
1. On all engines, remove the toothed drive belt (refer to section Removal, inspection and installation of a toothed drive belt).
2a. On F8Q 620 engines, proceed as follows (refer to illustrations):
- a) Hold the gear wheel with Renault Mot. 1200 (refer to section Removal and installation of the fuel pump) or other suitable ones. You can also use an old timing belt for this, wrapping it around the pulley and grabbing it with pliers.
- b) Loosen the pump gear nut. Do not remove the nut at this stage.
- With) Note the location of the key on the end of the fuel pump shaft. The pulley has two slots for the segment key (for Bosch and Lucas fuel pumps - refer to illustrations). Mark the keyway slot to ensure correct installation.
- d) Using a suitable puller, release the pulley from the cone on the pump shaft.
- e) Then unscrew the pulley nut and remove the washer.
- f) Remove the gear wheel and remove the key from the end of the pump shaft if it is loose.
Attention! On early versions of F8Q engines with a turbocharger (predominantly F8Q 784) fuel pump gear type "IAA" must be removed using Renault Mot. 1359 and Mot. 1357, and installation will require a torque wrench to tighten left hand threaded fasteners. On later versions of these engines (especially on F8Q 786 and F8Q 788) and on all F9Q engines, the fuel pump gear type "IAA" fixed with a non-ferrous metal nut with a built-in washer. For all engines, see Section Removal and installation of the fuel pump.
3. On early versions of F8Q turbocharged engines, (fuel pump gear type "IAA" fixed with a regular nut with a separate washer), proceed as follows:
- a) Install Renault Mot tool. 1131 (early version) or Mot. 1200 (late version), to prevent the pulley from rotating. It may be necessary to turn the crankshaft slightly clockwise to get the tool to engage the pulley teeth - make sure the dowel pin has been removed from the cylinder block before turning the crankshaft.
- b) Loosen the gear nut and remove the washer.
- With) Tool Renault Mot. 1359, unscrew the pulley center bolt clockwise - the bolt has a left-hand thread.
- d) Instead of the central bolt, screw in counterclockwise tool Renault Mot. 1357, then screw a 40 mm M12 x 1.25 bolt into the center of this tool. Clamp the bolt into the tool to remove the sprocket.
- e) Remove the gear wheel and remove the key from the end of the pump shaft if it is loose.
4. On later turbocharged F8Q engines and all F9Q engines, (fuel pump gear type "IAA" fixed with a non-ferrous metal nut with a built-in washer), proceed as follows:
- a) Install Renault Mot tool. 1131 (early version) or Mot. 1200 (late version), to prevent the pulley from rotating. It may be necessary to turn the crankshaft slightly clockwise to get the tool to engage the pulley teeth - make sure the dowel pin has been removed from the cylinder block before turning the crankshaft.
- b) Unscrew the nut, release the gear wheel from the cone of the pump shaft.
- With) Remove the gear wheel and remove the key from the end of the pump shaft if it is loose.
Mark the belt and gear for correct installation later.
Installation
1. Install in reverse order, paying attention to the following:
- a) On F8Q 620 engines, make sure the key is inserted into the correct slot in the pulley.
- b) Tighten the gear nut to the Specifications effort (contact the head Power and exhaust systems).
- With) Install and tension a new toothed drive belt as described in Section Removal, inspection and installation of a toothed drive belt.
- d) Before installing the outer drive belt cover on the fuel pump gear, check the injection timing as described in Chapter Power and exhaust systems.
Camshaft gear
Note. You will need a suitable puller for the job.
Removing
1. Remove the toothed drive belt as described in Section Removal, inspection and installation of a toothed drive belt.
2. On models with F9Q engines and air conditioning, remove the auxiliary drive belt tensioner mounting plate, then remove the alternator/fuel pump mounting bolt.
3. Turn away the bolts fastening the main arm of the right support to the engine, and get an arm.
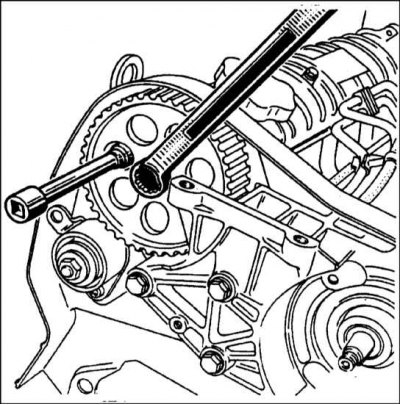
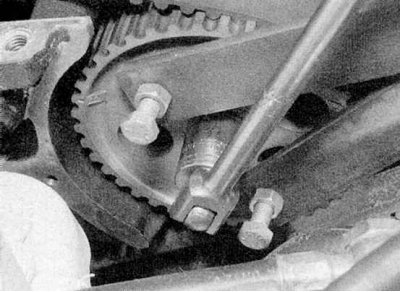
4. Turn away a bolt of a cogwheel of a cam-shaft. The pulley can be held with a suitable socket and an extension rod placed on the head of one of the bolts securing the inner toothed belt cover (refer to accompanying illustration). Alternatively, use an old drive belt wrapped around a pulley. Remove puck.
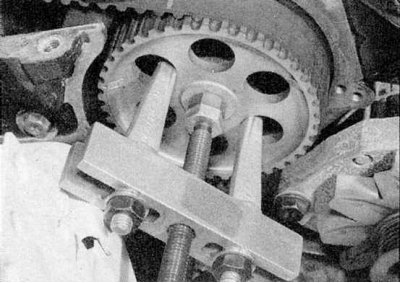
5. Remove the bolt, washer and camshaft sprocket. A suitable puller can be used for this.
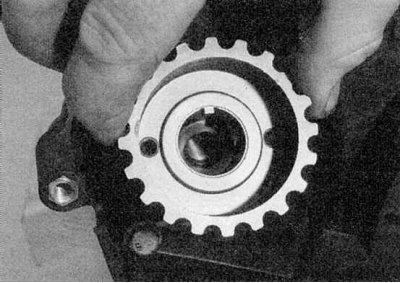
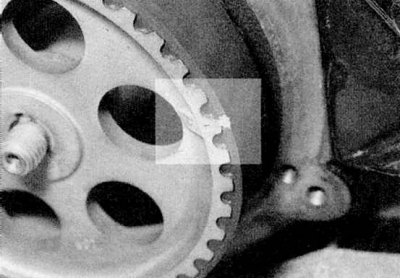
6. Remove the segment key from the end of the camshaft if it is loose - note that on late model engines the key is part of the pulley (refer to accompanying illustration).
Installation
1. Install the slotted key (where available) into the distributor. Establish a cogwheel with a protruding part to a head of the block of cylinders. Make sure the key fits correctly into the slot.
2. Install the bolt with washer and tighten it to the Specifications holding the pulley with the method used for removal.
3. Install the main bracket of the right support on the engine and tighten the mounting bolts.
4. Install the bolts securing the auxiliary drive belt tensioner mounting plate and fuel pump/alternator.
5. Install a new toothed drive belt as described in Section Removal, inspection and installation of a toothed drive belt.
Intermediate pulley
Removing
1. Remove the toothed drive belt as described in Section Removal, inspection and installation of a toothed drive belt.
2. Turn away two bolts of fastening and remove an intermediate pulley, deducing it from internal covers of a gear belt.
Installation
1. Install in reverse order.
2. Install a new toothed drive belt as described in Section Removal, inspection and installation of a toothed drive belt.
Intermediate pulley
Removing
1. Remove the toothed drive belt as described in Section Removal, inspection and installation of a toothed drive belt.
2. Remove the mounting nut and washer, remove the mounting bolt, then remove the tensioner assembly.
Installation
1. Install in reverse order. Make sure that the lug on the cylinder block fits into the hole in the tensioner bracket.
2. Install a new toothed drive belt as described in Section Removal, inspection and installation of a toothed drive belt.