
Disassembly
Attention. When disassembling the cylinder head, make sure that all parts can subsequently be installed in their original places.
- Remove the cylinder head.
- Remove the throttle assembly.
- Remove the intake and exhaust manifolds.
- Remove the fuel line along with the injectors.
- Gradually unscrew the cylinder head cover nuts.
- Remove the cylinder head cover and gasket.
- Remove the spark plugs.
- Unscrew the bolts securing the thermostat housing and remove it.
- Secure the camshaft pulley from turning and remove the bolt securing it.
- Remove the camshaft pulley and key.
- Gradually loosen and unscrew the camshaft bearing cap bolts and remove them.
- Remove the camshaft and two camshaft seals.
- Remove the pushers along with the adjusting washers.
- Using a valve spring compressor, compress the first valve spring and remove the retainers.
- Smoothly loosen the spring compression device and remove it.
- Remove the spring plate, spring and spring seat.
- Remove the springs from the remaining valves in the same way.
- Remove the oil seals and remove the valves from the cylinder head.
Testing and assembly
Note. When assembling the cylinder head, install the moving elements after lubricating them with engine oil.
- Clean all parts of the cylinder head, but it is very important not to scratch the mating surfaces of the parts.
- Remove carbon deposits from the combustion chambers and valve plates using a scraper or rotating wire brush.
- Check the valve discs and valve seats for chipping and scorching. Signs of minor chipping on the valve and seat can be removed by grinding in, first with coarse grit and then with fine grit abrasive paste.
- If there are deep chipping marks, the valves should be ground on a valve grinder and the seats on a valve seat milling machine. To perform the last two types of work, you must contact specialists.
- Check the valve guides for wear. Insert the valve into the guide. The valve in the guide should move easily, without side play. To replace worn guides with new ones, special tools are required.
- Check the camshaft for wear and wear of the bearing journals and cam contours. Any wear on the camshaft bearing journals indicates that the cylinder head needs to be replaced, since the bearings in the cylinder head are molded directly into the head material.
- Measure the outer diameter of the pushers and make sure that there is no wear or wear on the pushers and in the pusher sockets.
- Check the length of the valve springs when free and under load.
Valve guides
Attention. Valve guides can be replaced no more than twice.

Pic. 1.50. Place (A) Measurements of the installation size of the guide bushing: A = 43±0.2 mm
- Using a mandrel of the appropriate diameter, remove the guide sleeve from the mating surface of the cylinder head
- Measure the diameter of the socket for installing the guide sleeve in the cylinder head and, if necessary, bore it.
- Using a mandrel of the appropriate diameter, install a new guide sleeve on the camshaft side like this. so that the distance between the mating surface of the cylinder head and the bottom of the bushing corresponds to the value given in «Technical data».
- Using a special tool, process the inner diameter of the guide sleeve, while maintaining perpendicularity to the mating surface of the cylinder head.
Valve seats
- Check valve seats for chipping and burning. Signs of slight chipping on the seat can be removed by rubbing in first with coarse and then fine grinding paste
Valve stem sealing
- The intake and exhaust valve stems are sealed with oil deflector caps. It is recommended to replace oil seals after each removal
- To install oil seals, it is necessary to use a piece of pipe with an outer diameter of 12 mm.
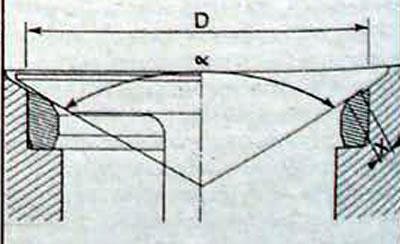
Pic. 1.51. Treatment of valve seats: X is the width of the working chamfer; D - outer diameter
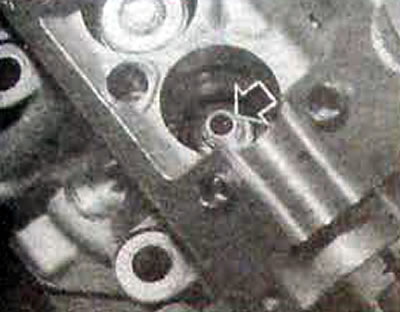
Pic. 1.52. Location of oil seal
Assembly
- Clean the cylinder head and blow out the lubricant channels.
- Clean all parts and lubricate all friction surfaces with engine oil.
- Lubricate the first valve stem with engine oil and insert it into the guide. Install the oil seal.
- Install the spring and spring plate.
- Compress the valve spring with a spring compressor and insert the cotters into the top of the valve stem.
- Smoothly remove the spring compressor and check that the crackers are in place.
- Install the remaining valves in the cylinder head in the same way.
- Once all the valves are in place, lightly tap the top of the valve springs with a plastic hammer to ensure that the valve springs are seated.
- Install the pushers with shims so that the washer markings face the pusher.
- Install the camshaft, camshaft bearing caps and gradually and sequentially screw in and tighten the cap bolts to the required tightening torque.
- Using a mandrel of the appropriate diameter, install two oil seals from the ends of the camshaft.
- Install the key into the camshaft groove and the camshaft pulley.
- Block the camshaft pulley from turning and secure it with a bolt.
- Check and, if necessary, adjust valve clearances.
- Install the thermostat housing with new Seals and secure it with bolts.
- Install the injectors and fuel line.
- Screw in the spark plugs.
- Install the cylinder head cover with a new gasket and secure with nuts, screwing them in gradually and sequentially.
- Install the intake and exhaust manifolds with new gaskets.
- Install the throttle assembly.
- Install the cylinder head.