
English Русский
Български
Беларускі
Український
Српски
Hrvatski
Română
Polski
Slovenský
Magyar
Bookmark Contacts Articles Sitemap
Company vehicles Peugeot Company vehicles Opel Company vehicles Skoda Company vehicles Land Rover Company vehicles Mitsubishi Company vehicles Volkswagen Company vehicles Honda
RenaultBook.ru


Duster   Fluence   Kangoo   Laguna   Logan   Megane   Sandero   Scenic   Symbol   Clio   Other
Renault 19 (1988-1996) Espace I and II (1984-1996) Espace III (1996-2002)

Oil pump (Renault Espace III)

  • Main
  • Renault
  • Espace III (1996-2002)
  • Power unit
  • Petrol engines F3R
  • Oil pump
0
Contents: Removal 🠛 Disassembly and inspection 🠛 Installation 🠛

Removal


  • Disconnect the cable from the negative battery terminal.
  • Raise the front of the vehicle.
  • Place a pan under the engine to collect engine oil.
  • Drain the engine oil.
  • Using a lifting mechanism, lift the engine so that its weight is supported by the lifting mechanism.
  • Remove the plate located between the engine and the gearbox.
  • On a vehicle with an F3R 768 engine, lower the engine subframe by 50 mm.
  • Remove the oil pan mounting bolts and separate it from the cylinder block.
  • Remove the oil pan and gasket.
  • Remove the oil pump mounting bolts and remove it.

Disassembly and inspection


  • Unscrew the mesh filter mounting bolts and remove it.
  • Remove the gears from the oil pump housing
  • Check the gears, gear seats in the pump housing and the mating surface for installing the mesh filter for scratches, nicks and wear.
  • Install the gears into the oil pump housing.
  • Using a metal ruler and feeler gauge, check the clearances between the gears and the oil pump housing (see values in "Technical Specifications").
  • Using a metal ruler and feeler gauge, check the end clearance of the oil pump gears.

Caution: If the clearances exceed the permissible values or there are scratches or marks on the pump elements, replace the oil pump assembly.
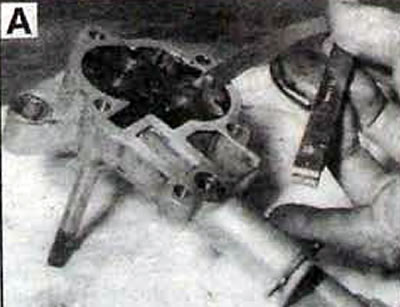

Fig. 1.80. Checking the clearance between the gear and the oil pump housing
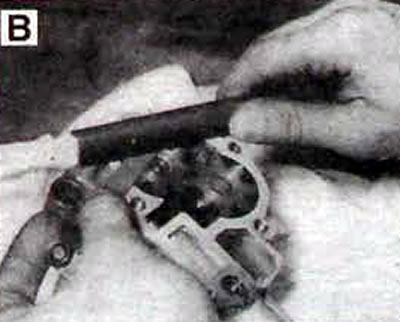
Fig. 1.80. Checking the clearance between the gear and the oil pump housing


Fig. 1.81. Checking the end clearance of the oil pump gears

Fig. 1.81. Checking the end clearance of the oil pump gears

  • Lubricate the gears and the mating surface of the pump body with engine oil to install the mesh filter.
  • Install the gears into the oil pump housing and mesh filter and secure it with bolts, tightening them to the required torque.
  • Remove the pressure reducing valve plug mounting pin (Fig. 1 82).
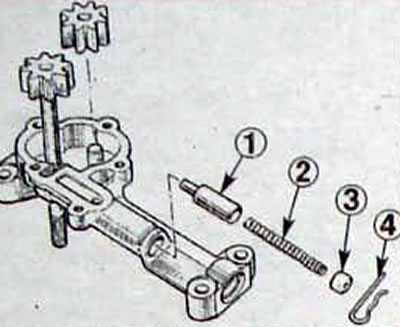
Fig. 1.82. Oil pump pressure reducing valve: 1 - piston; 2 - spring; 3 - cork; 4 - pin

Fig. 1.82. Oil pump pressure reducing valve: 1 - piston; 2 - spring; 3 - cork; 4 - pin

  • Remove the plug, spring and piston from the oil pump housing.
  • Check the piston and its seat for scratches, nicks and wear.
  • Lubricate the piston and spring and install them into the oil pump housing.
  • Install the plug and secure it with the pin.

Installation


  • Clean the seating surfaces of the oil pan and cylinder block.
  • On the F3R 728 engine, make sure there is a centering socket on the pump shaft (Fig. 1.83).
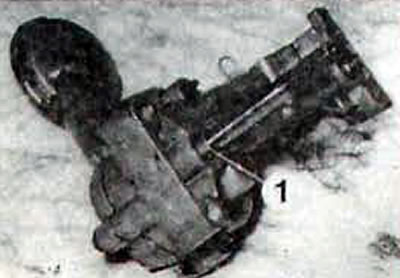
Fig. 1.83. Location of the centering socket (1) on the oil pump shaft of the F3R 728 engine

Fig. 1.83. Location of the centering socket (1) on the oil pump shaft of the F3R 728 engine


  • Install the oil pump and secure with bolts, tightening them to the required torque (fig. 1.84, 1.85).
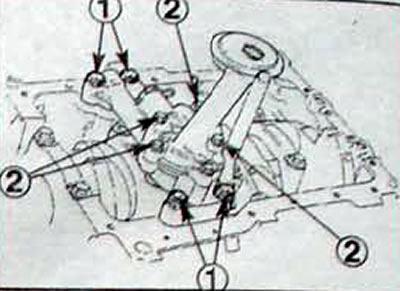
Fig. 1.84. Fastening the oil pump on the F3R 728 engine: 1 - bolts for fastening the oil pump to…

Fig. 1.84. Fastening the oil pump on the F3R 728 engine: 1 - bolts for fastening the oil pump to the cylinder block; 2 - bolts for fastening the mesh filter to the oil pump
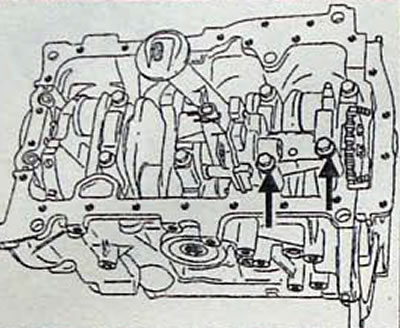

Fig. 1.85. Location of oil pump mounting bolts on F3R 768 engine

Fig. 1.85. Location of oil pump mounting bolts on F3R 768 engine

  • Install the oil pan with a new gasket and secure with bolts, tightening them to the specified torque.
  • Further installation is carried out in the reverse order of removal.
  • Fill the engine with oil.

Caution: To fill the lubrication system with engine oil before starting the engine, disconnect the connector from the inertial shock sensor and turn the engine crankshaft with the starter for 30 seconds.
This article is available on: russian, bulgarian, belarusian, ukrainian, serbian, croatian, romanian, polish, slovak, hungarian
Article has been reviewed by editor: Trofimova Anastasia
Share with friends:
Previous
Espace III: Petrol engines F3R
Next

Lubrication system — general information
Engine repair — disassembly, inspection and assembly
Pendulum engine mount
Removal and installation of F3R engine with JC5 gearbox
Cylinder head repair
Cooling System — Checking Oil Pressure
Cooling liquid
Draining the coolant
Filling the cooling system and removing air
Checking the tightness of the cooling system
Other articles on other Renault models

➽ Oil pump — removal and installation Renault Duster 1 (2009-2017)
➽ Removal the water pump inlet pipe Renault Fluence 1 (2009-2020, petrol)
➽ Oil pump Renault Kangoo 1 (1997-2007)
➽ Checking fuel pump performance (all engines) Renault Laguna 2 (2001-2007)
➽ Replacing the chain and gear of the oil pump drive Renault Logan 1 (2004-2012, petrol)
Link to this article in different formats
Reviews and comments of visitors
No comments yet


Add two numbers 28 + 45


Renault 19 (1988-1996) 
  • General information
  • Maintenance
  • Power unit
  • Engine repair
  • Exhaust system
  • Cooling system
  • Supply system
  • Single-point injection
  • Multi-point injection
  • Diesel injection system
  • Transmission
  • Clutch
  • Car gearbox
  • Chassis, running gear
  • Car suspension
  • Steering
  • Brake system
  • Wheels and tires
  • Body and interior
  • Exterior (external elements)
  • Interior (internal elements)
  • Heating and ventilation
  • Electrical equipment
  • Equipment and devices
  • Headlights and lighting
  • Ignition system
  • Power devices
  • Electrical circuits
Espace I and II (1984-1996) 
  • General information
  • Introduction to the guide
  • Troubleshooting
  • Power unit
  • Engine repair
  • Cooling system
  • Carburetor fuel system
  • Injection fuel system
  • Diesel fuel system
  • Ignition system
  • Transmission
  • Clutch
  • Car gearbox
  • Drive shafts
  • Chassis, running gear
  • Brake system
  • Steering
  • Front suspension
  • Rear suspension
  • Body and interior
  • Exterior (external elements)
  • Interior (internal elements)
  • Doors, locks and windows
  • Electrical equipment
  • Equipment and devices
  • Electrical circuits
Espace III (1996-2002) 
  • General information
  • Introduction to the manual
  • User manual
  • Power unit
  • Petrol engines F3R
  • Petrol engines Z7X
  • Diesel engines G8T
  • Diesel engines G9T
  • Transmission
  • Clutch
  • Mechanical gearbox
  • Automatic gearbox
  • Drive shafts
  • Chassis, running gear
  • Steering
  • Front suspension
  • Rear suspension
  • Brake system
  • Body and interior
  • Exterior (external elements)
  • Interior (internal elements)
  • Doors, locks and windows
  • Heating and ventilation
  • Electrical equipment
  • Equipment and instruments
  • Power devices
  • Electrical circuits
RenaultBook.ru © 2018–2026 | Mobile version | News and articles | Sitemap: EN BG BY UA RS HR RO PL SK HU | Administration | Site search | Bookmark
Duster 1 (2009-2017) | Fluence 1 (2009-2020, petrol) | Kangoo 1 (1997-2007) | Laguna 2 (2001-2007) | Logan 1 (2004-2012, petrol) | Logan 2 (2012-2020) | Megane 1 (1995-2002) | Megan 2 (2002-2009, petrol) | Sandero 1 (2007-2012, petrol) | Scenic 1 (1996-2003) | Symbol 1 (1999-2008, petrol) | Symbol 2 (2008-2013, petrol) | Renault 19 (1988-1996) | Espace I and II (1984-1996) | Espace III (1996-2002) | Clio 1 (1990-1998) |
We want your visit to be comfortable 😌 and use cookies 🍪 to do so.