
Gasoline engines
1. The auxiliary drive belt is located on the right side of the engine.
2. Depending on the type of engine and vehicle equipment, many different drive belt configurations may be encountered.
3. Due to high tension and their composition, drive belts wear out over time. Therefore, belts must be periodically adjusted and checked.
4. For better access to the drive belt, raise the front of the car and remove the right wheel, then unscrew the mounting bolts and remove the engine protection cover, also remove the mudguard from the inside of the wheel arch.
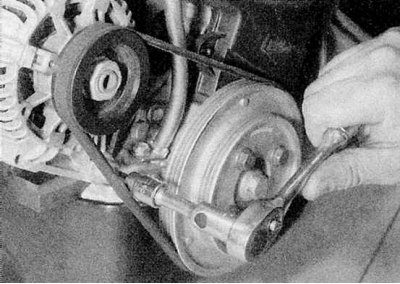
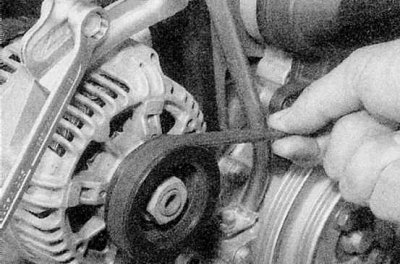
5. Rotate the crankshaft pulley with a wrench on the bolt and check the drive belt for cracks, loose rubber, and torn or worn ribs. Also check it for oiling and wear, which gives the drive belt a shiny look. If there is any doubt about the condition of the drive belt, replace it.
Note. Renault recommends changing the belt whenever it loosens.
Secondary Drive Belt Routing Diagram - 1.4L and 1.6L Models Without Air Conditioner
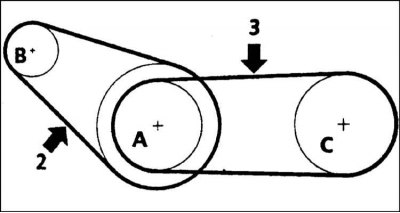
2 - Tension test point for the alternator drive belt; 3 - Tension test point for power steering drive belt; A - Crankshaft pulley; B - Generator; C - Power steering pump
Secondary Drive Belt Routing Diagram - 1.4L and 1.6L Models with Air Conditioning
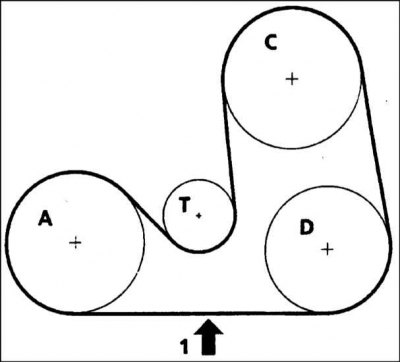
1 - Tension check point; A - Crankshaft pulley; C - Power steering pump; D - Air conditioning compressor; T - Tension mechanism
Secondary Drive Belt Routing Diagram - 2.0L Gasoline Models and Diesel Models without Air Conditioning
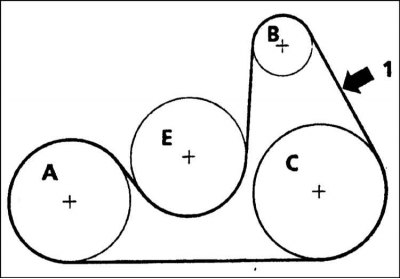
1 - Tension check point; A - Crankshaft pulley; B - Generator; C - Power steering pump; E - Coolant pump
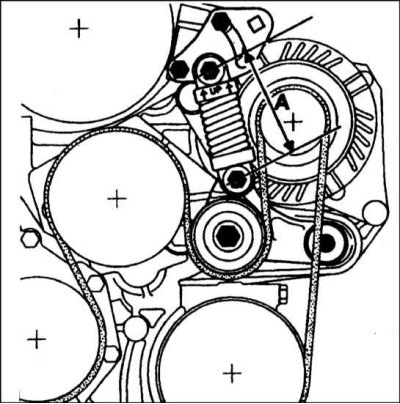
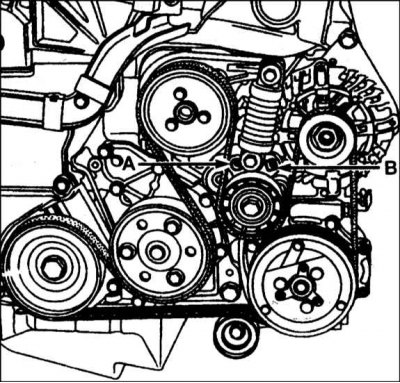
Secondary Drive Belt Routing Diagram - 16-Valve 2.0L Gasoline and Diesel Models with Air Conditioning (the tension test point is indicated by an arrow)
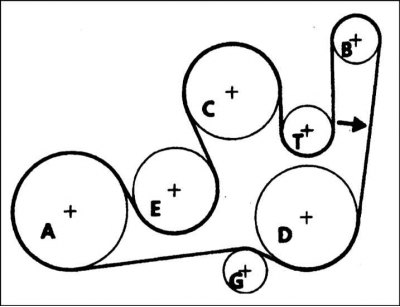
A - Crankshaft pulley; B - Generator; C - Power steering pump; D - Air conditioning compressor; E - Cooling system pump; G - Roller; T - Tension mechanism
Auxiliary Drive Belt Routing Diagram - 8-Valve 2.0L Air Conditioned Models
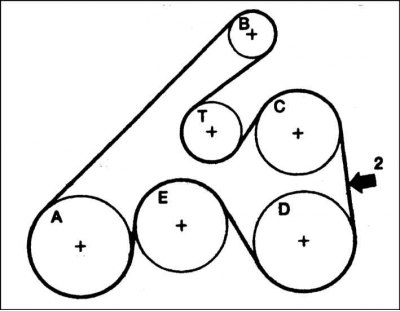
2 - Tension check point; A - Crankshaft pulley; B - Generator; C - Power steering pump; D - Air conditioning compressor; E - Cooling system pump; T - Tension mechanism
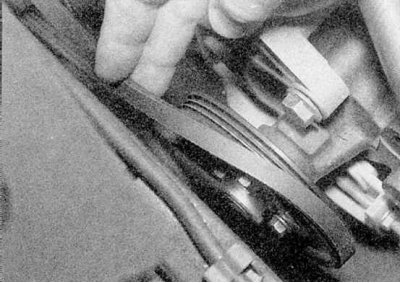
1. Service stations use a special tool to check the tension of the drive belt, but to check the tension at home, press the belt with your fingers in the middle of the longest section between the pulleys (refer to the illustrations above).
Engines 1.4 l (E7J) and 1.6 l (K7M)
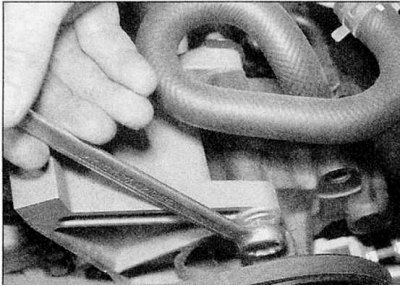
1a. If adjustment is needed on the power steering pump drive belt (models without air conditioning), loosen the pump mount and pivot bolts.
1b. Then loosen the adjustment locknut and turn the adjustment bolt until you get the correct tension (refer to illustrations).

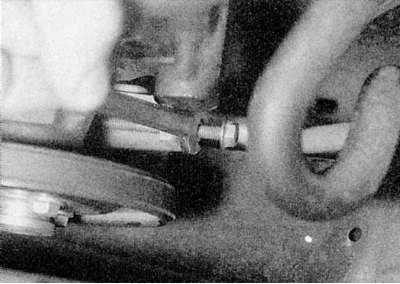
2a. If adjustment is needed on the alternator drive belt (models without air conditioning), jack up the front of the vehicle and place it on axle stands.
2b. Remove the right front wheel and wheel arch liner, then loosen the alternator lower mounting bolt.
2c. In the engine compartment, loosen the adjustment bolt, then move the alternator as required and retighten the bolt (refer to illustrations). Install the bushing and wheel, then lower the vehicle to the ground.
3. If power steering drive belt and air conditioning compressor need to be adjusted (models with air conditioning), release the electronic device of the engine management system and move it to the side without disconnecting the wiring.
4. While holding the idler pulley stationary with a 22mm wrench, loosen the pulley bolt using a 7mm socket wrench. Move the tensioner to reduce belt tension.
5. To tension the belt, move the tensioner pulley as required, then hold the pulley in this position with a wrench. Tighten the pulley bolt.
6. Run the engine for approximately 5 minutes, then recheck the tension.
Engines 2.0 l (F3R and F7R)
1. If adjustment is necessary on models without air conditioning, jack up the front of the vehicle and place it on axle stands. Remove the right front wheel and wheel arch liner, then loosen the alternator lower mounting bolt. In the engine compartment, loosen the adjustment bolt, then move the alternator as required and retighten the bolt. Install the bushing and wheel, then lower the vehicle to the ground.
2. Run the engine for approximately 5 minutes, then recheck the tension.
3. If adjustment is required on an F3R engine with air conditioning, refer to the procedures above. On F7R engines with air conditioning, the drive belt is adjusted by means of an automatic tensioner.
Diesel engines
1. Depending on the equipment of the car, you may encounter two kinds of drive belt configuration (refer to illustrations "Secondary Drive Belt Routing Diagram - 2.0L Gasoline Models and Diesel Models without Air Conditioning" And "Secondary Drive Belt Routing Diagram - 16-Valve 2.0L Gasoline and Diesel Models with Air Conditioning" higher).
2. If adjustment is necessary, on models without air conditioning, loosen the alternator mounting pivot bolts, then loosen the locknut and turn the adjusting bolt (refer to accompanying illustration). Run the engine for approximately 5 minutes, then recheck the tension.
3. Models with air conditioning have an automatic tensioner. If it is suspected that the drive belt tension is incorrect, contact a Renault workshop. To check the distance (A) between the centers of the tensioner fixing bolts, special tool Mot. 1387 (refer to accompanying illustration). As the actual bolt spacing is not determined by Renault, the spacing can only be checked with a special tool.
4. If a tool is available, proceed as follows: Loosen the locking knurled wheel, place the tool on the tensioner as shown in the illustration, then tighten the knurled wheel to lock the tool. Remove the tool and check that the distance between the centers of the bolts is within the indicated tolerance range. If the distance is below or above the tolerance range, first check that the tensioner mounting plate has been correctly placed, that the belt is of the correct type (not too short or long) and that it is laid out.
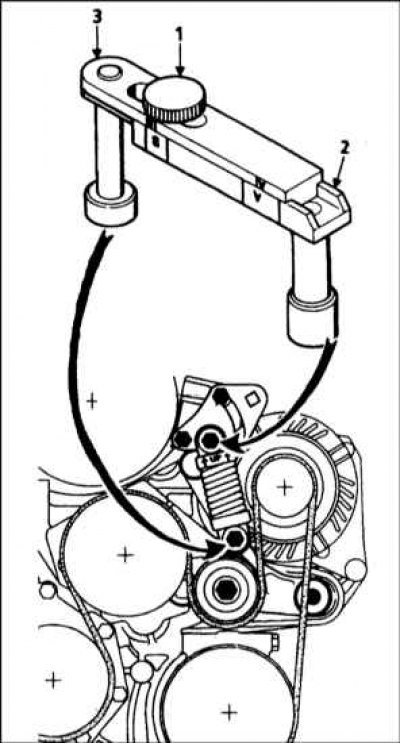
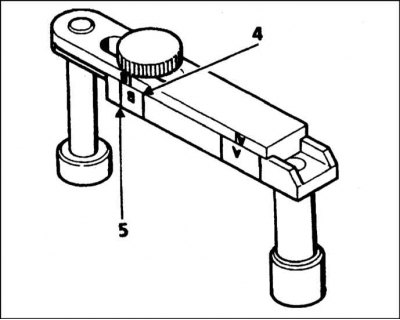
4a. Installation of special tool Mot 1387 to check the functioning of the automatic tensioner - models with air conditioning:
1 - Blocking wheel.
2, 3 - Levers.
4b. Auto Tensioner Bolt Center Distance Check - Air Conditioned Models:
4 - The minimum range of permissible deviations.
5 - The maximum range of permissible deviations.
All engines except 16-valve 2.0 l (F7R) with air conditioning
1. To remove the belt, completely loosen the tension as described above, then remove the belt from the pulleys. Note that where two belts are installed, the power steering pump drive belt must first be removed (refer to accompanying illustration).
2. Install a new belt.
3. Adjust the tension as described above.
16-valve 2.0 l engines (F7R) with air conditioning
Note. The following procedure will require a Renault Mot special tool. 1318.
1. Jack up the front of the vehicle and place it on axle stands. Remove the right front wheel and wheel arch liner.
2. Disconnect the earth cable from the battery (contact the head Engine electrical equipment for Scenic models).
Attention! If your car's radio is coded, make sure you have the correct key code
3. Release the engine control unit and move it to the side without disconnecting the wiring connector.
4a. Insert special tool Renault Mot. 1318 into the hole in the tensioner support plate. Insert a 10mm square wrench into the adjacent hole in the tensioner support plate. Use the square wrench to move the tensioner to the left, loosening the tension on the belt until the special tool is aligned with the tensioner mount. The tensioner should now lock in the relaxed position.
4b. Secondary Drive Belt Replacement - 16-Valve 2.0L Air Conditioned Models:
A - Hole for installing a special tool Renault
B - 10 mm square hole
5. Remove the belt from the pulleys.
6. When installing a new belt, make sure that it is correctly positioned in the grooves of the pulley (refer to accompanying illustration).
7. Using a square wrench, slightly squeeze the tension mechanism and pull out the special tool. Slowly release the square wrench and allow the tensioner to tension the drive belt.
8. Install the removed components, then lower the vehicle to the ground and install the negative cable to the battery.
Diesel engines
Note. Renault recommends changing the belt whenever it loosens.
Models without air conditioning
1. Completely loosen the belt tension as described above. Remove the belt from the pulleys, then install a new one. Make sure it runs correctly.
2. Adjust belt tension as described above.
Models with air conditioning
Note. Before removing the belt, check the distance between the tensioner mounting bolts using the Renault Mot 1387 tool.
1. Remove the bracket holding the fuel hose connecting the fuel filter to the pump.
2. Install a 9mm square wrench into the hole in the tensioner mounting plate.
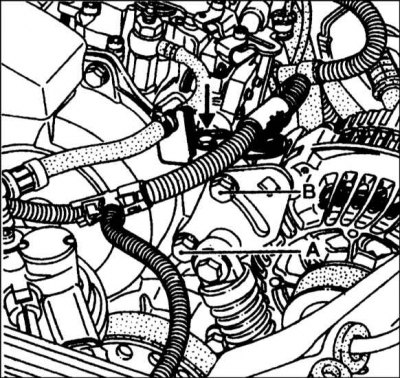
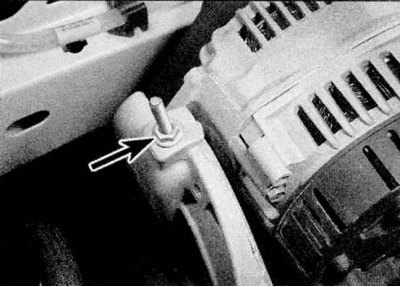
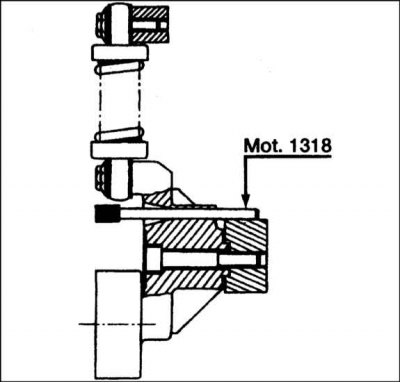
3. While holding the plate in this position, loosen the bottom (A), then top (B) tensioner plate fixing bolts (refer to accompanying illustration). The arrow points to the fuel hose bracket bolt.
4. Move the tensioner plate counterclockwise (when viewed from the front of the car), to loosen the belt tension.
5. Remove the belt from the pulleys, then install a new one. Make sure it runs correctly.
6. Reinstall the auto-tensioner by moving the mounting plate clockwise, then tighten the two mounting bolts.
7. Install the fuel hose bracket.