
Removal and installation of a gear belt of a drive of the gas-distributing mechanism, K7M engine (8 valves)
Removing the timing belt
1. Place the vehicle on a two post lift.
2. Disconnect the negative battery terminal.
3. Remove the front right wheel from the vehicle.
4. Remove the front right fender liner.
5. Unscrew the fastening bolts and remove the engine protective tray.
6. Remove attachment drive belt (see above).
7. Unscrew the mounting bolt and remove the crankshaft pulley, securing the flywheel from turning with a screwdriver.
8. Remove engine tie rod.
9. Install a traverse for hanging the engine (Mot. 1453).
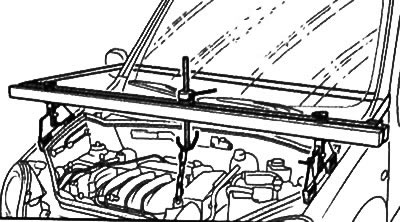
10. Hook the front mounting eye to the installed crosshead.
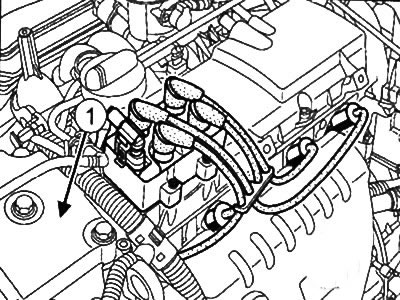
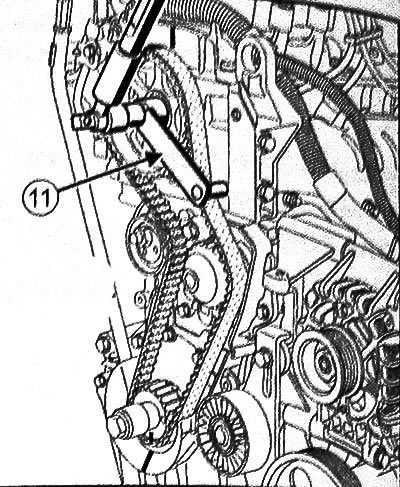
11. Remove cover (1) engine mount.
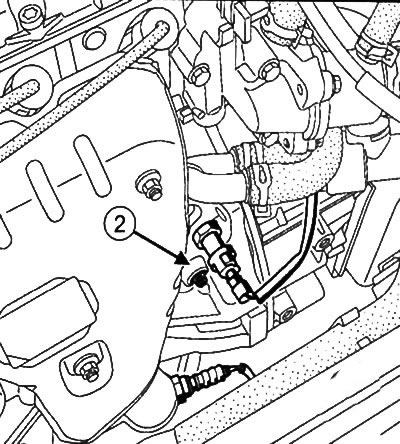
12. Remove plug (2) holes for the TDC locating pin.
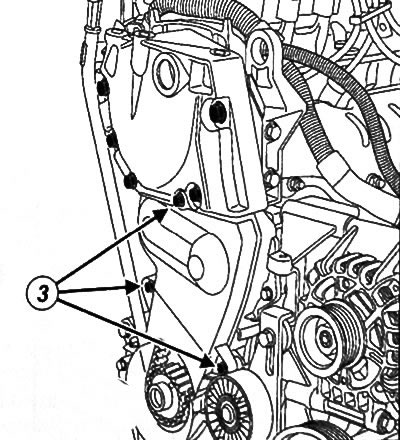
13. Loosen the bolts (3) fastening the lower cover of the gas distribution mechanism drive.
14. Remove the lower timing cover.
15. To turn away bolts of fastening of the top cover of the gas-distributing mechanism.
16. To remove the top cover of a drive of the gas-distributing mechanism.
17. Install the crankshaft pulley bolt with spacer (4).
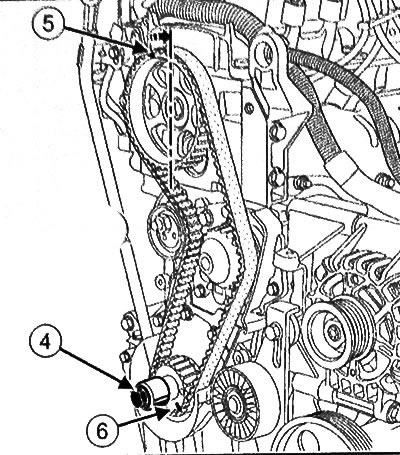
18. Turning the crankshaft clockwise, place a mark on the camshaft sprocket one tooth before the vertical axis of the sprocket at the top (5), and the mark of the crankshaft sprocket one tooth to the vertical axis of the sprocket at the bottom point (6).
19. Insert TDC locating pin (Mot. 1489).
20. Turn the crankshaft clockwise until it stops against the dowel pin (Mot. 1489).
21. Mark the lids with a marker.
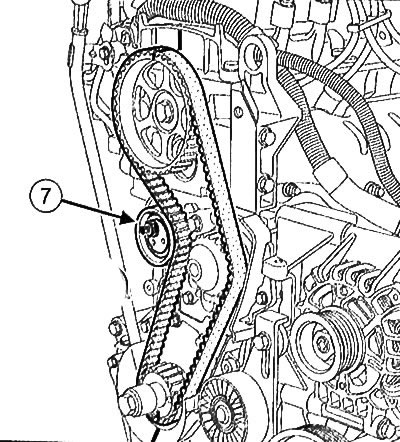
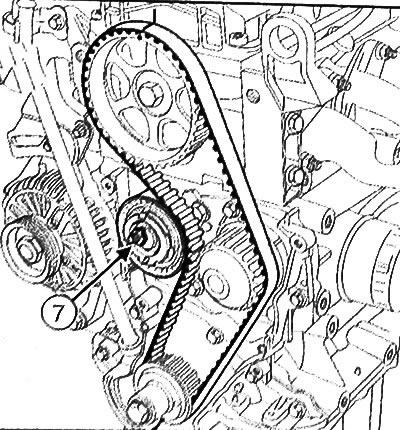
22. Loosen the nut (7) tension roller.
Type A
Type B
23. Remove the toothed belt driving the gas distribution mechanism.
24. Remove the tension roller.
Installing the timing belt
Attention:
- The timing belt must be replaced with a new one after each removal. In addition, it is also necessary to replace the idler pulley and the crankshaft pulley bolt with new ones.
- Be sure to degrease the end of the crankshaft (from the drive side of the gas distribution mechanism), toothed belt sprocket mounting holes and sprocket mounting surfaces on the crankshaft and camshafts, as well as the contact surface of the crankshaft pulley. This will prevent the toothed belt from slipping, which can cause engine damage.
1. Install a new tension roller.
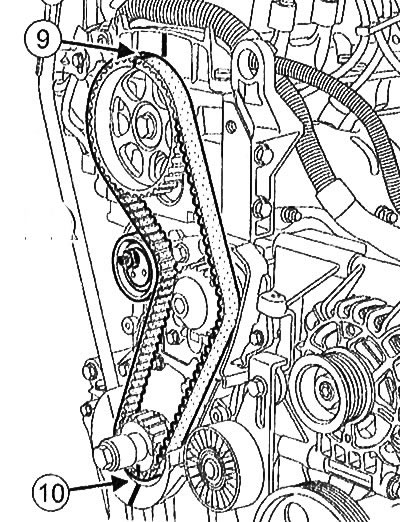
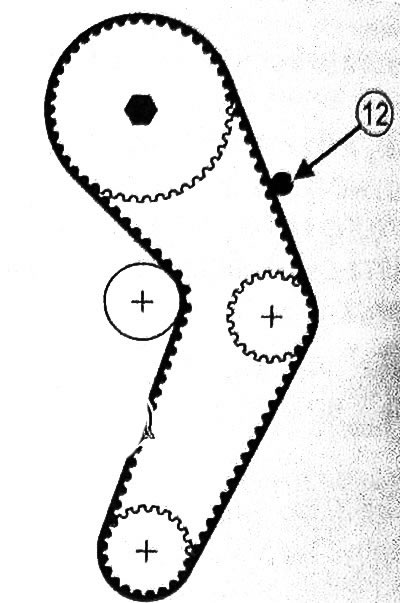
2. Install a new toothed timing belt, aligning the marks of the camshaft sprocket (9) and cranked (10) shafts marked with a marker when removed.
Note:
Toothed belt installation sequence:
- crankshaft pulley,
- tension roller,
- camshaft pulley,
- water pump gear.
Timing belt tension, type A
1. Place the tension roller on the drive belt.
2. Nazhivin, tension roller.
3. Remove TDC locating pin (Mot. I489).
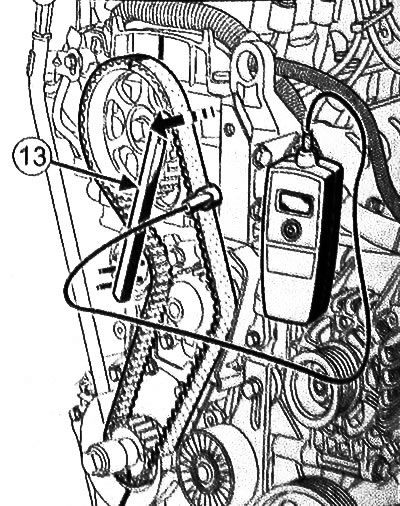
4. Install the toothed belt pretensioning tool (Mol. 1501) (11) on the camshaft sprocket.
5. Pretension the section (12) toothed belt using a torque belt with a torque of 10 Nm.
6. Remove the pretensioning tool (Mot. 1501).
7. Install toothed belt tensioner (Mot. 1135-01) (13) on the tension roller.
8. Tension the timing belt by turning the tension roller with the tensioner (Mol. 1135-01) counterclock-wise.
9. Adjust the toothed belt tension using the frequency indicator (Mot. 1715) to a value of 160±10 Hz and tighten the tension roller nut to a torque of 50 Nm
10. Turn the crankshaft two turns clockwise.
11. With locating pin 8MT (Mot. 1489) Set the crankshaft to the top dead center position of the piston of the first cylinder.
12. Remove TDC locating pin (Mot. 1489).
13. Install toothed belt pre-tensioning tool (Mot. 1501) on the camshaft sprocket.
14. Pretension the section (12) toothed belt using a torque belt with a torque of 10 Nm.
15. Remove toothed belt pretensioning tool (Mot. 1501).
16. With frequency indicator (Mot. 1715) make sure that the timing belt tension is 160±10 Hz.
17. If the tension value is not correct, adjust the tension by repeating the process from the beginning.
Timing belt tension, type B
1. Place the groove of the regulator (14) 10°after pointer (15), by turning the eccentric (16) counterclockwise with a Torx key.
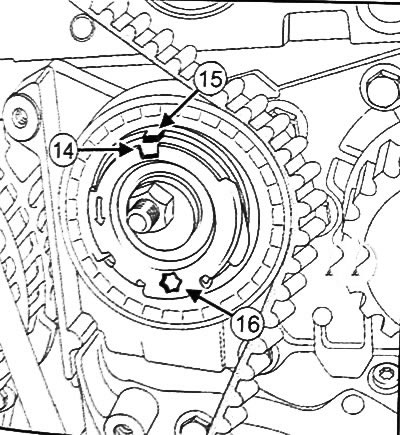
2. Tighten the tension roller nut to 25 Nm.
3. Remove TDC locating pin (Mot. 1489).
4. Turn the crankshaft two turns clockwise.
5. Insert TDC locating pin (Mot. 1489).
6. Turn the crankshaft clockwise until it stops in the TDC locating pin (Mot. 1489).
7. Make sure the groove (14) located opposite the sign (15). If it's not:
- loosen the tension roller nut one turn while holding the eccentric with a Torx wrench;
- gradually shift the groove of the regulator (14) 10°after pointer (15), by turning the eccentric (16) counterclock-wise;
- tighten the tension roller nut.
8. Remove TDC locating pin (Mot. 1489).
Completing the installation
1. Apply Frenetanche to the upper timing cover bolts.
2. Install the upper and lower timing cover.
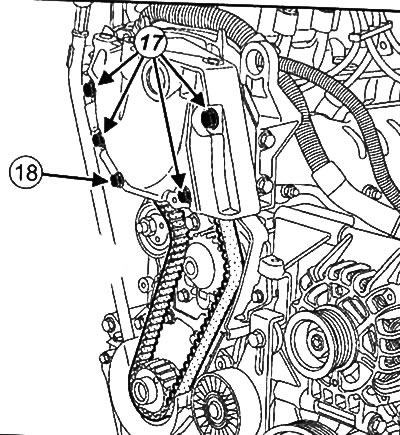
3. Tighten:
- M10 bolts (17) the top cover of the timing gear with a torque of 44 Nm
- M8 bolts (18) the top cover of the timing gear with a torque of 22 Nm
- bolts of fastening of the bottom cover of a drive of the gas-distributing mechanism (type A) torque 8 Nm.
- bolts of fastening of the bottom cover of a drive of the gas-distributing mechanism (type B) torque 12 Nm.
4. Insert TDC locating pin (Mot. 1489).
5. Install the crankshaft pulley.
6. Tighten the crankshaft pulley bolt to 30 Nm, and then tighten another 100±5°using the magnetized indicator lever for this purpose to tighten the cylinder head (Mot. 591-02) and a key for angular tightening of the cylinder head (Mot. 591-04).
7. Install the mounting post cover.
8. Tighten the engine tie rod bolts to 62 Nm.
9. Install attachment drive belt.
10. Further installation is carried out in the reverse order of removal.