
Attention:
When working in the engine compartment, precautions must be taken to avoid injury, as the engine cooling fan may start unexpectedly.
To avoid severe burns when the engine is hot, the following rules must be observed:
- do not open the cap of the expansion tank,
- do not drain fluid from the engine cooling system,
- do not open the vent caps.
Note: When working, you must be prepared for the leakage of liquid, so you need to prepare a drip tray to collect liquid and cover the surrounding components.
Removal and installation of the water chamber
D4F engine
Removing the water box
1. Place the vehicle on a two post lift.
2. Disconnect the negative battery terminal.
3. Unscrew the fastening bolts and remove the engine protective tray.
4. Drain the coolant from the engine cooling system.
5. Using special pliers (Mot. 1448) remove the hose clamps connected to the water box.
Note: Cover the TDC sensor with a cloth to prevent coolant from getting on the gearbox.
6. Disconnect the hoses from the water box.
7. Loosen the bolts (3) and remove the water chamber (4) with gasket
Water box installation
Attention:
- Do not scratch the connecting aluminum surfaces, any damage to the contact surfaces may cause leakage.
- When performing work, use goggles with side protection.
- The sealing surfaces must be clean, dry and free from grease to ensure the required tightness (avoid any fingerprints).
- Replace the water chamber gasket with a new one.
1. Place the water box with a new gasket on the engine.
2. Fasten, without tightening, the water chamber mounting bolts.
3. Tighten the water chamber bolts to 10 Nm.
4. Connect the hoses to the water box.
5. Using special pliers (Mot. 1448) install hose clamps.
6. Connect the negative battery terminal.
7. Fill and bleed the engine cooling system.
8. Install engine protection tray
K7M engine
Removing the water box
1. Place the vehicle on a two post lift.
2. Disconnect the negative battery terminal.
3. Unscrew the fastening bolts and remove the engine protective tray.
4. Drain the coolant from the engine cooling system.
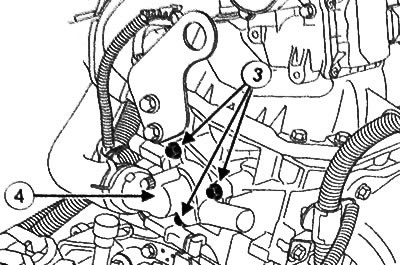
5. Unhook the wiring from the holders (1) And (2).
6. Loosen the bolt (3) and remove the rack (4).
7. Remove the water chamber (see general view drawing at the beginning of the chapter).
Water box installation
1. Use a cleaning agent to clean and degrease the contact surfaces of the cylinder head and water box.
Attention:
- Do not scratch the connecting aluminum surfaces, any damage to the contact surfaces may cause leakage.
- The sealing surfaces must be clean, dry and free from grease to ensure the required tightness (avoid any fingerprints).
2. Apply an even layer of sealant to the contact surfaces of the water box with a roller.
Caution: Excess applied sealant may be squeezed out when tightening threaded connections. Sealant entering the coolant may cause damage to some components (engine, radiator, etc.).
3. Install the water chamber on the engine cylinder head and remove excess sealant with a cloth.
4. Further installation is carried out in the reverse order of removal.
5. Fill and bleed the engine cooling system.
K4M engine
Removing the water box
1. Place the vehicle on a two post lift.
2. Disconnect the negative battery terminal.
3. Remove the air resonator.
4. Drain the coolant from the engine cooling system.
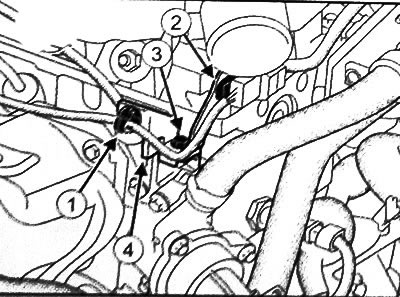
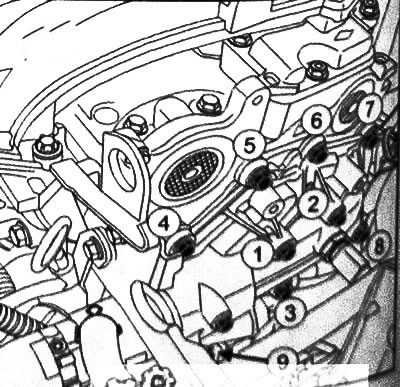
5. Disconnect the upper radiator hose (1) from the water chamber.
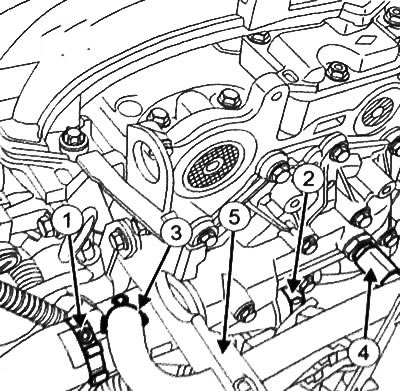
6. Disconnect the heater hose (2).
7. Disconnect the expansion tank hose (3).
8. Disconnect the coolant temperature sensor (4).
9. Unhook the hose from the support (5)
10. Loosen the bolts (6) and remove the water chamber.
Water box installation
Note: Be sure to replace the water box gasket with a new one.
Attention:
- Do not scratch the connecting aluminum surfaces, any damage to the contact surfaces may cause leakage.
- The sealing surfaces must be clean, dry and free from grease to ensure the required tightness (avoid any fingerprints).
1. Use a cleaning agent to clean and degrease the contact surfaces of the cylinder head and water box if it is being reused.
2. Install the water box.
3. Fasten, without tightening, the water chamber mounting bolts.
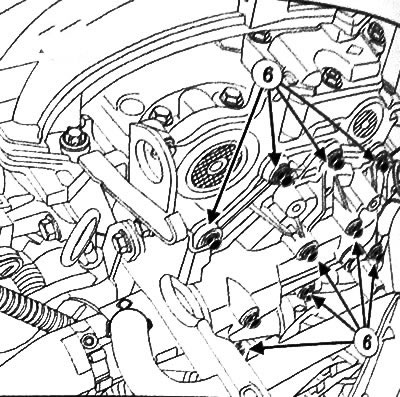
4. Tighten the water box bolts in the sequence shown in the figure with the specified tightening torques:
- coolant outlet bolts (starting torque): 4 Nm;
- water box bolts: 12 Nm
5. Connect the coolant temperature sensor.
6. Connect the expansion tank hose.
7. Connect the heater hose.
8. Connect the top waterbox hose.
9. Fill the engine cooling system.
10.Install the air resonator.
11. Connect the battery.
12. Start the engine and bleed the cooling system.
K9K engine
Removing the waterbox
1. Put the car on a two-foot lift.
2. Remove the intake duct.
3. Unscrew the fastening bolts and remove the engine protective tray.
4. Remove the front bumper from the car.
5. Drain the coolant from the engine cooling system.
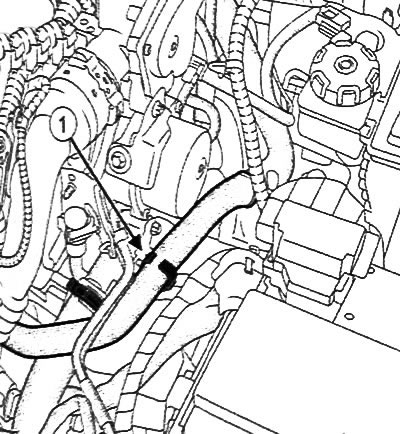
6. Unhook the pipe of the cooling system from the holder (1) and put aside.
7. Disconnect the coolant temperature sensor connector.
8. Disconnect the hoses from the water box.
9. Remove water box with gasket.
10. If necessary, remove the coolant temperature sensor from the water chamber.
Water box installation
Attention:
- Do not scratch the connecting aluminum surfaces, any damage to the contact surfaces may cause leakage.
- The sealing surfaces must be clean, dry and free from grease to ensure the required tightness (avoid any fingerprints).
Use a cleaning agent to clean and degrease the contact surfaces of the cylinder head and water box if it is being reused.
Installation is made in an order, the return to removal.
Fill and bleed the cooling system.