
Attention:
When working in the engine compartment, precautions must be taken to avoid injury, as the electric fan of the engine cooling system may turn on unexpectedly.
To avoid severe burns when the engine is hot, the following rules must be observed:
- do not open the cap of the expansion tank,
- do not drain fluid from the engine cooling system,
- do not open the vent caps.
Note: When working, you must be prepared for the leakage of liquid, so you need to prepare a drip tray to collect liquid and cover the surrounding components.
Removal and installation of the water pump of the D4F engine
Note:
- When replacing the water pump, it is necessary to thread the mounting holes of the new water pump to which the timing cover will be attached. The pump is supplied by the manufacturer with normal orifices.
- For threading in these holes, it is necessary to use self-tapping bolts for fastening the cover of the gas distribution mechanism. These bolts must be purchased with the water pump. Only new self-tapping bolts should be used for threading.
Loosen the mounting bolts and remove the water pump from the engine.
Installation is carried out in the reverse order.
Tightening torque for self-tapping bolts: 12 Nm.
Removal and installation of the water pump of the K7M and K4M engines
Removing the water pump
1. Place the vehicle on a two post lift.
2. Disconnect the battery.
3. Drain the coolant from the engine cooling system.
4. Remove the timing belt.
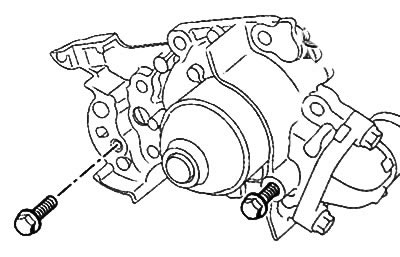
5. Loosen the bolts (1) and remove the water pump with gasket.

Water pump installation
Attention:
- The sealing surfaces must be clean, dry and free from grease to ensure the required tightness (avoid any fingerprints).
- Do not scratch the connecting aluminum surfaces, any damage to the contact surfaces may cause leakage.
1. With a cleaning agent, clean and degrease the contact surfaces of the cylinder block and water pump if it is reused.
2. Install the water pump with a new gasket.
3. Apply one to two drops of FRENETANCHE fixing compound to the bolts (1) And (4) water pump.
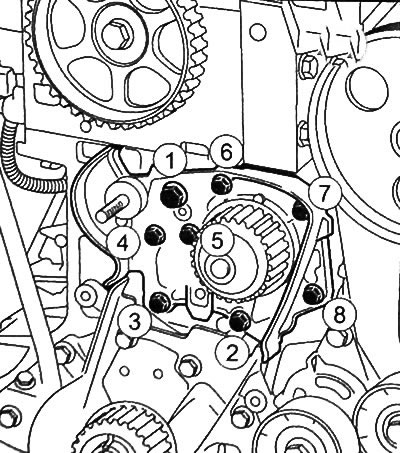
4. Tighten the water pump bolts in the specified sequence with the specified tightening torques:
- bolt M8 (1): 22 Nm;
- MB bolts (2-8): 11 Nm.
5. Further installation is carried out in the reverse order of removal.
6. Fill and bleed the engine cooling system.
Removal and installation of the water pump of the K9K engine
Removing the water pump
1. Place the vehicle on a two post lift.
2. Disconnect the battery.
3. Drain the liquid from the engine cooling system.
4. Remove the timing belt.
First type of installation
5. Unscrew the bottom bolt of the generator (D-

6. Unscrew the top bolt of the generator (2).
7. Tilt the generator towards the front of the car (3).
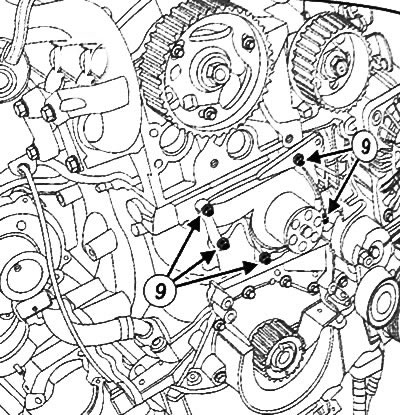
8. Loosen the bolts (4) and remove the inner timing cover.
The second type of installation
9. Loosen the lower alternator bolt (6).
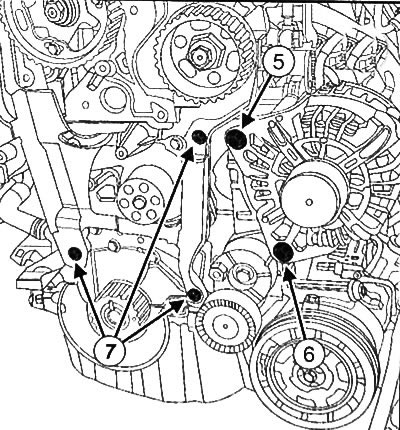
10. Unscrew the top bolt of the generator (5).
11. Slightly tilt the generator towards the front of the vehicle.
12. Loosen the bolts (7) and remove the inner timing cover.
First type of installation
13. Loosen the bolts (8) and remove the water pump with gasket.
The second type of installation
14. Loosen the bolts (9) and remove the water pump.
15. Bend the water pump gasket along the line (10).
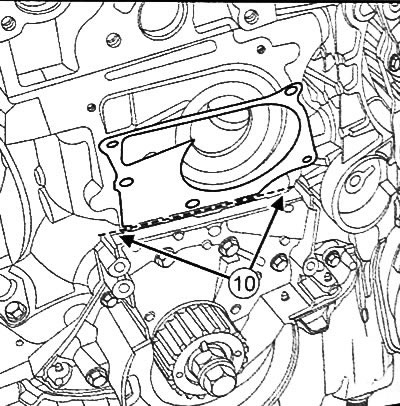
16. Cut the water pump gasket.
Water pump installation
Attention:
- When performing the operation, wear tight waterproof protective gloves (e.g. nitrile). Use goggles with side protection.
- The sealing surfaces must be clean, dry and free from grease to ensure the required tightness (avoid any fingerprints).
- Do not scratch the connecting aluminum surfaces, any damage to the contact surfaces may cause leakage.
1. Clean and degrease the contact surfaces of the cylinders and the water pump with a cleaning agent if it is reused.
First type of installation
2. Install a new water pump gasket.
3. Install the water pump.
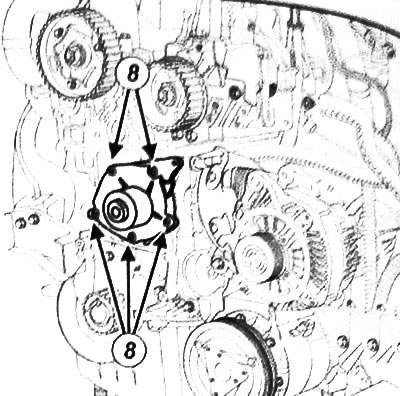
4. Screw on (2) And (5) water pump.
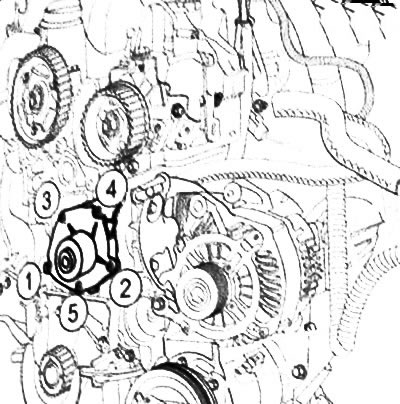
5. Apply to bolt (3) water pump one or two drops of FRENETANCHE.
6. Insert bolts (3), (1) And (4) to the water pump.
7. Tighten the water pump bolts in the sequence shown in the figure to a torque of 10 Nm.
The second type of installation
8. Install a new water pump gasket.
9. Install water pump.
10. Screw on (2) And (5) water pump.
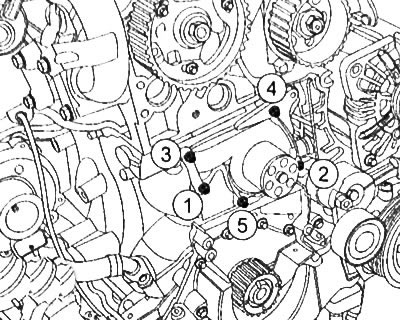
11. Apply to bolt (1) water pump one or two drops of FRENETANCHE.
12. Insert bolts (1), (3) And (4) to the water pump.
13. Tighten the water pump bolts in the sequence shown in the figure to a torque of 10 Nm.
Continuation for all types
14. Further installation is carried out in the reverse order of removal.
15. Fill and bleed the engine cooling system.