
English Русский
Български
Беларускі
Український
Српски
Hrvatski
Română
Polski
Slovenský
Magyar
Bookmark Contacts Articles Sitemap
Company vehicles Peugeot Company vehicles Opel Company vehicles Skoda Company vehicles Land Rover Company vehicles Mitsubishi Company vehicles Volkswagen Company vehicles Honda
RenaultBook.ru


Duster   Fluence   Kangoo   Laguna   Logan   Megane   Sandero   Scenic   Symbol   Clio   Other
Renault 19 (1988-1996) Espace I and II (1984-1996) Espace III (1996-2002)

Water pump — removal and installation (Renault Espace I)

  • Main
  • Renault
  • Espace I and II (1984-1996)
  • Power unit
  • Cooling system
  • Water pump — removal and installation
0
Contents: 4-cylinder engine 🠛 V6 engines 🠛
1. The water pump cannot be repaired. If the pump operates intermittently or leaks, replace the pump.

4-cylinder engine


2. All 4 cylinder engines have the same water pump, however on certain engines the plunger of the drive belt tensioner is installed in the pump housing. If you follow the instructions below when removing the pump, the tensioner may remain on the pump (see illustration). Never remove such a pump without loosening the tensioner. Before removing the pump, disconnect the negative cable from the battery and drain the coolant from the system.
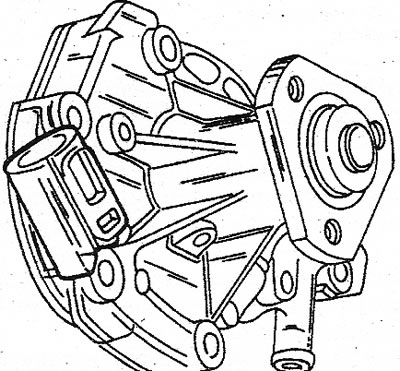
8.2 Water pump with installed tensioner for toothed drive belt

8.2 Water pump with installed tensioner for toothed drive belt


Original publication on the portal renaultbook

3. Remove the fan together with the motor. Remove the radiator as described in Chapter 3. Loosen the generator mounting bolts and remove the drive belt. In the same way (where is it installed) remove the power steering pump drive belt. Lock and remove the water pump pulley.

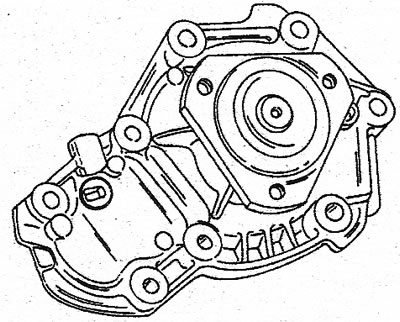
4. If the water pump shown in Illustration 8.2 is installed, place the clamp on the pump and tighten to hold the tensioner in the hole (see illustration). If there is no clamp, tie the parts together with a piece of wire. A pump without a tensioner is shown in Illustration 8.4b.
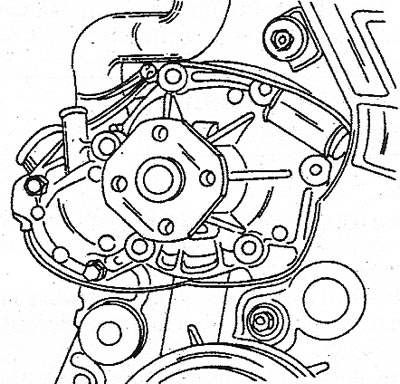


8.4a The clamp holds the tensioner on the water pump
8.4a The clamp holds the tensioner on the water pump


8.4b Water pump without tensioner

8.4b Water pump without tensioner


5. Disconnect the carburetor preheating hose and coolant supply hose from the pump and unscrew the water pump bolts. Remove the pump. If the pump is stuck in the cylinder head, tap it with a rubber mallet.

6. To check the pump, hold its body with one hand and turn the hub of the pump drive pulley with the other. This will make it easy to detect a damaged or seized bearing. In this case, replace the pump immediately.

7. If a pump with a tensioner is being replaced, transfer the tensioner parts to the new pump.

8. Install in reverse order. The sealing gasket between the pump and the cylinder head must be installed dry. Change the gasket each time. Never apply sealant to the bearing surfaces, otherwise it will be difficult to remove the pump.


9. When installing the pump with a tensioner, put the clamp on the pump again. After installing the pump, secure the coolant supply hose with two bolts.

10. Finally, adjust the belt tension and fill the cooling system.

V6 engines


11. The water pump cannot be repaired and must be replaced if damaged. The pump consists of a housing and a cover with an intermediate gasket. These parts can be separated if they need to be replaced.

12. Before removing the pump, disconnect the negative cable from the battery and drain the coolant from the cooling system. Disconnect the wiring from the terminal of the thermal switch.

13. Disassembly is complicated by the fact that it is necessary to remove the air filter, intake manifold, oil distribution pipe and drive belt.

14. Remove the clamps and disconnect the pump hoses.

15. Remove the water pump, thermal switch, thermostat housing cover bolts and remove the thermostat. Make dashed alignment marks on the outer edge of the thermostat and on the hole in the pump housing.

16. Disassemble the pump as shown (see illustration). Replace the sealing gasket between parts 1 and 2. Clean the surfaces from any remaining sealing material.
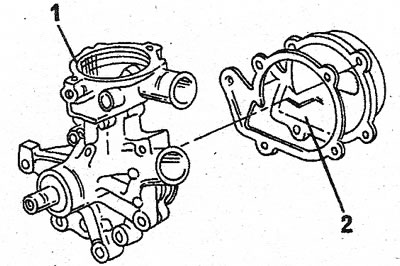
8.16 V6 Engine Water Pump Components Cover (2) and sealing gasket may separate from housing (1)

8.16 V6 Engine Water Pump Components Cover (2) and sealing gasket may separate from housing (1)


17. Install in reverse order. Install the sealing gasket without lubrication. Install the thermostat. Make sure that the O-rings are installed in the intake manifold.

18. Adjust the drive belt tension and fill with coolant.
This article is available on: russian, bulgarian, belarusian, ukrainian, serbian, croatian, romanian, polish, slovak, hungarian
Article has been reviewed by editor: Fedoseev Denis
Share with friends:
Previous
Espace I and II: Cooling system
Next

Thermal switch — checking serviceability
Fan Motor — Replacement
Fan — removal and installation
Radiator — checking the serviceability of the tank cap valve and the…
Radiator and fan — removal and installation
Drive Belts — Tension
Car thermostat
Other articles on other Renault models

➽ Water pump (K9K engine) Renault Duster 1 (2009-2017)
➽ Removal the water pump inlet pipe Renault Fluence 1 (2009-2020, petrol)
➽ Removal, cleaning and installation of the water pump (engines… Renault Laguna 2 (2001-2007)
➽ Replacing the water pump Renault Logan 1 (2004-2012, petrol)
➽ Removal and installation the water pump Renault Megane 1 (1995-2002)
Link to this article in different formats
Reviews and comments of visitors
No comments yet


Add two numbers 30 + 13


Renault 19 (1988-1996) 
  • General information
  • Maintenance
  • Power unit
  • Engine repair
  • Exhaust system
  • Cooling system
  • Supply system
  • Single-point injection
  • Multi-point injection
  • Diesel injection system
  • Transmission
  • Clutch
  • Car gearbox
  • Chassis, running gear
  • Car suspension
  • Steering
  • Brake system
  • Wheels and tires
  • Body and interior
  • Exterior (external elements)
  • Interior (internal elements)
  • Heating and ventilation
  • Electrical equipment
  • Equipment and devices
  • Headlights and lighting
  • Ignition system
  • Power devices
  • Electrical circuits
Espace I and II (1984-1996) 
  • General information
  • Introduction to the guide
  • Troubleshooting
  • Power unit
  • Engine repair
  • Cooling system
  • Carburetor fuel system
  • Injection fuel system
  • Diesel fuel system
  • Ignition system
  • Transmission
  • Clutch
  • Car gearbox
  • Drive shafts
  • Chassis, running gear
  • Brake system
  • Steering
  • Front suspension
  • Rear suspension
  • Body and interior
  • Exterior (external elements)
  • Interior (internal elements)
  • Doors, locks and windows
  • Electrical equipment
  • Equipment and devices
  • Electrical circuits
Espace III (1996-2002) 
  • General information
  • Introduction to the manual
  • User manual
  • Power unit
  • Petrol engines F3R
  • Petrol engines Z7X
  • Diesel engines G8T
  • Diesel engines G9T
  • Transmission
  • Clutch
  • Mechanical gearbox
  • Automatic gearbox
  • Drive shafts
  • Chassis, running gear
  • Steering
  • Front suspension
  • Rear suspension
  • Brake system
  • Body and interior
  • Exterior (external elements)
  • Interior (internal elements)
  • Doors, locks and windows
  • Heating and ventilation
  • Electrical equipment
  • Equipment and instruments
  • Power devices
  • Electrical circuits
RenaultBook.ru © 2018–2026 | Mobile version | News and articles | Sitemap: EN BG BY UA RS HR RO PL SK HU | Administration | Site search | Bookmark
Duster 1 (2009-2017) | Fluence 1 (2009-2020, petrol) | Kangoo 1 (1997-2007) | Laguna 2 (2001-2007) | Logan 1 (2004-2012, petrol) | Logan 2 (2012-2020) | Megane 1 (1995-2002) | Megan 2 (2002-2009, petrol) | Sandero 1 (2007-2012, petrol) | Scenic 1 (1996-2003) | Symbol 1 (1999-2008, petrol) | Symbol 2 (2008-2013, petrol) | Renault 19 (1988-1996) | Espace I and II (1984-1996) | Espace III (1996-2002) | Clio 1 (1990-1998) |
We want your visit to be comfortable 😌 and use cookies 🍪 to do so.