



2. Remove the cotter pin from the relief valve body, cover, spring and piston (see illustration).
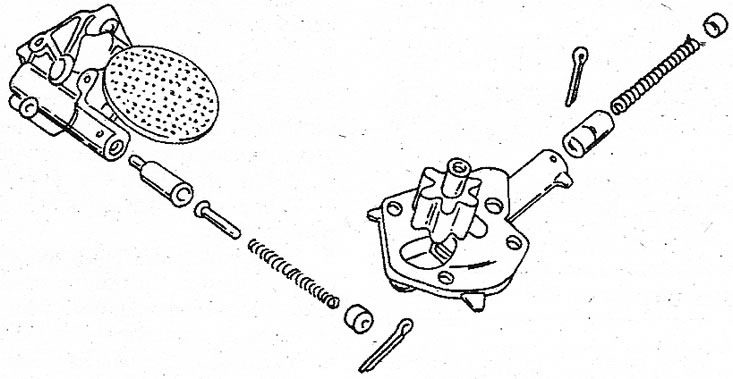
23.2 Oil pump. Left - for 4-cylinder engine, right - for V6 engine. When replacing oil pump rotors, indicate the engine number
3. Clean all parts thoroughly and inspect for wear or damage. Pump rotors should always be replaced in pairs. Measure the gaps between the rotors and the pump wall. To do this, install a feeler gauge at points "A" as marked (see illustration). The gap should not be more than 0.12 mm. Also measure the axial clearance of the rotors. To do this, place a steel ruler on the surface of the pump and measure the "B" sections with a feeler gauge, as shown. The maximum permissible value in this case is 0.10 mm.
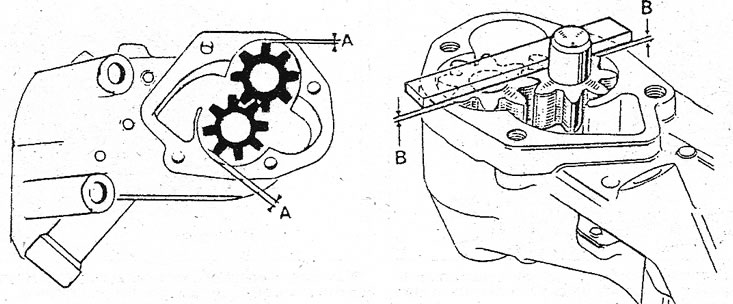
23.3 Measure the clearance between the outer side of the rotors and the pump housing at location "A". Check the axial clearance at location "B"
4. Assemble the pump in reverse order. Lubricate all internal parts thoroughly.
Assemble the relief valve using the drawing and install the safety pin.
5. Assembly and installation of the V6 engine oil pump requires a little more attention:
6. Insert the well-lubricated slave rotor into the pump bore and install the pump cover. Tighten the cover bolts evenly to avoid pinching the rotors.
Information is located on the website (RenaultBook.ru)
7. Remove the oil filter and use an oil can to squirt some engine oil into the holes as shown illustrations 3.173, for primary lubrication of the pump.
8. Put the chain on the crankshaft sprocket. Install the oil pump sprocket and tighten the bolts evenly, having previously lubricated them.
9. Install the camshaft drive cover together with the sealing gasket.
10. Place the pulley on the crankshaft (the pulley slot must fit onto the woodruff key) and tighten the nut to a torque of 180 Nm.
11. Tighten all drive belts.
12. Fill the engine with oil according to specifications.