
Parking brake adjuster
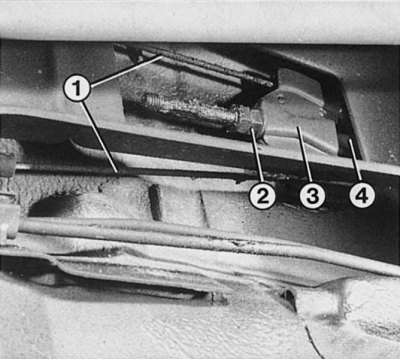
1 - parking brake tension cables going to the rear wheels; 2 - nut and locknut of the adjusting device; 3 - balancer of the parking brake cables; 4 - threaded rod of the parking brake lever.
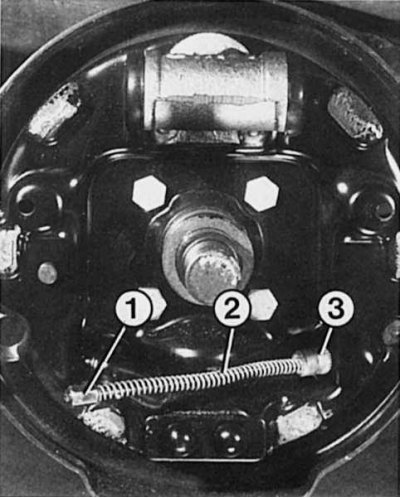
Left: After the brake cable (3) inserted into the drum brake shield, it is necessary to move the pressure spring (2) back to tether nipple (1) could be dressed on the rocker of the parking brake.
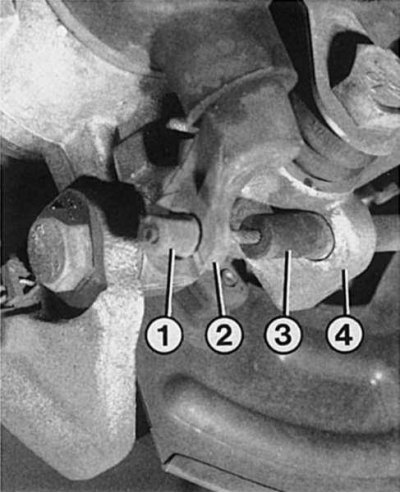
On right: To accurately adjust the parking brake after changing the cable, it is important that the cable (3) correctly positioned in the base (4). After adjusting the cable nipple (1) with the parking brake released, it must rest without tension, but also without play, against the parking brake lever (2).
 |  |
- The parking brake action should begin with the third click of the lever.
- When fixing the sixth click on the lever, however, no later than the eighth click, the rear wheels must be blocked.
- Longer lever travel means more wear on the rear brake pads or stretching of the parking brake cables.
- Often, the elements of the adjusting device after «winter salt» wedged; at the same time, the parking brake cables move heavily in damaged and contaminated shells. To avoid this, regularly lubricate the rubbing exposed elements of the parking brake.
- The parking brake adjustment is necessary after replacing the parking brake cable or brake pads, or when the cable is pulled out.
Parking brake cable replacement
1. First remove the heat shield.
2. Raise the rear of the vehicle and make sure it is stationary.
3. Release the parking brake.
4. Loosen the nut and locknut on the balancer just enough to release the cables.
5. Remove the brake drum and brake shoes to be able to unhook the cable from the rocker arm.
6. On disc brakes, pull the cable nipple against the spring force of the brake lever and coil spring from the nipple mount and remove it. Remove the cable from the various mounts on the underside of the vehicle and remove it.
7. When mounting, which is in the reverse order of the removal process, update the fasteners and clamps that have become unusable, otherwise sources of additional noise may appear.
8. Be sure to complete the basic installation.
Parking brake adjustment
Adjustment should only be carried out after replacing the parking brake cable or after working on the brake system. Before adjusting, check that the parking brake cable is correctly installed in the guides and adjusting devices in the rear wheel brake mechanism.
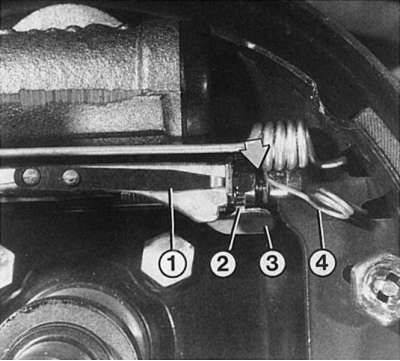
Before adjusting the parking brake, it is necessary to check the ease of movement of the toothed nut (2). Also make sure that the spacer spring (4) is not trapped between the spacer head and the toothed nut. After the toothed nut has been unscrewed by 5-6 teeth, the brake drum can be reinstalled. To check the adjusting device after adjusting the parking brake, press the brake pedal many times and rotate the ratchet-operated (3) toothed nut, you should hear clicks produced by the ratchet latch (1).
1. Release the parking brake.
2. Remove the heat shield at the point where the rod passes.
3. Check the correct location and ease of movement of the cable.
4. Vehicles with drum brakes: remove the brake drum.
5. Check the ease of movement of the toothed nut and loosen it by 5-6 teeth.
6. Check up, whether locking pins of a yoke of a parking brake adjoin to a brake block.
7. Loosen the lock nut and tighten the adjusting nut on the balancer until the parking brake rocker locking pin begins to lift off the brake shoe when the parking brake lever is pulled between the first and second clicks, and when the second click is reached, it will be noticeably raised.
8. In this position, secure the balancer mounting nut with the locknut.
9. Install the brake drums.
10. After lowering the vehicle, press the brake pedal several times with your foot to bring the brake pads to their original position. At the same time clicks in the adjusting device.
11. Vehicles with disc brakes: with the parking brake fully released on the wheel brake cylinders, check for ease of movement of the brake levers and press them back as far as they will go.
12. Adjust the position of the tension cables on the balancer so that the brake levers, when using the parking brake between the first and second clicks of the lever, begin to rise from the stop. This should be supervised by an assistant.
13. To check, alternately press the brake levers on the right and left against the stop. If the brake lever of the opposite wheel moves, then the brake cables are too tight.
14. In this case, loosen the brake cable adjusting nut until both levers rest against the stop.
15. Pull the parking brake lever and release it again.
16. Check up if necessary ease of the course of back wheels.
Note. Recommendation: If the free play of the parking brake increases again after a while, then do not adjust the parking brake system any more, but remove the brake drums and restore the mobility of the adjusting mechanism. If the parking brake levers in the wheel brake mechanisms are not attracted by the tension cable, then the cable may be pinched somewhere.