
Brake booster
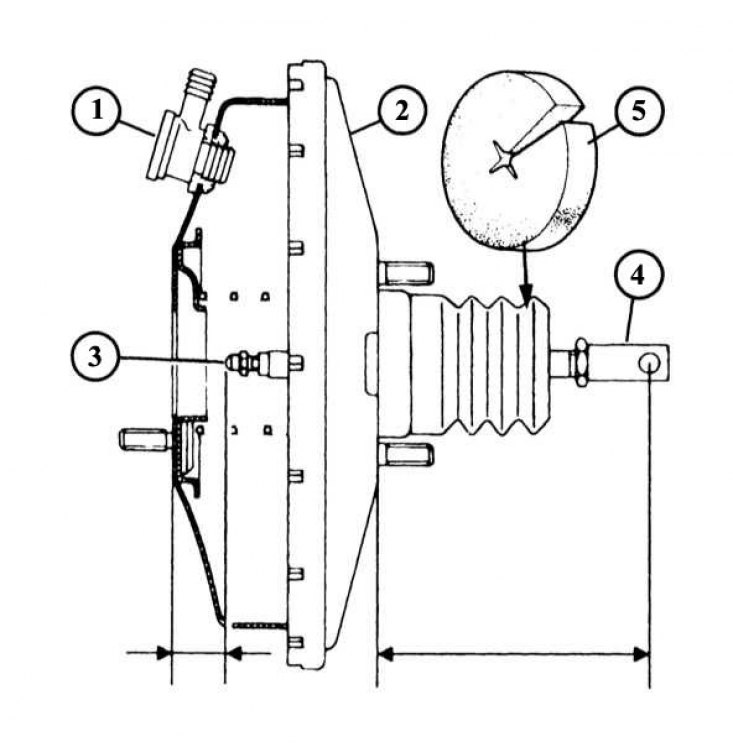
1 - check valve with rubber seal; 2 - housing of the brake booster membrane; 3 - a pusher with an adjusting device to the main brake cylinder; 4 - pusher with an adjusting device to the brake pedal.
Value «X» is 22.3 mm, the L value is 124.5 mm. The air filter is located under the rubber cuff (5) — it is replaced without removing the brake booster.
Front Brake Hose Retainer Assembly
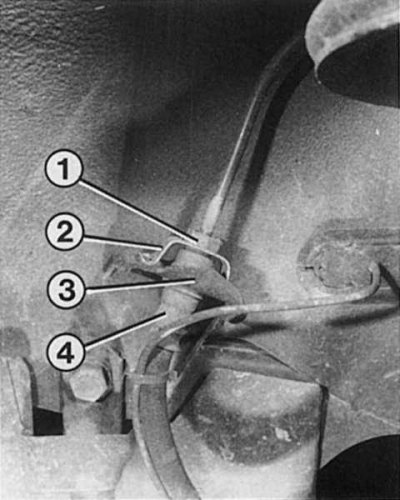
1 - union nut of the fixed pipeline of the brake drive; 2 - spring; 3 - brake hose holder; 4 - detail of fastening of a brake hose.
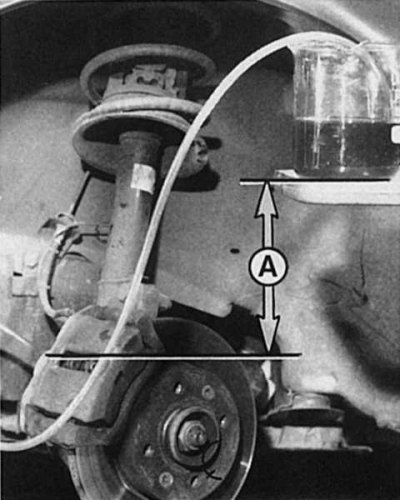
To bleed air from the brake system, remove the wheels and raise the vehicle. Shown here is how far above the bleeder (A=30 mm) there must be a container for receiving brake fluid. The bleeder hose must be lowered into the brake fluid. Don't forget to keep an eye on the reservoir in the engine bay!
With all the work described below, you will directly deal with the brake fluid. So a few safety tips:
- Brake fluid is highly toxic and must never be ingested or on open wounds.
- Brake fluid will corrode the paintwork. Therefore, do not place brake fluid-soaked cloths or tools on the vehicle.
- Wash off traces of brake fluid in the engine compartment after work, but only after all connections are completely tightened.
- To loosen and tighten brake lines, you must have a 10 x 11 brake line wrench (e.g. Hazet 05202). For brake hoses, a regular wrench will do.
- After completion of work in the hydraulic drive, it is necessary to remove air from the brake system. It is enough to remove air only from the circuit of the brake drive, where the work was carried out.
Removing brake lines
1. Loosen the union nut of the brake line. At the same time, hold the detachable element, for example, the brake hose, from turning.
2. If the nut is rusted, as a result of which the pipeline itself scrolls, then the pipeline must be replaced. Thin-walled tubes break quickly.
3. The following method can be used to loosen piping connections, especially if the corresponding piece of piping is to be replaced.
4. Saw off the brake line near the connection, unscrew the flare nut with a hex wrench.
5. If the new pipeline needs to be slightly bent, then this can only be done with a large radius. Otherwise, the thin tube may break.
6. Support the inside of the bent piping with your hands. In this way, you can gradually bend the pipeline along the entire bending radius.
7. Take care not to damage the outer coating of the pipeline.
8. Install the brake line into the holders.
9. Always use new O-rings when installing.
10. Bleed the brakes.
Removing the brake hose
1. Loosen the union nut of the relevant brake line. When doing this, be careful not to twist the pipeline.
2. If the brake hose is attached to the body with a metal holder, in which it is fixed with a metal clamp. When assembling, do not forget about this hose holder, as it fixes the hose.
3. When installing, screw in the end of the hose with the male thread first.
4. Then tighten other connections.
5. The brake hose must not be twisted. For control, a strip of paint along the hose is used.
6. Bleed the brakes.
7. After assembly, check if the hose rubs anywhere when turning the steering wheel or when the suspension is working.
8. Repeat this check after the test drive.
Removing wheel brake cylinders
1. Remove the brake drum and brake shoes.
2. Clamp the appropriate brake hose with a clamp or clamp.
3. Turn off the union of prorolling and the pipeline of a brake actuator on a back surface of a board of the brake mechanism and plug openings.
4. Turn off fixing bolts of the brake cylinder and remove it.
5. After assembly, bleed the brakes.
Removing the brake fluid reservoir
1. Disconnect the multi-pin connector of the brake fluid level control indicator.
2. Unscrew the cover.
3. Pump out the brake fluid with a clean pipette or syringe.
4. Having turned sideways, remove a tank from the main brake cylinder.
5. At installation establish new sealing rings in openings of the main brake cylinder, having wiped them with a brake liquid.
6. Bleed the brakes.
Note. Recommendation: when removing the reservoir cap, make sure that the brake fluid does not damage the electrical contacts.
Removing the brake master cylinder
1. Pump out a brake liquid from a tank.
2. Disconnect the pin block for the control indication of the brake fluid level.
3. Turn off all brake pipelines from the main brake cylinder. Before doing this, mark the location of each pipeline.
4. Plug the connection holes to prevent dirt from getting in.
5. Turn off nuts of fastening of pipelines to the amplifier of a brake drive and carefully remove the main brake cylinder.
6. If the amplifier pusher moved, then the correct values should be set.
7. When installing, be sure to seal between the brake master cylinder and brake booster and keep the bearing surfaces clean.
8. Bleed the brakes.
Removing the brake booster
1. Remove the main brake cylinder.
2. Disassemble the rod in the brake actuator of the brake pedal fork (spring clip and pin).
3. Turn off 4 nuts of fastening of the amplifier of brakes to a forward wall of a motor compartment.
4. After assembly, bleed the brakes. On a diesel engine, pay attention to the correct fastening of the low pressure hose.
Removing the low pressure hose
Diesel only
1. Remove the low pressure hose from the pump and plug the holes to keep out dirt.
2. Remove the nut and bolt from the pump flange.
3. Carefully remove the vacuum pump along with the gasket.
4. Before installation clean surfaces of contact of the vacuum pump and a head of the block of cylinders.
5. When installing a new pump, the drive fork must also be replaced.
6. If the pump was easily separated from the flange, then install a new sealing ring.
Removing air from the brake drive
After repair, air must be bled from the brake hydraulics. In the auto repair shop, a special device is used for this, but ordinary bleeding of the brakes is no less effective.
1. Before removing the air, equalize the pressure in the booster with atmospheric pressure by repeatedly pressing the brake pedal.
2. The bleeding sequence should be as follows: right rear - left front and left rear - right front.
3. Fill the reservoir on the master cylinder with fresh brake fluid. While bleeding the brakes, you should constantly add brake fluid to the reservoir, otherwise air may enter the system.
4. Remove the rubber cap from the bleeder plug.
5. Put on the transparent hose (e.g. from aquarium ventilation) on the fitting, place the free end of the hose in a vessel filled with brake fluid, which must be located at least 30 cm above the level of the bleeder fitting. Due to this, the brake bleeder is also under fluid pressure, and air cannot enter the brake system through it.
6. Loosen the bleed plugs half a turn.
7. Ask an assistant to slowly depress the brake pedal. This will release the brake fluid and trapped air. You will see air bubbles in the transparent hose and in the vessel.
8. Tighten the bleeder screw, while the assistant should keep the pedal depressed.
9. Let the assistant release the pedal, it will return to its previous position, and wait 3 seconds for the master cylinder to refill.
10. Repeat the process.
11. Wait for the master cylinder to fill and repeat the bleeding process until the air stops coming out. At the same time, you and the assistant must signal to each other when to press the pedal and when the bleed valve must be closed again.
12. The brake pedal must be kept pressed all the way down until the bleeder screw is completely tightened.
13. In the same way remove air from other brake mechanisms.
14. After the end of the pumping process, check the efficiency of the brake system.