
- Brake system. Visually check the tightness and condition of pipelines, hoses, brake cylinders and their connections.
- Check the wear and remaining thickness of the brake pads and the brake fluid level.
- Drum brakes. Remove the brake drums and inspect them. If there are grooves on their surface, replace or give it for boring.
- Brake fluid. Replace
- Tires. Check the remaining tread height of the tires, including the spare wheel, and tire pressure. Check tire wear and damage patterns.
- Tighten, if necessary, the wheel bolts with a torque of 90 Nm, working in a criss-cross pattern. Do not grease wheel bolts.
Brake lines - visual inspection
1. Place the vehicle on jack stands.
2. Clean the brake lines.
Attention! The pipelines of the brake system are made of metal and coated with a layer of polymer material to prevent corrosion. If the protective polymer layer is damaged, the pipeline may rust. Therefore, cleaning the brake lines with a wire brush and sandpaper is not allowed.
3. Check up, lighting a lantern, tightness of the pipelines of the brake mechanism going from the main brake cylinder to wheel brake mechanisms. The master brake cylinder is located in the engine compartment under the brake fluid expansion tank.
The pipelines of the brake system should not have kinks, dents or breaks. They should not have corrosion ulcers or worn places. Otherwise, the pipeline to the next joint should be replaced with a new one.
Brake hoses connect pipelines to the wheel brake cylinders and are routed near the moving parts of the vehicle. They are made of high pressure material, but over time they can become porous, swell, or be cut by sharp objects. In the presence of at least one of these defects, the hose must be replaced.
4. Locate damage by bending the brake hoses (see illustration). The hoses must not be twisted. Be guided by the colored lines on the hoses, if any!
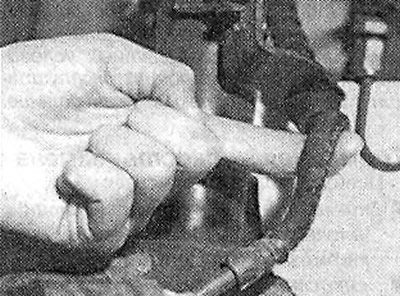
15.4 Locate damage by bending the brake hoses
5. Turn the steering wheel all the way to the left and then to the right. Brake hoses must not touch other parts of the vehicle in any position of the wheels.
Joints of pipelines and hoses must not be wet. The presence of moisture is evidence of a brake fluid leak.
Attention! If the expansion tank and its gaskets are wet, this does not necessarily indicate a defect in the brake master cylinder. Brake fluid is likely leaking through the vent in the reservoir cap or through the cap gasket.
6. Lower the car on wheels.
Brake fluid level and level warning light - check
The expansion tank with brake fluid is located in the engine compartment. The tank consists of two chambers, one chamber for each brake circuit. The expansion tank cap has a vent that must not be blocked.
The reservoir is made of transparent material, which makes it easy to determine the level of the brake fluid at any time. It is recommended to check the brake fluid level in the reservoir regularly.
The level of brake fluid in the expansion tank with the cap closed should not be above the MAXI mark, but should not fall below the MINI mark either (see illustration 15.0).
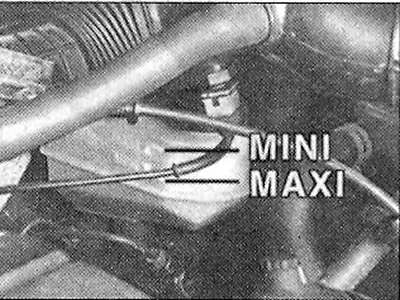
15.0 The level of brake fluid in the expansion tank with the cap closed should not be above the MAXI mark, but should not fall below the MINI mark either
7. Fill the system with only SAE J 1703, DOT 3 or DOT 4 brake fluid.
Due to wear of the disc brake pads, a slight decrease in the level of brake fluid in the expansion tank may occur. This is considered normal.
However, if the brake fluid level drops significantly for a short time, this indicates a brake fluid leak. In this case, you should immediately find the place of the leak. As a rule, the cause is the wear of the cuffs of the wheel brake cylinders. For safety reasons, in such cases, you should contact the workshop to check the entire brake system.
Brake fluid level warning light - check
8. Turn on the ignition and release the parking brake lever.
9. Press the contact on the cap of the expansion tank with your finger.
10. Have an assistant watch the brake warning light. She should be on fire. If not, check the wiring diagram for the power wires.
Residual thickness of brake pads - check
11. Mark the position of the front wheels on the hubs with paint. This will allow the assembly to set the balanced wheel in its original position.
12. Loosen the wheel bolts. In this case, the car must be on the ground.
13. Stand in front of the car on the goats and remove the wheels.
14. Visually check the thickness of the brake pads along with the metal backing plate (see arrows in illustration) through a hole in the caliper. If in doubt, remove the pads and measure their residual thickness with a caliper.
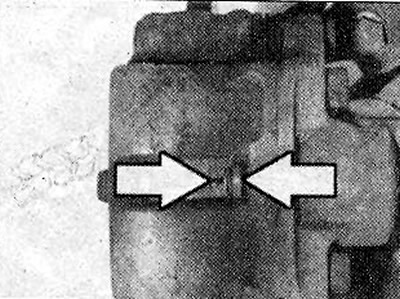
15.14 Visually check the thickness of the brake pads together with the metal backing plate (see arrows) through a hole in the caliper
15. Remove the rubber cap from the inspection hole to inspect the rear brake pads and shine a flashlight into the hole (see arrow in illustration). The wear limit of brake pad linings is considered reached if the thickness of the pad, excluding the metal base, is 0.6 mm. If in doubt, remove the pads and measure their residual thickness with a caliper.
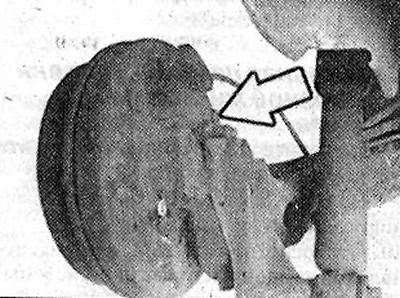
15.15 Remove the rubber cap from the inspection hole to inspect the rear brake pads and shine a flashlight into the hole
If the pads wear down to the minimum allowable thickness, they should be replaced. If only one brake pad is worn out, all four axles on both wheels are subject to replacement.
Attention! As a rule of thumb, 1 mm of brake pad corresponds to at least 1,000 km of run. This rule can be applied when operating the car in adverse conditions. Under normal operating conditions, brake pads last longer.
Brake fluid - replacement
Required tools:
- consignment key for unscrewing the fitting for bleeding the hydraulic drive of the brake mechanism;
- container for collecting brake fluid.
Necessary materials:
- brake fluid specification SAE J 1703, DOT 3 or DOT 4.
Brake fluid absorbs moisture from the air through the pores in the brake hoses. This confluence of time leads to a decrease in the boiling point of the brake fluid. With a heavy load on the brakes in such cases, vapor locks can form in the pipelines, which significantly impairs the functioning of the brake system.
Brake fluid should be changed every 3 years, preferably in the spring.
16. Observe the rules for handling brake fluid, see the relevant chapter.
17. Take the brake fluid from the expansion tank with a siphon, leaving a layer of liquid about 10 mm thick in it.
Attention! Do not take all the brake fluid out of the expansion tank and do not expose the bottom of the expansion tank. In this case, air will enter the system.
18. Fill the expansion tank with new brake fluid up to the maximum mark on the tank.
Brake fluid drain sequence (pumping system):
- 1. Brake caliper of the rear right wheel.
- 2. Front left wheel brake caliper.
- 3. Caliper of the brake mechanism of a back left wheel.
- 4. Front right wheel brake caliper.
Attention! This procedure for bleeding the brake system does not apply to vehicles equipped with ABS.
The procedure for bleeding the brake system for vehicles with TEVES ABS is as follows:
- 1. Front left wheel brake caliper.
- 2. Brake caliper of the rear right wheel.
- 3. Front right wheel brake caliper.
- 4. Caliper of the brake mechanism of a back left wheel.
When a BOSCH ABS vehicle is equipped, the brake system is bled in the following sequence:
- 1. Brake caliper of the rear right wheel;
- 2. Brake caliper of the rear left wheel;
- 3. Front left wheel brake caliper;
- 4. Front right wheel brake caliper.
19. Put a clean transparent hose on the fitting of the first brake cylinder, and lower the free end of the hose into a container.
20. Ask an assistant to squeeze the brake pedal several times until resistance appears. While holding the brake pedal in the depressed position, unscrew the brake bleeder of the right rear wheel with a spanner 1 (see illustration).
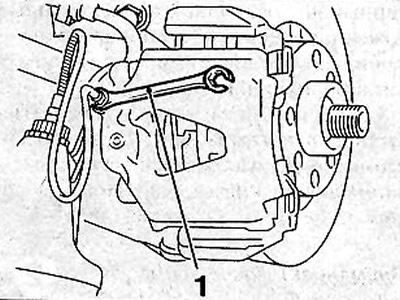
15.20 While holding the brake pedal in the depressed position, unscrew the brake bleed valve of the right rear wheel with a spanner 1
21. Wrap the fitting when the brake pedal reaches the front end position and rests on the floor. Release the pedal.
22. Repeat this procedure several times (about 10), until fresh brake fluid comes out of the hose. This liquid can be recognized by its lighter color.
In a similar way, remove the old brake fluid from the remaining calipers, strictly adhering to the specified procedure for bleeding the hydraulic drive.
Attention! The escaping brake fluid must be clear and without air bubbles.