
- Perform a visual leak check on the transmission.
- Manual Transmission. Check the oil level and top up if necessary.
- Drive shafts. Check the condition of the CV joints and make sure they are tight.
- Vehicles with automatic transmission / final drive. Check oil level or change oil.
Gearbox - visual leak test
Leaks are possible in the following places:
- A) at the junction between the cylinder block and the gearbox (flywheel seal/gearbox shaft seal);
- b) on the oil filler plug/on the drain plug;
- V) at the junction of the gearbox and the front wheel drive axle shafts.
To locate leaks, do the following:
1. Clean the gearbox housing with a cold cleaner.
2. Check the oil level and add oil if necessary.
3. Sprinkle lime or talc on suspected leaks.
4. Carry out a test drive. Since the fluidity of the oil increases when the engine heats up and it seeps faster in places where tightness is broken, the length of the test drive should be about 30 km.
5. Place the vehicle on jack stands after the test drive.
6. Inspect the gearbox by lighting it with a flashlight and locate leaks
Manual transmission - oil level check
Special tools are not required.
Required materials: gear oil specification API GL5 or MIL L2105 C or D. Gear oil must be recommended by RENAULT for use, for example, ELF TRX 75W 80W.
1. Place the vehicle on jack stands or on a level surface.
2. Remove, if available, engine and gearbox protection.
The 2 filler/level plug is located on the front side of the gearbox (see illustration 14.0).

14.0 Screw plug 2 for filler/inspection port
1 - drain plug
The illustration shows the power unit of a car with a 1.4-/1.6-liter engine. For other models, these plugs are in the same places.
3. Unscrew plug 1 of the filler / control hole and check the oil level with your finger (see illustration). Its level should reach the edges of the filler hole. Add oil if necessary.
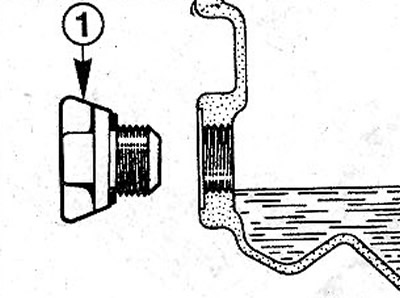
14.3 Remove filler/level plug 1 and check the oil level with your finger
Attention! Oil filling must be done from an oil can. Before refueling, place a container under the gearbox into which excess oil will drain. Add oil in small batches, waiting each time for oil to drain into the crankcase. This is necessary because the oil is quite viscous.
The filling volume of gear oil is about 3.40 liters. For cars with a 16-valve 2.0-liter engine, 3.10 liters.
4. Replace the power block guard, if necessary.
5. Lower the vehicle onto its wheels.
Automatic transmission - oil change
Required tools: wrench with triangular socket, eg FACOM B.Vi. 1213.
Attention! The temperature of the transmission oil is measured to avoid overfilling the transmission oil. In RENAULT workshops, a diagnostic tool is connected for this purpose (tester). For this reason, we recommend having the transmission oil changed by a workshop.
Required consumables: transmission oil ELF RENAULT MATIC D2 (D20104) or MOBIL ATP 220 D (D20104 or D21412) or TEXAMATIC 4011.
6. Place the vehicle horizontally on jack stands.
7. Remove, if available, engine and gearbox protection.
8. Unscrew plug B and completely drain the oil (see illustration). After draining, screw the plug back into place.
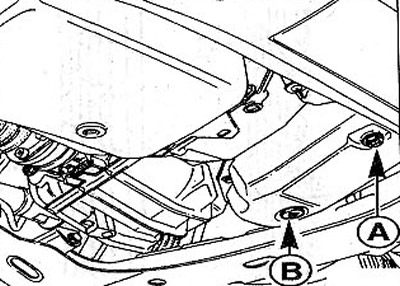
14.8 Unscrew plug B and completely drain the oil
Attention! Do not unscrew screw plug A during this operation (see illustration 14.8).
9. Remove the cap from the tube and insert a funnel with a fine mesh sieve into it. The presence of a sieve is mandatory so that contaminants do not get into the gearbox along with the oil (see illustration).
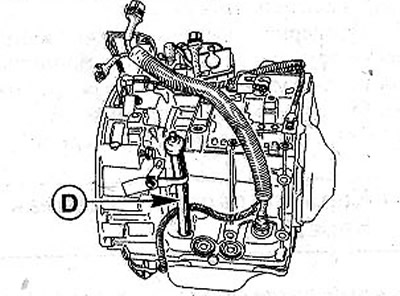
14.9 Remove the cap from tube D and insert a funnel with a fine mesh sieve into it. The illustration shows the AD4 gearbox
10. Fill the gearbox with approximately 3.5 liters of gear oil.
Attention! The refueling volume of the AD4 automatic transmission is approximately 5.7 liters, while the newer ORO model is approximately 6.0 liters. However, only 3.5 liters of oil need to be filled in. The rest of the gear oil is in the torque converter.
11. Start the engine. The automatic transmission control lever must be in position P, and the box must be cold (about 20°C).
12. Leave the engine to idle until the transmission oil is heated to +60°C. This temperature is measured in RENAULT workshops with a tester connected to the diagnostic socket on the fuse box.
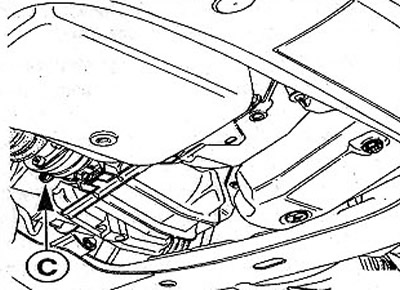
13. When the oil reaches the specified temperature, unscrew plug A without turning off the engine (see illustration 14.8).
Attention! This will start to leak oil, so substitute a suitable container to collect it. Allow excess oil to drain for approximately 20 seconds. The volume of leaked oil will be a little over 0.1 liters.
14. Screw plug A into place.
If the amount of leaked oil is less than 0.1 liters, then the amount of oil filled in the box is not correct. In this case, pour 1 liter of gear oil into the box and wait until the box has cooled down. Then completely repeat the procedure for checking the oil level.
15. Install, if necessary, the protection of the power unit.
Automatic transmission. Checking the oil level in the final drive
Automatic transmission AD4
Special tools are not required.
Required materials: gear oil specification API GL 5 or MIL L 2105 C or D. Gear oil must be recommended by RENAULT for use, for example, ELFTRX 75W 80W.
16. Place the vehicle on jack stands or on a level surface.
17. Remove, if available, engine and gearbox protection.
18. Unscrew the plug from the filler / control hole and check the oil level with your finger (see illustration). Its level should reach the edges of the filler hole. Add oil if necessary.
14.18 Remove the filler/level plug and check the oil level with your finger
Attention! Oil filling must be done from an oiler. Before refueling, place a container under the gearbox into which excess oil will drain. Add oil in small batches, waiting each time for oil to drain into the crankcase. This is necessary because the oil is quite viscous.
19. Install, if necessary, the protection of the power unit.
Cuffs (covers) CV joints of drive shafts - check
20. Install the car on the goats.
21. Check the condition of the rubber cuffs 1. Pay special attention to the presence of traces of grease on the covers themselves and adjacent parts (see illustration).
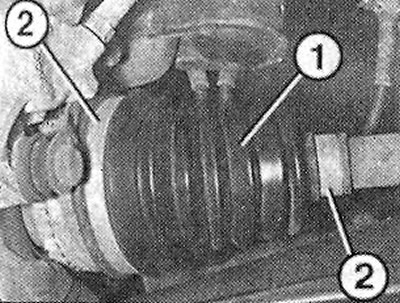
14.20 Check the condition of the cuff rubber
22. Check the fastening of the clamps of the 2 protective cuffs (see illustration 14.20).
23. Make sure, by lighting the cuffs with a lamp, that there is no porosity or cracks. If such defects are found, replace the cuff. If the cover is bent inward or torn, then also replace it immediately.