
- inspection pit or hydraulic gantry garage lift;
- special oil filter removal tool (pliers, wrench or tool HAZET 2172, and for a car with a diesel engine, a socket head of 27 mm);
- an 8 mm wrench for unscrewing the drain plug, as well as a container for collecting oil with a volume of at least 6 liters.
Necessary parts to replace worn out (if it will merge, and not be taken away by a siphon):
- a new sealing aluminum or copper ring for the drain plug;
- replaceable oil filter element;
- depending on the type of engine 3-6 liters of engine oil. Use only oil recommended by RENAULT.
The difference between the MAXI and MINI marks on the dipstick is approximately 1.5 liters of oil, and for cars with a 16-valve engine it is 0.6 liters. The oil level must be between both marks on the dipstick. For vehicles with an oil level indicator, the volume is signaled to the driver when the ignition is switched on for about 30 seconds on the coolant temperature gauge.
An oil change must be carried out every 15,000 kilometers, and for vehicles with a diesel engine, every 10,000 kilometers. If the car is used a little, then the oil should be changed once a year. In this case, it is necessary to change the replaceable filter element of the oil filter.
At increased operational loads, such as driving in the city, frequent starting of a cold engine, or even operating a car in dusty conditions, changing the oil and fuel filter should be carried out more often.
Engine oil can also be sampled with a probe through the dipstick guide tube (at a gas station). But in this case, new oil should usually be purchased at the same station.
Filling volumes of engine oil (with filter change):
- Vehicles with a 1.4 liter petrol engine (E7J) - 3.0 liters
- Vehicles with a 1.6 liter petrol engine (E7M) - 3.25 liters
- Vehicles with a 1.4/1.6 liter petrol engine (E4J/E4M) - 4.0 liters
- Vehicles with 2.0 liter petrol engine - 6.0 liter
- Vehicles with a 1.9 liter diesel engine (F8Q) - 5.0 liters
- Vehicles with a 1.9 liter diesel engine (F9Q) - 5.5 liters
Attention! Waste oil, as well as the oil filter and oil-soaked rags, must not be poured out or disposed of with household waste. The oil must be handed over at the disposal points.
Draining engine oil
1. Warm up the engine to operating temperature. To do this, drive a short distance until the coolant temperature gauge starts to show the operating temperature of the coolant. After that, drive for about another five kilometers to ensure that the engine oil is at the correct temperature.
2. Place the vehicle horizontally on jack stands.
3. Remove the engine mudguard.
4. Unscrew the oil filter 4 (see illustration). The oil filter, when viewed in the direction of travel, is located on the front side of the cylinder block.
To unscrew the oil filter, use a special tool 5, for example, HAZET 2169 (see illustration 7.4). You can pierce the filter from the side with a fairly sharp screwdriver. In this case, a container must be placed under the filter to collect the flowing oil.
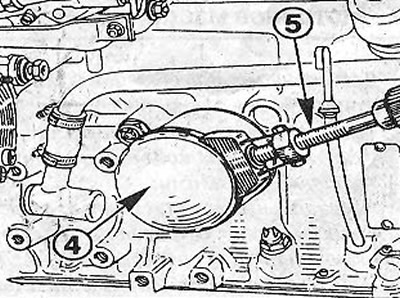
7.4 Unscrew the oil filter 4
On vehicles with a diesel engine, the oil filter is unscrewed using a socket head 27 mm behind the hexagon on the filter housing.
Attention! Depending on the model, the oil filter may differ from that shown in illustration 7.4.
5. Place a used oil container under the used engine oil drain hole.
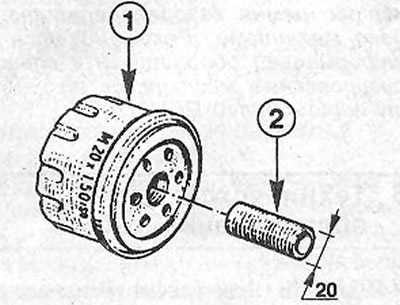
6. Turn out the screw plug 1 located at the bottom of the oil pan and drain the oil (see illustrations 7.6, 7.6a and 7.6b). To unscrew the plug from the drain hole, an 8 mm socket wrench is required. On vehicles with a 2.0 liter petrol engine and a 1.9 liter diesel engine, the plug must be removed from the engine mudguard before unscrewing the plug.
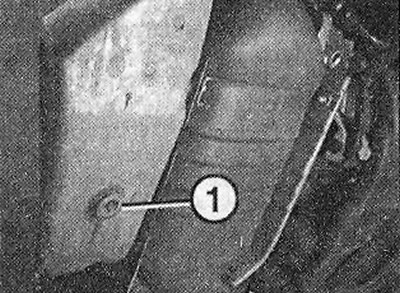
7.6 Oil drain plug. Vehicles with a 1.4-/1.6-liter petrol engine
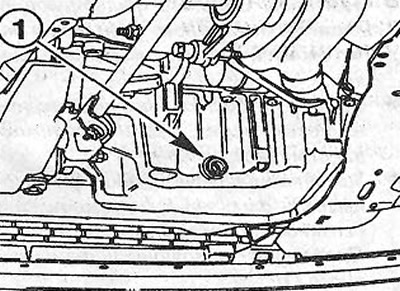
7.6a Oil drain plug. Cars with 16-valve engine | 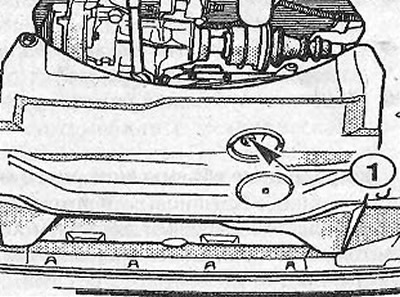
7.6b Threaded plug for draining oil. Vehicles with 2.0 liter petrol engine and 1.9 liter diesel engine |
Attention! If a large amount of metal chips and metal abrasion products are found in engine oil, then this indicates the presence of scoring, for example, in crankshaft bearings or connecting rod bearings. To avoid further damage, the oil passages must be thoroughly cleaned after the engine has been overhauled.
Refilling engine oil
7. Screw the screw plug with a new O-ring into the drain hole and tighten it to 30 Nm.
8. Lower the car on wheels.
9. Wipe on the block of cylinders the place of fastening of the oil filter. If the filter gasket remains on the block, remove it.
10. Make sure that the threaded socket 2 is screwed into the filter housing 1 as far as it will go (see illustration).
7.10 Make sure that the threaded socket 2 is screwed into the filter housing 1 as far as it will go
Attention! If the fitting is loose, clean its threads and apply a protective paste to them «LOCTITE FRENETANCH».
11. Lightly coat the rubber sealing ring of the new oil filter with engine oil
12. Install the new oil filter in place and screw it in by hand until the gasket fits. Once the gasket is in contact with the cylinder block, tighten the filter 1/2 turn. It is also recommended that you first read the instructions of the manufacturer of the oil filter being installed.
13. Fill in new engine oil through the oil filler neck in the cylinder head cover and check the level with a dipstick.
Attention! It is strongly recommended to first add 1/2 liter less oil and warm up the engine. After that, after a few minutes, you need to check the oil level and, if necessary, replenish the volume. Excess oil must be taken away, otherwise engine gaskets or catalyst may be damaged.
14. After a test drive, check the tightness of the drain plug and the oil filter gasket. Tighten them carefully if necessary.
15. Check the oil level approximately 2 minutes after stopping the engine using the dipstick and add oil if necessary.
For better control over engine performance, when changing oil, fill in engine oil of the same type as the used one, and, if possible, the same brand. To avoid mixing, it is advisable when changing the oil to write down its brand, type and viscosity on a special tag, which should then be fixed to the engine.
Attention! The indiscriminate use of oils of different types adversely affects the condition of the engine. If possible, do not mix engine oils of the same type, but different brands. If necessary, you can safely mix oil of the same brand and type, but of different viscosities.
Visual inspection for leaks and oil leaks
If the engine is contaminated with oil, or if oil consumption is high, determine where the oil is leaking. To do this, inspect the following places:
1. Open the oil filler cap and check its gasket for porosity and damage.
2. Check the fit of the crankcase ventilation hoses, especially in the section between the oil separator and the air filter.
3. Check the cylinder head cover gasket.
4. Check the cylinder head gasket.
5. Check the O-ring on the oil drain plug.
6. Check the oil filter gasket, which is located between the filter and the filter mounting flange.
7. Check the oil pan gasket.
8. Check the oil seals at the junction of the engine and gearbox (flywheel or gearbox shaft seal).
Since oil leaks usually spread over a large surface area of the engine, it can be difficult to determine the location of the leak at a glance. The following search method is recommended:
- Wash the engine. To do this, spray the engine with an aerosol cleaner and, after allowing it to act, rinse with water. Before this, cover the high voltage wires, the generator, and, if necessary, the ignition distributor with a plastic bag.
- Sprinkle outside the connecting joints on the engine and their gaskets with lime or talc.
- Check the oil level and add oil if necessary.
- Take a test drive. Since the oil liquefies when the engine is hot and therefore leaks out more quickly at leaks, this trip is best done on a high-speed road, covering a distance of about 30 km.
- Inspect the engine when finished. test drive, illuminating the places to be inspected with a lantern, and determine the places of oil leakage. Eliminate the identified faults.
Engine oil level - check
After! The oil level should be checked every 1,000 kilometers and topped up if necessary. For 1,000 yushometers of run, no more than 1 liter of oil is allowed. Exceeding this volume indicates wear of the oil seals and / or piston rings.
16. Warm up the engine and put the car on a horizontal surface.
17. Stop the engine and wait about three minutes to allow the oil to drain into the sump.
18. Pull out the oil dipstick (probe) and wipe it dry with a clean cloth.
19. Insert the dipstick all the way into place, and then pull it out again and check the oil level.
The engine oil level is normal if it is between both marks on the dipstick. If the oil level is near the lower mark, then the oil must be topped up.
The difference between the MAXI and MINI marks on the dipstick is approximately 1.5 liters of oil, and for cars with a 16-valve engine it is 0.6 liters.
The oil is filled through the oil filler neck in the cylinder head cover. Use only the prescribed oil and do not use additives.
Attention! If the oil level is above the c mark, then the excess oil must be removed, because this can damage the engine or catalytic seals.