
- appropriate fuel filter.
- diesel engine. Handles Mot. 1311-06 for unscrewing fuel line clamps.
- Gas engine. Special pliers Mot. 1265 for unscrewing the fuel lines from the fuel filter.
Diesel engine fuel filter - condensate removal and replacement
A suitable container is required to collect condensate.
Attention! Immediately collect any diesel fuel spilled on rubber parts such as coolant circulation hoses. Wipe the surface of these parts. Otherwise, their rubber will swell and break down over time.
Fuel filter 1 is located in the engine compartment near the right fender. The filter has an electric heater 2, which prevents thickening of diesel fuel in winter. There is a lever to remove air from the system (pear) manual paging 3 (see illustration 11.0).
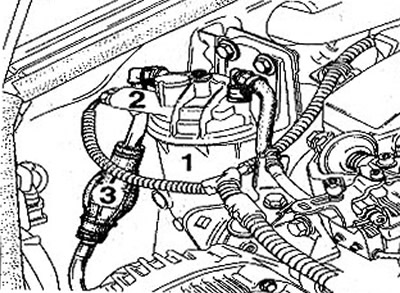
11.0 Diesel fuel filter
Condensate removal
1. Place a suitable container under drain hole 2 (see illustration).
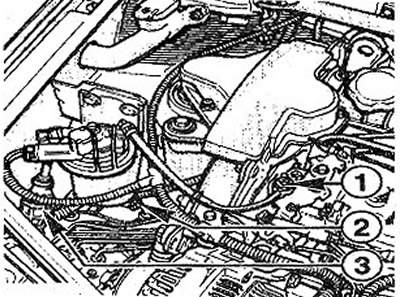
11.1 Place a suitable container under drain hole 2
2. Loosen drain plug 2 (see illustration 11.1).
3. Do approximately 10 bag pumps 3 hand pumps (see illustration 11.1). This will cause fuel to flow out of the filter. Empty the fuel filter completely.
4. Tighten drain plug 2 (see illustration 11.1).
5. Remove air from the fuel system.
Air removal
6. Loosen the bleed screw 1 on the filter supply hose (see illustration 11.1).
7. Perform pumping with a pear 3 manual pumping of fuel until the fuel comes out of the nozzle without air bubbles. Collect escaping fuel in a container.
8. Tighten bleed screw 1 and continue to bleed the system until you feel resistance (see illustration 11.1).
9. Fully depress the accelerator pedal and run the starter for about 15 seconds without preheating.
If the engine does not start, wait a few seconds and then start it after preheating.
10. Visually check the fuel system for leaks, especially at the hose connections.
Fuel filter replacement
11. Drain the condensate from the fuel filter.
12. Disconnect fuel lines from the fuel filter. To do this, squeeze the hose clamp from the sides so that the drivers A and B are raised (see illustration). If the clamp has a tool for removing hoses RENAULT Mot. 1311-06, then insert it from the side into the clamp and push.
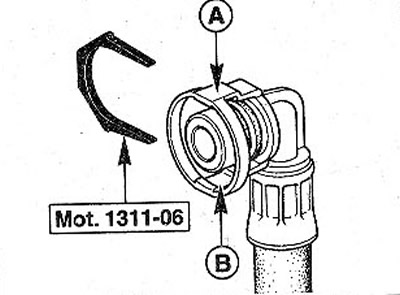
11.12 To do this, squeeze the hose clamp from the sides so that the drivers A and B are raised
13. Disconnect the fuel heater power wire at the filter.
14. Unscrew the filter holder and fix it in a vise, and then unscrew the fuel filter.
15. Fill the new filter completely with diesel fuel and screw it into the holder. Moisten the filter seal with fuel before doing this.
16. Install the holder together with the fuel filter in place.
17. Connect the fuel heater power wire.
18. Connect the fuel hoses and make sure they are fixed.
19. Remove air from the fuel system.
20. Carry out a test drive and check the fuel system for leaks.
Cars with a gasoline engine
The fuel filter of these cars is located on the bottom of the car in front of the fuel tank. The fuel filter is fixed with a clamp (see illustration 11.0a). To replace the filter, you will need jack stands.
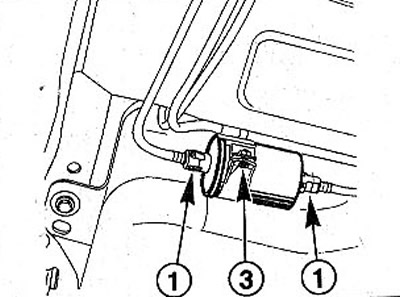
11.0a Fuel filter for a car with a gasoline engine
Attention! Pinching the supply and return hoses to avoid fuel leakage is not allowed.
Removing
Attention! When changing the fuel filter, do not smoke or keep open flames nearby. Fire hazard! Ensure that the room is well ventilated. Fuel vapors are poisonous. Prepare a fire extinguisher.
21. Disconnect the wire terminal from the battery «masses» (-).
Attention! This removes the recorded information from some devices, and the security code from the radio, as well as all automatic settings on the radio. Therefore, before disconnecting the battery, read the chapter «Battery - removal and installation».
22. Raise the rear of the car and place on the goats.
23. Place a suitable container under the fuel filter to collect fuel.
Attention! Pinching the supply and return hoses to avoid fuel leakage is not allowed. Otherwise, they will be damaged. Therefore, fuel leakage is possible.
24. Disconnect fuel lines 1 using special pliers Mot. 1265 (see illustration). To do this, the pliers are installed on the coupling and the fuel line is pressed.
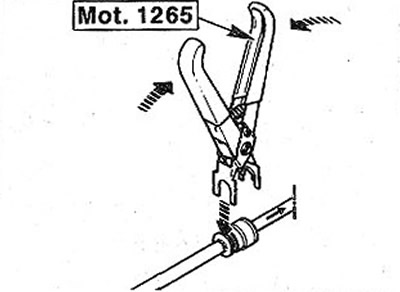
11.24 Disconnect the fuel lines 1 using special pliers Mot. 1265
Attention! The fuel line can be released from the coupling without the use of special pliers.
25. Unscrew the bolt 3 fastening the filter clamp and remove the filter (see illustration 11.0a).
Attention! The fuel filter is filled with fuel even after disconnecting the fuel lines.
Installation
26. Install the fuel filter so that the arrows on its body point away from the fuel tank towards the engine.
27. Fix the filter in a collar and tighten a bolt of fastening.
28. Connect the fuel lines to the filter by hand. Make sure they stick.
29. Lower the car on wheels.
30. Connect wire terminal «masses» (-) to the negative pole of the battery.
31. Set the clock and program the radio to receive radio stations.
32. Perform a test drive, and after it check the tightness of the fuel hose connection.