
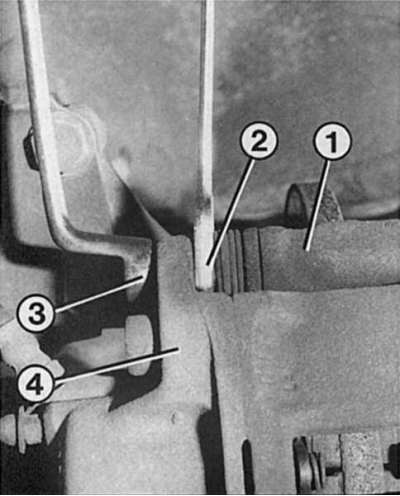
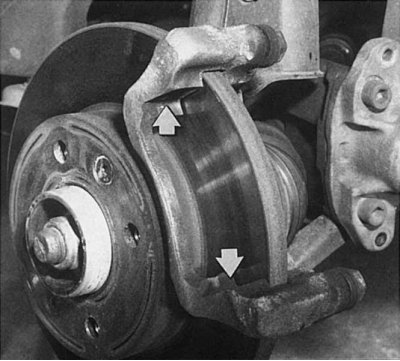
Left: for loosening the locking bolt (3) hold the guide bolt with a wrench (2). Then the disc wheel brake caliper (4) can be removed from the brake shoe holder (1).
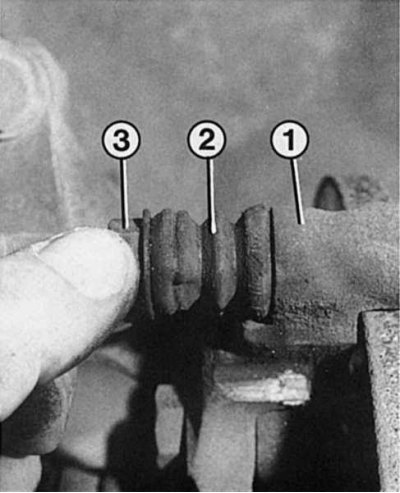
Right: damaged or carelessly installed dust seal (2) quickly leads to sticking of the guide bolt (3) due to the ingress of dirty water and salt. As a result, the brake caliper cannot move freely along the guide bolt, which leads to premature brake wear. Therefore, before installing the guide bolt into the brake pad holder, (1) bolt needs to be lubricated.

After removing the guide bolt stopper (1) brake caliper (3), remove the caliper (2) with a hose attached, which will allow you to easily remove the brake pads. If only the lower stop bolt is removed, the brake caliper can be lifted up, making it easy to replace either pad.
Brake pad (together with its bearing part) should not be thinner than 6 mm, if the thickness is less than 6 mm, all 4 brake pads must be replaced. At the same time, make sure that the brake discs do not have damage or deep scratches.
Based on our experience, it is best to move the brake cylinder piston into the housing using a clamp and an old brake pad or plank inserted between them.
Before installing the brake pads, clean their sockets (shown by arrows) and apply some copper grease. At the same time, make sure that the lubricant does not get on the working surfaces of the brake discs and pads.
Use a clean pipette or syringe to remove excess brake fluid.
1. Raise the machine at the front and secure.
2. Remove wheels.
3. Turn the steering wheel to provide good access to the blocks.
4. Disconnect the brake pad wear sensor from the inner brake pad.
5. Bendix braking system (one-piece brake discs): Use a thin screwdriver to pry the retaining clip out of the wedge at the top of the brake mechanism.
6. Use a screwdriver to push out the brake caliper wedge. At the same time, lightly press the brake caliper inward against the tension spring.
7. Pull the brake caliper outward to push the brake piston into the hydraulic brake cylinder to release the brake pads.
8. Pull the outer and inner brake pads out of their sockets.
9. If necessary, remove both tie-down straps. At the same time, remember the sequence of work.
Brake System (solid and ventilated brake discs): Loosen the locking screws of the brake caliper. To do this, hold the guide bolt with a wrench so that it does not rotate between the brake shoe holder and the disc wheel brake caliper.
Elements of the brake system Girling (upstairs) and Bendix (at the bottom)
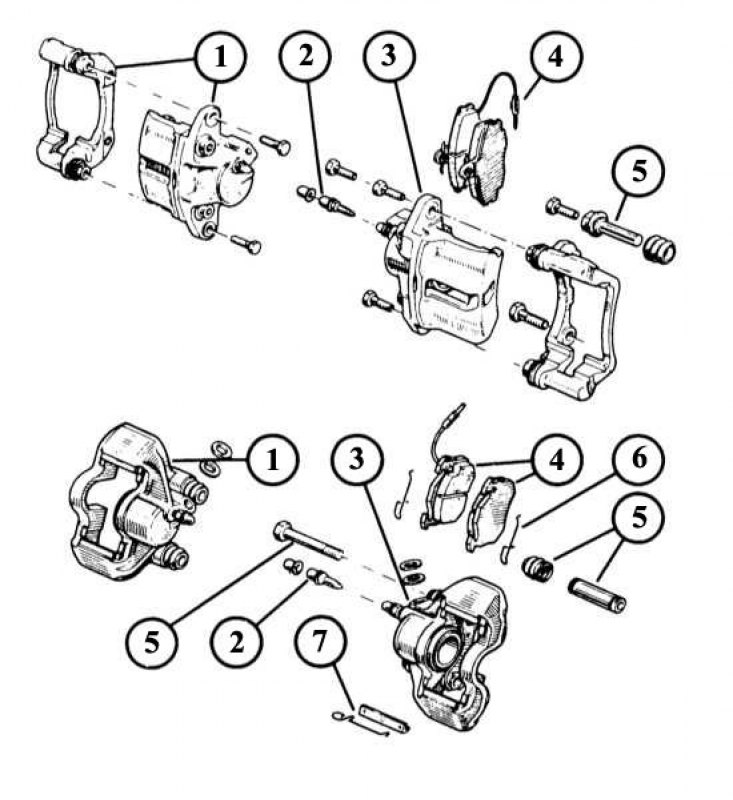
1 - the right side of the caliper; 2 - gasket fitting with dust cap; 3 - the left side of the caliper; 4 - external and internal (with wear indicator) brake pads; 5 - caliper guide bolts with a locking screw; 6 - spring; 7 - wedge with spring stopper.
1. Remove the brake caliper.
2. Pay attention to the fact that the brake hose is not stretched and twisted. Hang the brake caliper with a wire in the wheel arch.
3. Remove the brake pads from their sockets. At the same time, mark the direction of installation of the springs.
4. Both types of brake systems: Press the pistons into the caliper using a clamp. To prevent damage to the piston or seal between the brake cylinder piston and the clamp, place an old brake shoe or hard board.
5. Clean the dirt from the brake pad sockets with alcohol (never with petrol) and a rag.
6. Remove burnt residues with a screwdriver. When doing this, do not damage the dustproof cuff of the piston of the brake cylinder.
7. Check up integrity of a dustproof cuff and a sealing ring.
8. Check that the bellows on both guide bolts are intact.
9. Before installation, make sure that the brake disc is free of grease, dirt and scratches.
10. Bendix brake system: install the springs on the brake pads.
11. Install the brake pads in the caliper sockets. At the same time, install the block from the wire of the wear sensor from the inside.
12. Press the caliper against the wheel hub.
13. Insert the wedge and secure it with the safety clip.
14. Girling Brake System: Insert the brake pads into the sockets. At the same time, make sure that the shoe with the friction lining wear sensor was installed on the inside and that the springs on both shoes are installed correctly.
15. Put on a support of the disk wheel brake mechanism.
16. Install the locking bolt using an anti-twist tool (e.g. Loctite «Frenbloc»). Install a new one if the locking bolt is very worn!
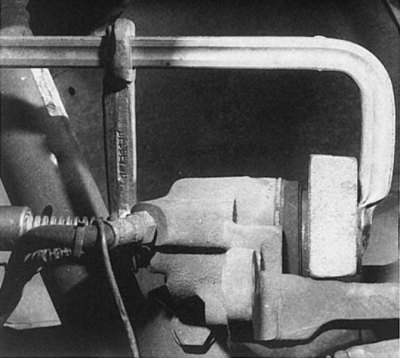
17. Tighten the lock screw to 35 N.m.
18. Press the caliper against the wheel hub, treat the upper screw with a liquid agent against spontaneous unscrewing and tighten with a torque of 35 N.m.
19. Install wheels and lower machine.
20. Press a foot on a brake pedal some times against the stop. Now the pads are pressed against the brake disc, and the car is ready for operation.
Note. Recommendation: With new brake pads, you should brake as carefully as possible for the first 500 km. Strong braking immediately after installing new brake pads leads to burning of the friction linings, resulting in a change in their structure. After that, it will not be possible to achieve a normal braking effect, as the friction linings harden - «glassy», as the experts say.
Elimination of sticking of the brake caliper and pistons of brake cylinders
Dirt on the sliding surfaces of the caliper and brake shoe holder can cause the caliper to sour and run hard. A damaged piston seal causes the piston to lock in the brake caliper. These reasons lead to uneven braking.
1. Check that the pads move easily along their guides, otherwise: clean the guides with a screwdriver. When doing this, be careful not to damage the piston seals.
2. Remove the brake pads.
3. Check the mobility of the brake caliper and guide bolt. Clean the guides with a screwdriver.
4. In order for the guides to continue to move, lubricate the friction surfaces and the wedge with a small amount of copper grease.
5. Check if the piston moves easily.
6. To prevent the piston of the brake cylinder from extending too far in the brake caliper, a clamp with an inserted plank or an old brake shoe can be used as a limiter.
7. Ask the assistant to carefully press the brake pedal. Is the piston moving?
8. If the piston does not move, depress the brake pedal until the piston begins to move.
9. Return the piston with a clamp to its original position.
10. Repeat this process until the piston moves easily.
11. Lubricate the piston sides with ATE brake paste.
Removing the brake caliper
Brake system
1. Remove the wheel.
2. Remove the brake pads.
3. Loosen the caliper mounting bolts and remove it from the brake cylinder piston housing.
4. At installation of a support of the disk brake mechanism tighten both bolts of fastening the moment of 100 Н.м.
Removing brake pad holders
brake shoe holder (braking system) and, accordingly, the entire caliper with a hydraulic wheel brake cylinder (braking system) secured with 2 bolts to the shock absorber mount knuckle.
1. Remove the wheel.
2. Bendix brake system: remove the brake pads.
3. Unscrew both bolts of fastening of a steering rotary support on the inside of the brake mechanism.
4. If necessary, unscrew the hose on the brake cylinder.
5. Remove a support in gathering with the brake cylinder.
6. To replace the brake cylinder, the brake caliper must be removed.
7. When installing the caliper on the wheel brake cylinder, tighten both bolts to a torque of 100 N.m.
8. Girling Brake System: Remove the wheel brake caliper and brake pads.
9. Tie up the caliper with the brake hose not removed to the suspension strut with a wire so that the hose is not stretched or twisted.
10. Turn off fixing bolts of the holder of a brake shoe from a steering rotary support.
11. If the brake hose needs to be removed, then tie up the hose so that the hole is as high as possible, and plug it to prevent leakage of brake fluid.
12. When installing the brake shoe holder, insert both locking bolts into the swivel bearing and tighten to 35 Nm.
13. Clamp the brake hose with a small clamp or clamp. Do not damage the brake hose while doing this.
14. Turn off a brake hose from a support.
15. Plug the brake hose with a plug to prevent leakage of brake fluid.
16. Pay attention to the fact that both supporting surfaces (dense cone) brake hose
17. and the mounting holes of the brake cylinder were not damaged or dirty, since the brake hose is installed without an O-ring.
18. When installing, tighten the freely hanging and not twisted brake hose with a torque of 13 Nm.
19. Turning wheels to the right and to the left, check up, whether the brake hose rubs against something.
20. Bleed the brakes.
21. If the brake hose cannot be removed, then press the brake pedal several times so that the brake pads are correctly installed relative to the brake disc.
Replacing a damaged piston seal
A damaged piston seal must be replaced so that the brake piston does not lose mobility due to dirt ingress.
1. Remove the caliper as described when replacing the pads.
2. Have an assistant gently press the brake pedal with your foot so that the piston slowly comes out of the brake cylinder. Insert a suitable plank between the piston and the piston housing so that the piston does not come out completely from the cylinder and its surface is not damaged.
3. Remove the dust seal and, if necessary, also the piston seal with a hook or a small screwdriver from the piston ring groove.
4. To avoid loss of brake fluid, unscrew and plug the caliper brake hose.
5. Clean the pistons and the inside of the cylinder with alcohol, alcohol or clean brake fluid and check for scratches on the piston surface and inside the cylinder.
6. Fit a new dust seal and piston o-ring into the groove and slide onto the piston.
7. Insert the pistons into the cylinder and push them in as far as they will go.
8. Put the dust collar on the cylinder body and crimp it evenly in a circle.
9. After completing the work, bleed the brakes, check the brake fluid level and make sure that the brake system is tight.
Removing brake discs
Brake discs should always be replaced on both wheels. One-sided replacement of discs is not allowed.
1. Remove the brake caliper (braking system) and brake shoe holder with brake caliper (braking system) and hang it on the shock absorber strut so that the brake hose is not twisted.
2. Loosen both Phillips brake disc lock screws. This is easier and more convenient to do with an impact screwdriver.
3. If this fails, then use a toothed puller.
4. Mark the position of the brake disc relative to the wheel hub for reassembly.
5. Remove the brake disc from the wheel hub by hitting it with a rubber mallet.
6. Before installing a new brake disc, thoroughly clean the bearing surface of the wheel hub.