
Automatic brake adjustment mechanism
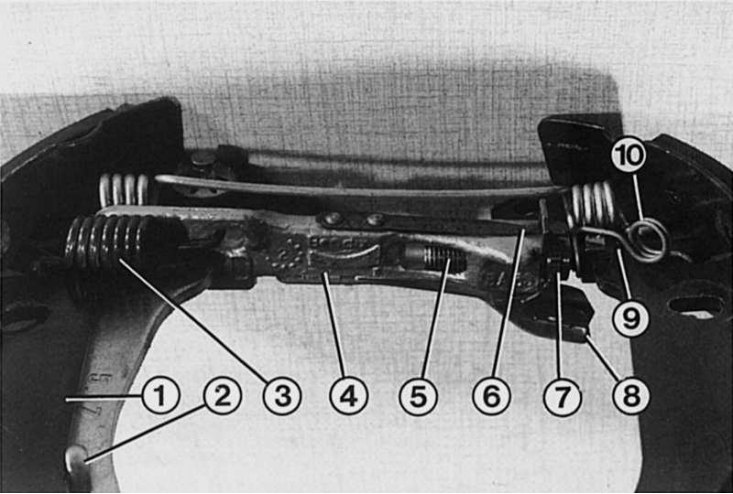
1 - passive brake shoe; 2 - lever for manual drive of pads with limiter; 3 - coupling spring of the parking brake strut; 4 - strut of the regulating device of the brake mechanism; 5 - pusher thread; 6 - locking spring of the toothed adjusting nut; 7 - toothed adjusting nut; 8 - ratchet lever; 9 - pusher; 10 - clamping spring.
The figure shows the elements of the left brake drum
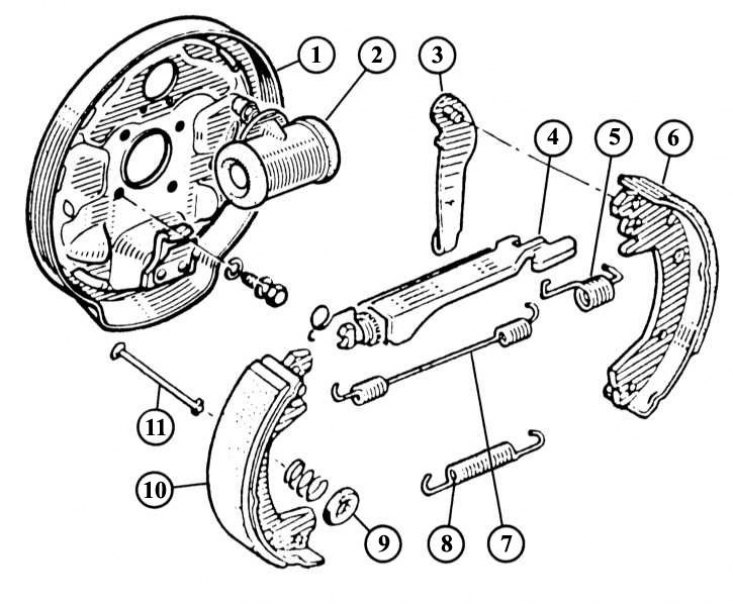
1 - shield of the brake mechanism; 2 - wheel brake cylinder; 3 - parking brake rocker; 4 - strut for adjusting the brake mechanism; 5 - strut coupling spring; 6 - passive brake shoe; 7 - upper coupling spring; 8 - lower coupling spring; 9 - lock washer for pressing brake pads; 10 - active brake shoe; 11 - locking pin for pressing the brake pads.
If, when removing the brake pads, the parking brake rocker (5) has been separated from the passive shoe, a new lock washer must be used for reassembly. When installing the brake shoes, tilt the parking brake rocker to the center of the hub and put the parking brake cable on it.
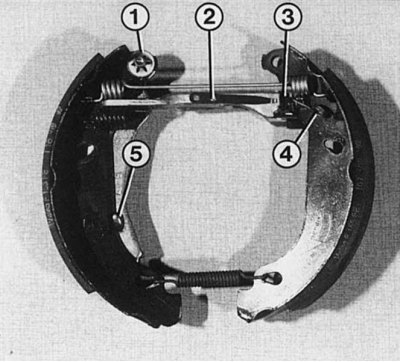
With the brake pads correctly installed on the shield, the toothed nut (3) spacers (2) must be installed so that the axis of inclination of the brake shoes is inside the diameter of the brake drum. Before installing the brake drum, check that the pressure is moving freely
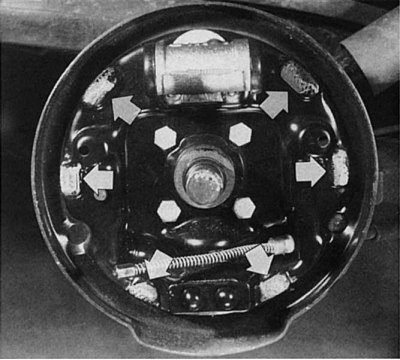
Before installing new brake pads, the brake shield must be cleaned. In addition, it is necessary to lubricate the 6 contact points of the brake pads (shown by arrows) copper paste.
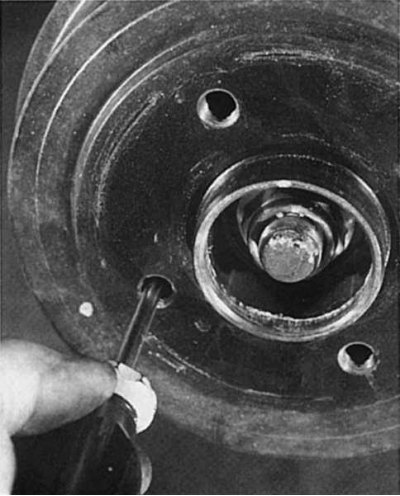
Left: In this position of the brake drum, the parking brake rocker stop of the passive brake shoe can be disengaged. To do this, press a screwdriver placed in the wheel bolt hole on the parking brake rocker towards the center in the direction of the vehicle.
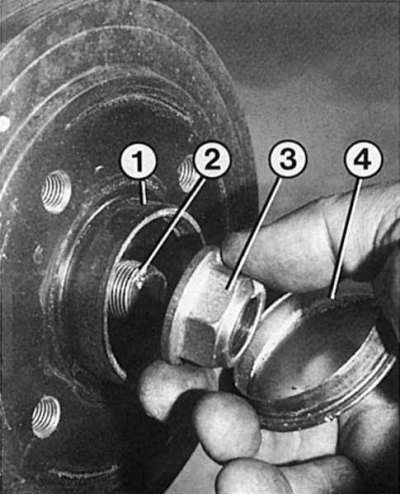
Right: After removing the hub cap (4) from the brake drum (1) you can unscrew the hub nut (3) with wheel hub thread (2). When removing the brake drum, do not lose the adjusting washer of the hub nut.
 |  |
- The length of the idle stroke of the pedal should not exceed 1/3 of the entire pedal stroke.
- More pedal travel means the brake pads need to be replaced.
- The reason for the increase in the stroke of the brake pedal can also be a jammed brake pad or a rusted wheel brake caliper.
Automatic brake adjustment
With increasing wear of the brake pads, the spacer between the brake pads should be lengthened. For this, a toothed nut with a spring-loaded ratchet lever located on the thread of the spacer is used. The spring-loaded ratchet lever extends the compressed strut when braking and thus moves the brake pads to a new position. Those. The brake pads are pushed outward, so that a minimum distance is always maintained between the brake pad and the drum.
Removing the brake drums
1. Raise the vehicle, secure and remove the rear wheel.
2. Release the parking brake.
3. With a screwdriver inserted into the hole in the brake drum under the wheel bolt, press the parking brake rocker of the passive brake shoe inward toward the center of the vehicle. This will disengage the small stop pin of the parking brake rocker.
4. Then push the parking brake rocker back with a screwdriver until the brake pads are completely released.
5. Carefully knock down the hub cover with a hammer, use a chisel if necessary.
6. Turn off a nut of a nave and remove together with an adjusting washer.
7. Remove the brake drum. If it does not go, then rotate the brake drum by tapping on it with a rubber mallet or a hammer with a plank placed against the drum. In the workshop, a puller is used for this.
8. Clean the brake mechanism. Wipe the brakes either with a clean rag and alcohol or blow with compressed air. The remaining dust from the pads can be removed with a brush or vacuum cleaner.
Checking the condition of the brake drum
1. Check the brake drum for damage and cracks. At the same time, carefully inspect the working brake surfaces to detect the presence of scratches.
2. If there are deep scratches, the drums are bored on the machine. In this case, the inner diameter of the drum will become larger.
3. The new brake drums have an inner diameter of 180.25mm. In the presence of deep scratches, the brake drums can be bored out to 181.25 mm. If the drums are worn more than 181.25 mm, both brake drums must be replaced.
Note. Recommendation: For uniform braking, both brake drums must have the same diameter. When boring one brake drum, it is imperative to bore the other by the same amount, even if it does not have marks.
Removing the brake pads
Worn and oily brake pads must be replaced as the friction linings are glued onto the brake pads. Always replace all 4 brake pads.
1. Raise the vehicle, secure and remove the wheel.
2. Remove the brake drum.
3. Bendix brake system: press the brake shoe spring plate with pliers, turn 90° (why it is necessary to fix the locking pin on the back of the brake shield so that it does not rotate) and remove the spring plate, as well as the pressure spring. Remove lock pin.
4. Unhook the lower coupling spring, located between the brake shoes, tongs.
5. Remove the brake pads from the support.
6. Press the brake pads at the bottom one against the other to release the brake cylinder.
7. Remove the brake shoes so that you can unhook the parking brake cable.
8. To remove the active brake pad from the spacer, tilt it from the bottom outward to release the threaded part of the spacer. Before doing this, unhook the small spring from the brake shoe.
9. Remove the upper coupling spring between the brake shoes. To remove the spacer from the passive brake pad, pull back the spacer, releasing the spring so that the spacer can be lowered down.
10. Remove the spring and spacer.
11. Before installing new brake pads, the brake shield must be cleaned. In addition, it is necessary to lubricate the 6 contact points of the brake pads (shown by arrows) copper paste.
12. Girling Brake System: Remove lower return spring with pliers or screwdriver.
13. Remove the top return spring.
14. Press the brake shoe spring plate with pliers, turn 90° (in this case, it is necessary to fix the locking pin on the back of the brake mechanism shield so that it does not rotate) and remove the spring plate, as well as pressure. Remove lock pin.
15. Loosen the parking brake cable.
16. Remove the passive brake shoe from the support and remove the parking brake cable from the rocker arm.
17. Remove the passive brake shoe and spacer.
18. Remove the active brake pad.
19. When replacing the brake pads, also remove the adjusting lever with spring from the active brake pad.
20. Both types of brake systems: with the brake pads removed, do not press the brake pedal so that the pistons do not come out of the brake cylinder.
21. With the brake shoes removed, check the brake cylinders for leaks. To do this, pull back the dust cap. If there is leakage of brake fluid under it, repair or replace the brake cylinder. Make sure that the pistons of the brake cylinder of the wheel do not slip out of it, otherwise air will enter the brake system and you will have to bleed the brakes. If necessary, secure the pistons with a clamp.
22. Blow out the brake drum and brake shield with compressed air or clean them with a dry paint brush while using a powerful vacuum cleaner.
23. Before installation, check the mobility of the parking brake rocker and spacers and, if necessary, lubricate them with Wolfracote or Liqui Moly Schmierfix.
24. Brake system Bendix: When replacing the brake pads, install the parking brake rocker on the new passive brake pad and secure it with a new lock washer.
25. When installing the spacer, make sure that the spring is installed correctly relative to the brake shoe - it must be fixed on the shorter hook of the brake shoe.
26. Put the spring on the spacer looking down and pull it up until it takes the correct position on the brake shoe.
27. When installing the adjuster in the strut hole, make sure that the spring is not pinched between the strut and the toothed nut, and there is a gap between the toothed nut and the strut mounting on the block.
28. Put the active brake shoe on the spacer and install the upper spring between both brake shoes.
29. Slide both brake pads downward towards each other until the fastening of the adjusting device is installed in the bridge of the active brake pad.
30. Put the return spring on the active brake shoe.
31. Pull the parking brake rocker inward and install the brake shoes mounted earlier on the spacers on the brake shield. At the same time, put the parking brake cable on the rocker arm.
32. Fully sink the pistons into the brake cylinder.
33. From below, fold the brake pads with each other so that they can be put on top of the brake cylinder. Be careful not to damage the dust seals when doing this.
Installation
1. Install the brake pads from below on the support.
2. Install the brake shoe clamps.
3. Install the lower spring between the brake shoes.
4. Brake System Girling: If you are installing new brake pads, install the adjuster lever and adjuster spring on the active brake pad.
5. Hang the parking brake cable on the rocker and install the passive brake shoe on the brake shield.
6. Install the spacer on the active brake shoe so that the notch on the brake shoe faces the adjuster lever.
7. Install the active brake shoe together with the spacer on the brake shield.
8. Fully sink the pistons into the brake cylinder.
9. Establish clips of brake pads.
10. Install the upper and lower springs between the brake shoes.
11. Both types of brake systems: Use a screwdriver to turn the toothed nut to set the brake shoe axle inclination so that they are located inside the diameter of the brake drum, which is 179.2 mm in the new drum.
12. Install the brake drum and tighten the new hub nut.
13. Then press several times (about 20) on the brake pedal so that the brake shoes are centered in the drum and the adjusting tool sets both shoes in the same position. The click of the toothed nut of the automatic adjusting device should be heard.
14. Remove the brake drum again for the final installation of the parking brake cable.
15. Adjust the parking brake cable so that when the parking brake is applied between the first and second clicks, the parking brake rocker just starts moving, and at the second click it opens the brake pads.
16. Put the brake drum back on and tighten the hub nut to 160 Nm.
17. Lubricate the new hub cap with wheel bearing grease and tap the hub mount with a rubber mallet.
18. Install the wheels and lower the car.
Note. Recommendation: before removing the brake pads, you should definitely remember or write down the sequence of work and the location of individual elements. Thanks to this, you will greatly facilitate your subsequent assembly. If you are working on both brakes at the same time, then in no case do not allow them to interchange parts.
Spacers for the right and left brake systems are different. On the Bendix brake system, the spacer for the left side is indicated «G» (French «gauche») And «D» («droite») for the right. In addition, the toothed adjusting nut of the left brace has a left hand thread and the right hand brace has a right hand thread. Also, the toothed nut of the left brace has a slot that is not present on the right nut. In this case, the spring of the right spacer is varnished.
On the Girling brake system, the left side threaded strut tappet is silver and the right side is gold, with the pushrod on the left hand-threaded.