
Attention:
- Use protective gloves.
- Do not start the engine without the attachment drive belt installed - there is a risk of damage to the crankshaft pulley.
Removing the Attachment Drive Belt
1. Place the vehicle on a two post lift.
2. Remove the engine protection tray.
3. Remove the front right wheel from the vehicle.
4. Remove the front right fender liner.
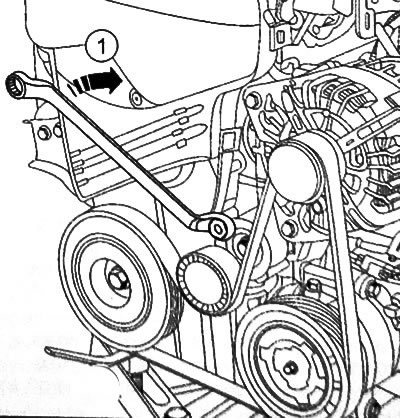
5. With a 16mm ring wrench (1) Turn the automatic attachment drive belt tensioner clockwise.
6. Remove the implement drive belt.
7. Loosen the attachment belt tensioner bolt.
8. Remove the attachment drive belt tensioner.
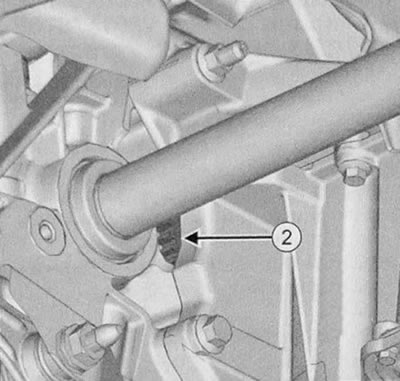
9. Using a screwdriver, fix the flywheel from turning through the window (2).
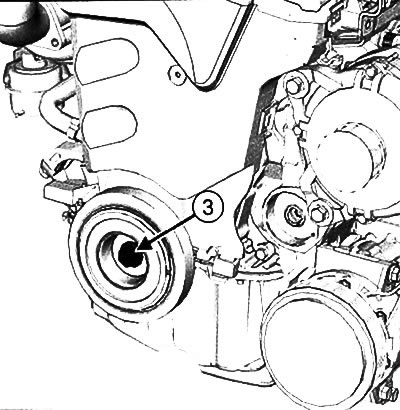
10. Loosen the fixing bolt (3) and remove the crankshaft pulley.
Attachment Drive Belt Installation
Note: If the crankshaft pulley is reused, clean its grooves with a brush to remove any deposits.
Caution: Use only a brush with bristles made of plastic or non-corrosive materials to clean the pulley (e.g. copper).
Note:
Be sure to replace the following parts with new ones:
- Crankshaft pulley bolt.
- Attachment drive belt.
- Attachment drive belt tensioner.
- Attachment belt tensioner bolt.
1. Install the crankshaft pulley by turning it to align with the crankshaft key.
2. Fit a new crankshaft pulley bolt.
3. Secure the engine flywheel against turning with a screwdriver.
4. Tighten the crankshaft pulley bolt to 120 Nm, then tighten another 90°±15°.
5. Install a new tension roller with a new fixing bolt.
6. Tighten the attachment bolt for the attachment drive belt tensioner to 40 Nm.
7. Install a new attachment drive belt.
8. Rotate the crankshaft two full turns in the direction of engine rotation.
9. Further installation is carried out in the reverse order of removal.
Checking Attachment Belt Tension
See chapter "The mechanical part of the gasoline engine 1.2 l".