
English Русский
Български
Беларускі
Український
Српски
Hrvatski
Română
Polski
Slovenský
Magyar
Bookmark Contacts Articles Sitemap
Company vehicles Peugeot Company vehicles Opel Company vehicles Skoda Company vehicles Land Rover Company vehicles Mitsubishi Company vehicles Volkswagen Company vehicles Honda
RenaultBook.ru


Duster   Fluence   Kangoo   Laguna   Logan   Megane   Sandero   Scenic   Symbol   Clio   Other
Renault 19 (1988-1996) Espace I and II (1984-1996) Espace III (1996-2002)

High pressure fuel pump (Renault Espace III)

  • Main
  • Renault
  • Espace III (1996-2002)
  • Power unit
  • Diesel engines G9T
  • High pressure fuel pump
0
Contents: Removal 🠛 Installation 🠛
It is not recommended to disassemble the high pressure fuel pump.

Caution: Before carrying out any work on the fuel rail, connect the diagnostic tool to the injection system control unit and ensure that the fuel rail is not under pressure.


Take precautions against possible burns from hot fuel.

Removal


  • Disconnect the cable from the negative terminal of the battery
  • Remove the air flow sensor
  • Remove the air filter housing
  • Remove the expansion tank and set it aside.
  • Remove the air duct located between the heat exchanger and the engine stop valve housing by disconnecting the fuel line from the pressure switch.
  • Remove the reinforcement paw (1. Fig. 4.35). connecting the turbocharger engine stop block housing with the power steering pump bracket
  • Remove the EGR hose and sealing gaskets. Replace the hose and gaskets when installing the air duct.
  • Disconnect the connector from the EGR control solenoid valve.
  • Remove the bolts (3. Fig. 4.53) engine stop housing fastenings.
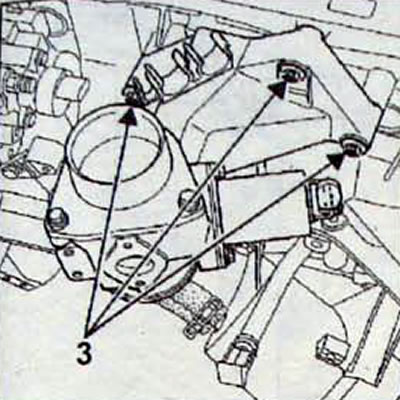
Fig. 4.53. Location of bolts (3) for fastening the engine stop housing

Fig. 4.53. Location of bolts (3) for fastening the engine stop housing

  • Remove the pipe (5, Fig. 4.38), connecting the throttle body to the intake manifold and the intake manifold.
  • From the bottom of the vehicle, remove the engine stop housing.
  • By tag (1, Fig. 4.2) on the crankshaft pulley, set the engine crankshaft to the TDC position of the piston of the 1st cylinder, unscrew the plug (A. Fig. 4.3) and using the Mot. 1536 lock, block the crankshaft from turning.
  • Disconnect the pump pressure regulator (RSV), diesel fuel temperature sensor and position sensor.
  • Disconnect the fuel return line and the fuel supply line at the pump and install plugs to prevent dirt from entering.
  • Remove the expansion tank mount.
  • Disconnect the line guard and move it to the side as far as possible.
  • Disconnect the high pressure fuel line at the pump outlet/fuel rail inlet and install sealed plugs.
  • Remove the position sensor (1, Fig. 4.54). while trying not to drop the sealing ring into the gear block.
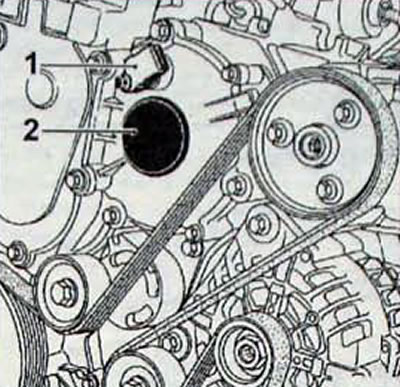
Fig. 4.54. Location of the position sensor (1) and cap (2) of the pump hub

Fig. 4.54. Location of the position sensor (1) and cap (2) of the pump hub


  • Remove the pump hub cap (2).
  • Fit the Mot 1548 tool with the centring sleeve, then once the tool is in place, remove the centring sleeve (Fig. 4.55).
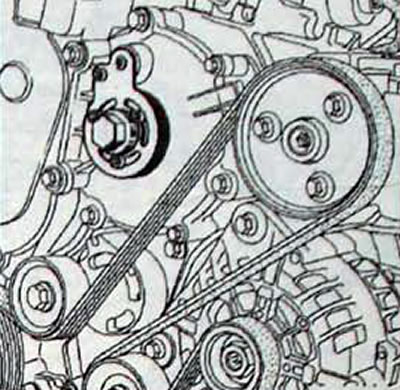
Fig. 4.55. Installing the Mot. 1548 tool with a centering sleeve on the engine

Fig. 4.55. Installing the Mot. 1548 tool with a centering sleeve on the engine

  • Remove TDC locking tool Mot. 1536.
  • Using a screwdriver, lock the engine flywheel and unscrew the central nut securing the pump hub.
  • Loosen the three pump mounting bolts on the multifunctional bracket a few turns (Fig. 4.56).
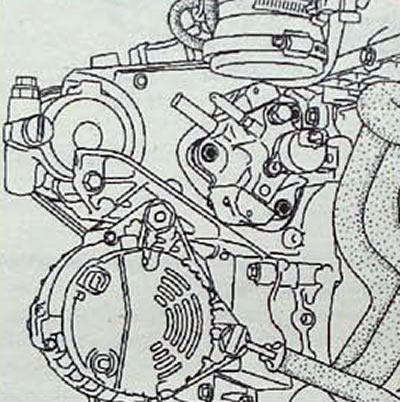
Fig. 4.56. Location of pump mounting bolts on the multifunctional bracket

Fig. 4.56. Location of pump mounting bolts on the multifunctional bracket

  • Turn the sleeve of tool Mot. 1548 to remove the pump (Fig. 4.55).
  • Remove the bolts and high pressure fuel pump.

Installation


  • Installation is carried out in the reverse order of removal.
  • When installing the pump, use the center nut to install the new pump. Be sure to align the holes of the rear pump mount.
  • Using tool Mot. 1503, install the cover of the new pump (Fig. 4.57).
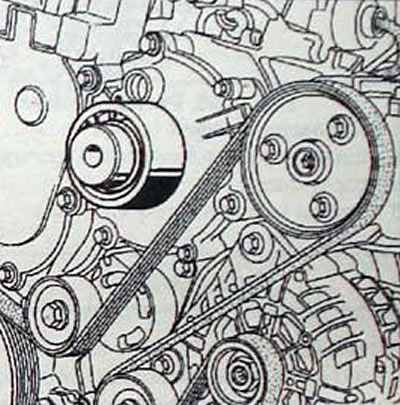
Fig. 4.57. Using tool Mot. 1503 to install the new pump cover

Fig. 4.57. Using tool Mot. 1503 to install the new pump cover


Do not apply additional force to the high pressure fuel line, to do this:
  • loosen the fuel rail mounting bolts;
  • bring the high pressure fuel line nuts on the pump and line side close together before tightening them to the specified torque;
  • tighten the fuel line to the specified torque;
  • tighten the nuts on the pump side and the fuel line side to the required tightening torque.

Each time the injection pump is removed, be sure to replace the diesel fuel recirculation line.

Perform a fuel system refill:
  • close the tap (R, Fig. 4.52);
  • run the low pressure pump several times with the ignition on;
  • start the engine;
  • open the tap, while in the open position of the tap the two colored marks are aligned

Use a diagnostic tool to check for recorded fault codes in the memory and, if present, delete them.

After performing any work, make sure that there are no leaks from the diesel fuel supply circuit. Allow the engine to idle until the electric cooling fan is turned on, and then increase the engine's crankshaft speed several times while idling.
This article is available on: russian, bulgarian, belarusian, ukrainian, serbian, croatian, romanian, polish, slovak, hungarian
Article has been reviewed by editor: Trofimova Anastasia
Share with friends:
Previous
Espace III: Diesel engines G9T
Next

Fuel filter
Electromagnetic thermal valves
Glow plugs
Engine pre-heating and post-heating system
Control lamps
Injectors — removal and installation
Fuel distribution line protection
Fuel pressure regulator
Checking oil pressure
Cooling system
Other articles on other Renault models

➽ High pressure fuel pump (HPFP) Renault Duster 1 (2009-2017)
➽ High pressure fuel pump Renault Kangoo 1 (1997-2007)
➽ Flushing the high-pressure fuel pump (HPFP) Renault Laguna 2 (2001-2007)
➽ High pressure fuel pump Renault Logan 2 (2012-2020)
➽ Checking the electric fuel pump (all engines) Renault Fluence 1 (2009-2020, petrol)
Link to this article in different formats
Reviews and comments of visitors
No comments yet


Add two numbers 42 + 32


Renault 19 (1988-1996) 
  • General information
  • Maintenance
  • Power unit
  • Engine repair
  • Exhaust system
  • Cooling system
  • Supply system
  • Single-point injection
  • Multi-point injection
  • Diesel injection system
  • Transmission
  • Clutch
  • Car gearbox
  • Chassis, running gear
  • Car suspension
  • Steering
  • Brake system
  • Wheels and tires
  • Body and interior
  • Exterior (external elements)
  • Interior (internal elements)
  • Heating and ventilation
  • Electrical equipment
  • Equipment and devices
  • Headlights and lighting
  • Ignition system
  • Power devices
  • Electrical circuits
Espace I and II (1984-1996) 
  • General information
  • Introduction to the guide
  • Troubleshooting
  • Power unit
  • Engine repair
  • Cooling system
  • Carburetor fuel system
  • Injection fuel system
  • Diesel fuel system
  • Ignition system
  • Transmission
  • Clutch
  • Car gearbox
  • Drive shafts
  • Chassis, running gear
  • Brake system
  • Steering
  • Front suspension
  • Rear suspension
  • Body and interior
  • Exterior (external elements)
  • Interior (internal elements)
  • Doors, locks and windows
  • Electrical equipment
  • Equipment and devices
  • Electrical circuits
Espace III (1996-2002) 
  • General information
  • Introduction to the manual
  • User manual
  • Power unit
  • Petrol engines F3R
  • Petrol engines Z7X
  • Diesel engines G8T
  • Diesel engines G9T
  • Transmission
  • Clutch
  • Mechanical gearbox
  • Automatic gearbox
  • Drive shafts
  • Chassis, running gear
  • Steering
  • Front suspension
  • Rear suspension
  • Brake system
  • Body and interior
  • Exterior (external elements)
  • Interior (internal elements)
  • Doors, locks and windows
  • Heating and ventilation
  • Electrical equipment
  • Equipment and instruments
  • Power devices
  • Electrical circuits
RenaultBook.ru © 2018–2026 | Mobile version | News and articles | Sitemap: EN BG BY UA RS HR RO PL SK HU | Administration | Site search | Bookmark
Duster 1 (2009-2017) | Fluence 1 (2009-2020, petrol) | Kangoo 1 (1997-2007) | Laguna 2 (2001-2007) | Logan 1 (2004-2012, petrol) | Logan 2 (2012-2020) | Megane 1 (1995-2002) | Megan 2 (2002-2009, petrol) | Sandero 1 (2007-2012, petrol) | Scenic 1 (1996-2003) | Symbol 1 (1999-2008, petrol) | Symbol 2 (2008-2013, petrol) | Renault 19 (1988-1996) | Espace I and II (1984-1996) | Espace III (1996-2002) | Clio 1 (1990-1998) |
We want your visit to be comfortable 😌 and use cookies 🍪 to do so.