English Русский
Български
Беларускі
Український
Српски
Hrvatski
Română
Polski
Slovenský
Magyar
Bookmark Contacts Articles Sitemap
Company vehicles Peugeot Company vehicles Opel Company vehicles Skoda Company vehicles Land Rover Company vehicles Mitsubishi Company vehicles Volkswagen Company vehicles Honda
RenaultBook.ru


Duster   Fluence   Kangoo   Laguna   Logan   Megane   Sandero   Scenic   Symbol   Clio   Other
Symbol 1 (1999-2008, petrol) Symbol 2 (2008-2013, petrol)

Master Brake Cylinder — Removal and Installation (Renault Symbol 2)

  • Main
  • Symbol
  • Symbol 2 (2008-2013, petrol)
  • Chassis, running gear
  • Brake system
  • Master Brake Cylinder — Removal and Installation
0
Contents: Removal 🠛 Installation 🠛
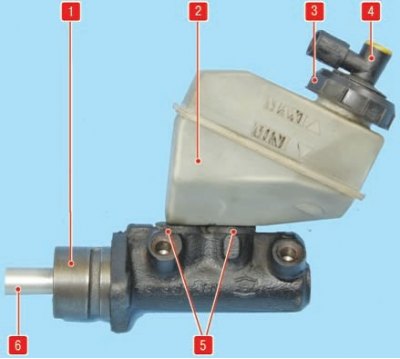
Master brake cylinder with reservoir: 1 - master brake cylinder; 2 - master brake cylinder…

Master brake cylinder with reservoir: 1 - master brake cylinder; 2 - master brake cylinder reservoir; 3 - tank cap; 4 - brake fluid level sensor; 5 - connecting bushings; 6 - piston pusher


Tightening torques:
  • Brake pipe nipples - 14 Nm
  • Brake master cylinder nuts - 18 Nm

Removal


  • disconnect the negative battery cable;
  • disconnect the brake fluid level sensor connector in the expansion tank;
  • using a large syringe or rubber bulb, remove as much brake fluid as possible from the expansion tank;
  • remove the injection system ECU in the engine compartment;
  • disconnect the power steering reservoir fasteners and move the reservoir toward the engine;
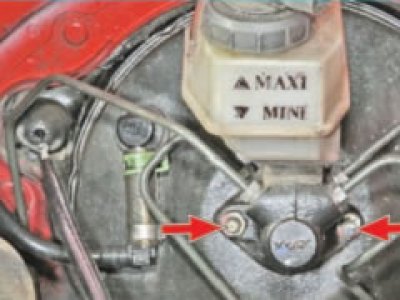
disconnect the power steering reservoir fasteners and move the reservoir toward the engine;

  • remove the expansion tank from the master brake cylinder by pulling it upwards, taking measures to collect any leaking fluid;
  • clean the place where the pipes connect to the main brake cylinder from dirt. Remember or mark the location of the pipes. Unscrew the connecting nipples and disconnect the pipes from the cylinder;
  • take measures to prevent dirt from getting into the openings of the brake system;
  • unscrew the two nuts securing the vacuum tube;
  • unscrew the two nuts securing the master brake cylinder to the vacuum booster;
  • remove the master brake cylinder.

Figure 7.19. Master brake cylinder supplied as spare parts: 1 – main brake cylinder; 2, 4 – plugs;…

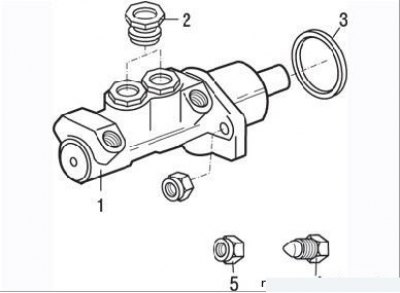
Figure 7.19. Master brake cylinder supplied as spare parts: 1 – main brake cylinder; 2, 4 – plugs; 3 – sealing ring; 5 – fastening nut


In spare parts master brake cylinder (with two outputs for a normal system and with four outputs for a system with ABS). supplied with seals, plugs and mounting nuts.

A repair kit of parts for the main brake cylinder is not produced, therefore, if the cylinder is damaged, it is replaced with a new one with the obligatory replacement of the sealing ring (Figure 7.19).

Installation
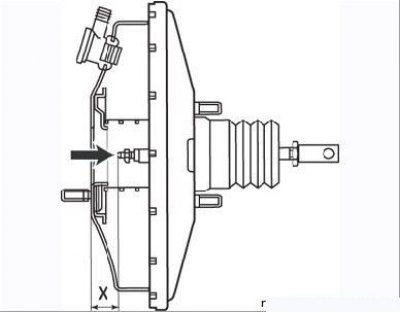


Figure 7.20. Adjusting the pusher length: X=22.3 mm; the arrow shows the adjusting bolt of the…

Figure 7.20. Adjusting the pusher length: X=22.3 mm; the arrow shows the adjusting bolt of the pushrod


(Source is located on the website Renaultbook.ru)
  • before installation, check the distance X (Figure 7.20). It should be 22.3 mm. If necessary, adjust the size with the bolt;
  • clean the mating surfaces of the units to be connected;
  • install a new sealing ring onto the rear end of the master cylinder;
  • install the cylinder on the studs so that the pusher enters the cylinder cavity to the required depth;
  • screw the mounting nuts onto the studs and tighten them to the specified torque;
  • connect the pipelines to the cylinder body according to the marks made;
  • lubricate the rubber seals with brake fluid, then press the expansion tank fittings into them;
  • perform the remaining operations in the reverse order of removal;
  • add brake fluid to the reservoir and remove air from the brake system drive.
This article is available on: russian, bulgarian, belarusian, ukrainian, serbian, croatian, romanian, polish, slovak, hungarian
Article has been reviewed by editor: Kupriyanov Sergey
Share with friends:
Previous
Symbol 2: Brake system
Next

Rear brake cylinder — removal and installation
Rear brake pads — removal and installation
Brake drum — removal and installation
Brake pressure regulator
Brake disc — removal and installation
Vacuum brake booster — removal and installation
Brake hoses — removal and installation
Removal and installation the parking brake lever
Adjusting the handbrake
Replacing the handbrake cable
Other articles on other Renault models

➽ Brake line between the hydraulic unit and the master cylinder Renault Duster 1 (2009-2017)
➽ Master brake cylinder Renault Fluence 1 (2009-2020, petrol)
➽ Master brake cylinder Renault Kangoo 1 (1997-2007)
➽ Removal and installation the master brake cylinder Renault Laguna 2 (2001-2007)
➽ Checking the level and adding brake fluid to the master cylinder… Renault Logan 1 (2004-2012, petrol)
Link to this article in different formats
Reviews and comments of visitors
No comments yet


Add two numbers 41 + 25


Symbol 2 (2008-2013, petrol) 
  • General information
  • User manual
  • Maintenance
  • Power unit
  • Engine repair
  • Cooling system
  • Fuel system
  • Exhaust system
  • Ignition system
  • Transmission
  • Clutch
  • Mechanical gearbox
  • Automatic gearbox
  • Drive shafts
  • Chassis, running gear
  • Front suspension
  • Rear suspension
  • Steering
  • Brake system
  • Body and interior
  • Exterior (external elements)
  • Interior (internal elements)
  • Doors, locks and windows
  • Heating and ventilation
  • Electrical equipment
  • Equipment and devices
  • Headlights and lighting
  • Power devices
  • Electrical circuits
Symbol 1 (1999-2008, petrol) 
  • General information
  • User manual
  • Car care
  • Maintenance
  • Power unit
  • Engine repair
  • Cooling and lubrication system
  • Supply system
  • Exhaust system
  • Ignition system
  • Transmission
  • Clutch
  • Mechanical gearbox
  • Automatic gearbox
  • Drive shafts
  • Chassis, running gear
  • Car suspension
  • Steering
  • Brake system
  • Body and interior
  • Exterior (external elements)
  • Interior (internal elements)
  • Doors, locks and windows
  • Restoration and repair
  • Electrical equipment
  • Equipment and devices
  • Headlights and lighting
  • Power devices
  • Heating and ventilation
  • Electrical circuits
RenaultBook.ru © 2018–2026 | Mobile version | News and articles | Sitemap: EN BG BY UA RS HR RO PL SK HU | Administration | Site search | Bookmark
Duster 1 (2009-2017) | Fluence 1 (2009-2020, petrol) | Kangoo 1 (1997-2007) | Laguna 2 (2001-2007) | Logan 1 (2004-2012, petrol) | Logan 2 (2012-2020) | Megane 1 (1995-2002) | Megan 2 (2002-2009, petrol) | Sandero 1 (2007-2012, petrol) | Scenic 1 (1996-2003) | Symbol 1 (1999-2008, petrol) | Symbol 2 (2008-2013, petrol) | Renault 19 (1988-1996) | Espace I and II (1984-1996) | Espace III (1996-2002) | Clio 1 (1990-1998) |
We want your visit to be comfortable 😌 and use cookies 🍪 to do so.