
English Русский
Български
Беларускі
Український
Српски
Hrvatski
Română
Polski
Slovenský
Magyar
Bookmark Contacts Articles Sitemap
Company vehicles Peugeot Company vehicles Opel Company vehicles Skoda Company vehicles Land Rover Company vehicles Mitsubishi Company vehicles Volkswagen Company vehicles Honda
RenaultBook.ru


Duster   Fluence   Kangoo   Laguna   Logan   Megane   Sandero   Scenic   Symbol   Clio   Other
Symbol 1 (1999-2008, petrol) Symbol 2 (2008-2013, petrol)

Brake drum — removal and installation (Renault Symbol 2)

  • Main
  • Symbol
  • Symbol 2 (2008-2013, petrol)
  • Chassis, running gear
  • Brake system
  • Brake drum — removal and installation
0
Contents: Removal 🠛 Installation 🠛 Option #2 🠛
Note: Both brake drums must have the same inside diameter, i.e. if only one drum needs to be bored, both must be bored anyway. Do not exceed the maximum allowable bore diameter.
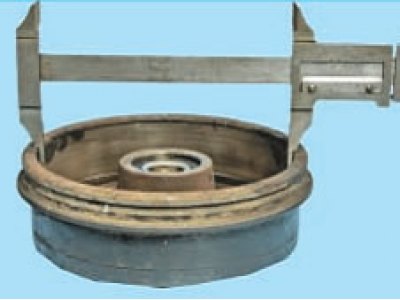

Acceptable sizes are indicated on first page of the section

Acceptable sizes are indicated on first page of the section


Special tool:
  • Inertial puller - Em. 880
  • Hub Cap Extractor - Rou. 943

Tightening torques:
  • Wheel block - 90 Nm
  • Hub nut - 175 Nm

Removal


  • raise the rear of the car and place supports under the body;
  • remove the wheel from the desired side;
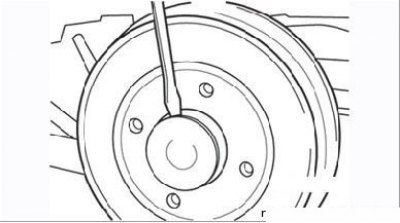
Figure 7.12. Removing the hub cap

Figure 7.12. Removing the hub cap

  • use a puller to remove the hub cap from the center of the wheel. If you don't have a puller, you can use a wide-blade screwdriver and a hammer (Figure 7.12);
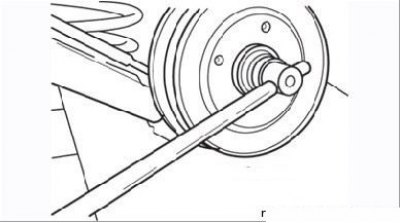
Figure 7.13. Unscrewing the wheel hub mounting nut

Figure 7.13. Unscrewing the wheel hub mounting nut


  • unscrew the hub mounting nut and remove the washer (Figure 7.13);
  • release the parking brake lever. Release the parking brake cable tension under the vehicle by unscrewing the lock nut. To do this, first remove the heat shields covering the work areas;
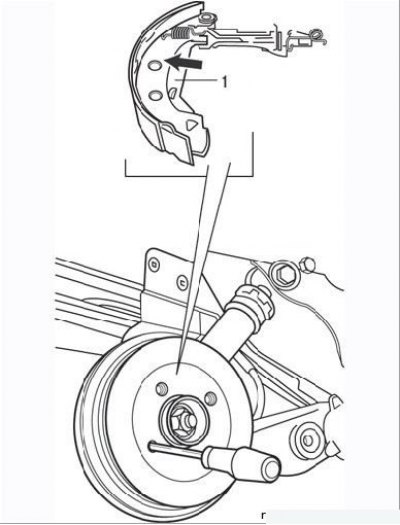
Figure 7.14. Using a screwdriver to move the adjusting post through the bolt hole: 1 – squeeze shoe

Figure 7.14. Using a screwdriver to move the adjusting post through the bolt hole: 1 – squeeze shoe

  • insert the blade of a screwdriver into one of the threaded holes in the brake drum for the wheel mounting bolts and move the adjusting post to release its protrusion from the brake shoe (Figure 7.14). To move the release lever away from the shoe, move it back;
  • remove the brake drum from the wheel hub axle;
  • clean the drum from dirt and dust. Keep in mind that dust from brake pad wear products is carcinogenic, so do not blow it off, but use a special cleaning agent;
  • inspect the drum for cracks that may appear around the wheel bolt holes, chips, or other damage. Replace both drums if such damage is present.

Shallow grooves are allowed on the working surface of the drum; significant grooves require turning both drums to the dimensions specified at the beginning of the section.


Measure the drum diameter in several mutually perpendicular planes. If oval wear is detected that cannot be corrected by turning, replace both brake drums.

Installation


  • if using new drums, clean them from preservative grease;
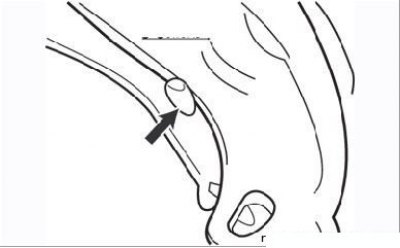
Figure 7.15. The stop protrusion on the parking brake release lever (arrow) should rest against the…

Figure 7.15. The stop protrusion on the parking brake release lever (arrow) should rest against the edge of the shoe

  • make sure that the stop lug on the parking brake release lever rests against the rib of the shoe (Figure 7.15);
  • lubricate the hub axle with a thin layer of consistent grease and place the drum on it without tilting it, gradually pushing it into place until it stops;
  • install the washer and new nut onto the hub axle. Tighten the nut to the specified torque. Install the hub cap;
  • press the brake pedal several times to set the pads to the working position;
  • adjust the parking brake (see below);
  • install the wheel and lower the vehicle.

Option #2


Removal


1. Using an extractor and an inertia puller, remove the hub nut cap.

2. Release the parking brake. Loosen the secondary parking brake cables and move the parking brake lever rearward.

3. Insert a screwdriver into the hole in the support disc and press the parking brake lever to release it from the lock (E) on the brake shoe.
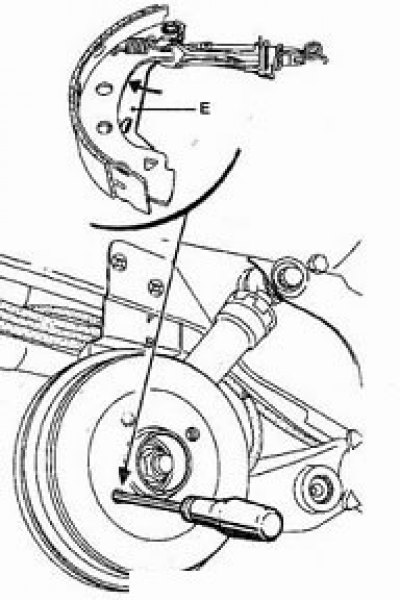


3. Insert a screwdriver into the hole in the support disc and press the parking brake lever to…


4. Unscrew the hub mounting nut. Remove the washer and brake drum.

Installation


1. Wash the brake parts with brake cleaner.

2. Install the brake drum and washer. Tighten the mounting nut to the specified torque.

3. Install the nut cap.

4. Adjust the clearance in the brake pads by pressing the brake pedal repeatedly.

5. Adjust the parking brake cable.
This article is available on: russian, bulgarian, belarusian, ukrainian, serbian, croatian, romanian, polish, slovak, hungarian
Article has been reviewed by editor: Kupriyanov Sergey
Share with friends:
Previous
Symbol 2: Brake system
Next

Brake pressure regulator
Brake disc — removal and installation
Brake caliper — removal and installation
Replacing the front brake pads
Brake system — general information
Rear brake pads — removal and installation
Rear brake cylinder — removal and installation
Master Brake Cylinder — Removal and Installation
Vacuum brake booster — removal and installation
Brake hoses — removal and installation
Other articles on other Renault models

➽ Rear brake drum Renault Duster 1 (2009-2017)
➽ Brake drum Renault Kangoo 1 (1997-2007)
➽ Rear drum brake shoes Renault Logan 2 (2012-2020)
➽ Rear wheel brakes — removing and installing the brake drum Renault Sandero 1 (2007-2012, petrol)
➽ Brake Drum/Brake Disc and Hub — Removal and Installation Renault Scenic 1 (1996-2003)
Link to this article in different formats
Reviews and comments of visitors
No comments yet


Add two numbers 42 + 40


Symbol 2 (2008-2013, petrol) 
  • General information
  • User manual
  • Maintenance
  • Power unit
  • Engine repair
  • Cooling system
  • Fuel system
  • Exhaust system
  • Ignition system
  • Transmission
  • Clutch
  • Mechanical gearbox
  • Automatic gearbox
  • Drive shafts
  • Chassis, running gear
  • Front suspension
  • Rear suspension
  • Steering
  • Brake system
  • Body and interior
  • Exterior (external elements)
  • Interior (internal elements)
  • Doors, locks and windows
  • Heating and ventilation
  • Electrical equipment
  • Equipment and devices
  • Headlights and lighting
  • Power devices
  • Electrical circuits
Symbol 1 (1999-2008, petrol) 
  • General information
  • User manual
  • Car care
  • Maintenance
  • Power unit
  • Engine repair
  • Cooling and lubrication system
  • Supply system
  • Exhaust system
  • Ignition system
  • Transmission
  • Clutch
  • Mechanical gearbox
  • Automatic gearbox
  • Drive shafts
  • Chassis, running gear
  • Car suspension
  • Steering
  • Brake system
  • Body and interior
  • Exterior (external elements)
  • Interior (internal elements)
  • Doors, locks and windows
  • Restoration and repair
  • Electrical equipment
  • Equipment and devices
  • Headlights and lighting
  • Power devices
  • Heating and ventilation
  • Electrical circuits
RenaultBook.ru © 2018–2026 | Mobile version | News and articles | Sitemap: EN BG BY UA RS HR RO PL SK HU | Administration | Site search | Bookmark
Duster 1 (2009-2017) | Fluence 1 (2009-2020, petrol) | Kangoo 1 (1997-2007) | Laguna 2 (2001-2007) | Logan 1 (2004-2012, petrol) | Logan 2 (2012-2020) | Megane 1 (1995-2002) | Megan 2 (2002-2009, petrol) | Sandero 1 (2007-2012, petrol) | Scenic 1 (1996-2003) | Symbol 1 (1999-2008, petrol) | Symbol 2 (2008-2013, petrol) | Renault 19 (1988-1996) | Espace I and II (1984-1996) | Espace III (1996-2002) | Clio 1 (1990-1998) |
We want your visit to be comfortable 😌 and use cookies 🍪 to do so.