
English Русский
Български
Беларускі
Український
Српски
Hrvatski
Română
Polski
Slovenský
Magyar
Bookmark Contacts Articles Sitemap
Company vehicles Peugeot Company vehicles Opel Company vehicles Skoda Company vehicles Land Rover Company vehicles Mitsubishi Company vehicles Volkswagen Company vehicles Honda
RenaultBook.ru


Duster   Fluence   Kangoo   Laguna   Logan   Megane   Sandero   Scenic   Symbol   Clio   Other
Symbol 1 (1999-2008, petrol) Symbol 2 (2008-2013, petrol)

Brake caliper — removal and installation (Renault Symbol 2)

  • Main
  • Symbol
  • Symbol 2 (2008-2013, petrol)
  • Chassis, running gear
  • Brake system
  • Brake caliper — removal and installation
0
Tightening torques:
  • Wheel bolt - 90 Nm
  • Caliper guide bolt - 40 Nm
  • Caliper mounting bolt - 100 Nm

Work order:
  • raise the front of the car and place supports under the body;
  • remove the wheel from the desired side;
  • reduce the inevitable fluid loss during the work by placing a piece of polyethylene film under the expansion tank lid. It is acceptable to clamp the hose coming from the expansion tank;
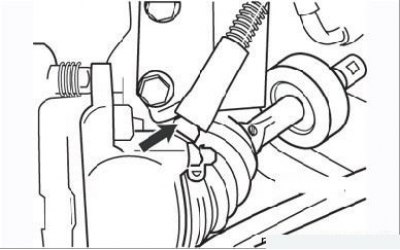
Figure 7.3. Loosening the brake hose nut (arrow)

Figure 7.3. Loosening the brake hose nut (arrow)

  • clean the dirt from the place where the brake hose is connected to the caliper and loosen the nut (Figure 7.3);
  • remove the brake pads as described above;
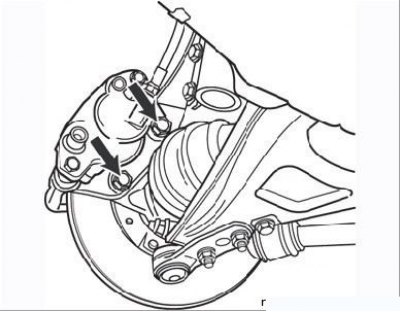
Figure 7.4. Bolts securing the caliper to the steering knuckle (arrows)

Figure 7.4. Bolts securing the caliper to the steering knuckle (arrows)

  • unscrew the two bolts securing the caliper to the steering knuckle (Figure 7.4);
  • completely unscrew the brake hose, turning the brake caliper, and not the other way around;
  • check the condition of the hose and replace it if necessary;
  • clean the caliper from dirt and corrosion products using a cleaning fluid for the brake system;
  • remove the boot mounting clamp using a thin-bladed screwdriver;
  • using compressed air (for example, from a foot pump), connected to the hole for the brake hose, push the piston out of the cylinder. First, install a wooden block in the caliper recess in front of the piston to prevent damage to the piston on the caliper surface. Remove the dust cover from the piston;
  • carefully, preferably with a plastic tool, remove the sealing ring from the brake cylinder, being careful not to scratch the surface of the cylinder;
  • press the guide bushings out of the caliper and remove their covers;
  • using a special fluid for brake system parts, thoroughly wash all parts. Do not use mineral solvents such as kerosene or gasoline for washing - they are aggressive for rubber hydraulic parts. Dry the parts immediately with compressed air or a lint-free cloth. Blow out the channels with compressed air;
  • inspect the cylinder and piston surfaces. No scratches, corrosion, or local wear are allowed. Check the condition of the guide pins and the corresponding bores in the caliper. The pins should not be damaged, they should move easily in the bores, but not dangle in them. If in doubt, replace the defective parts;
  • replace the brake cylinder sealing ring, as well as all old dust boots and seals;
  • before assembly, make sure that all parts are absolutely clean and dry;
  • immerse the piston and new seal in clean brake fluid, lubricate the inner surface of the cylinder with it;
  • install the piston seal into the cylinder groove by hand - tools can damage the seal. Install a new dust boot on the piston. Insert the piston into the cylinder. Gently press the piston into the cylinder, turning it slightly so that it enters without tilting. Press the piston completely into the cylinder so that the outer edge of the dust boot fits into the groove on the caliper;
  • install the boot mounting clamp into the caliper groove;
  • apply grease from the repair kit or other suitable non-stick compound to the guide bushings. Install the bushings on the caliper;
  • install new rubber boots, placing them in the grooves;
  • screw the caliper onto the brake hose until it stops;
  • install the caliper on the steering knuckle and tighten the two mounting bolts to the specified torque;
  • install the brake pads as described above;
  • apply Loctite Frenblok to the threads of the guide pins;
  • tighten the guide pins with new bolts to the specified torque, starting with the bottom pin;
  • tighten the brake hose connection nut to the specified torque;
  • install the brake pad wear sensor connector;
  • remove the clamp from the expansion tank hose or remove the polyethylene seal (depending on what was used);
  • bleed the brake circuit that was worked on as described below;
  • install the wheel;
  • lower the car;
  • press the brake pedal several times to bring the pads into working position.
This article is available on: russian, bulgarian, belarusian, ukrainian, serbian, croatian, romanian, polish, slovak, hungarian
Article has been reviewed by editor: Kupriyanov Sergey
Share with friends:
Previous
Symbol 2: Brake system
Next

Replacing the front brake pads
Brake system — general information
Brake disc — removal and installation
Brake pressure regulator
Brake drum — removal and installation
Rear brake pads — removal and installation
Rear brake cylinder — removal and installation
Other articles on other Renault models

➽ Front brake caliper Renault Duster 1 (2009-2017)
➽ Rear brake caliper Renault Fluence 1 (2009-2020, petrol)
➽ Removal and installation the brake caliper Renault Laguna 2 (2001-2007)
➽ Replacing the front wheel brake caliper Renault Logan 1 (2004-2012, petrol)
➽ Removal and installation the front brake caliper Renault Megan 2 (2002-2009, petrol)
Link to this article in different formats
Reviews and comments of visitors
No comments yet


Add two numbers 32 + 45


Symbol 2 (2008-2013, petrol) 
  • General information
  • User manual
  • Maintenance
  • Power unit
  • Engine repair
  • Cooling system
  • Fuel system
  • Exhaust system
  • Ignition system
  • Transmission
  • Clutch
  • Mechanical gearbox
  • Automatic gearbox
  • Drive shafts
  • Chassis, running gear
  • Front suspension
  • Rear suspension
  • Steering
  • Brake system
  • Body and interior
  • Exterior (external elements)
  • Interior (internal elements)
  • Doors, locks and windows
  • Heating and ventilation
  • Electrical equipment
  • Equipment and devices
  • Headlights and lighting
  • Power devices
  • Electrical circuits
Symbol 1 (1999-2008, petrol) 
  • General information
  • User manual
  • Car care
  • Maintenance
  • Power unit
  • Engine repair
  • Cooling and lubrication system
  • Supply system
  • Exhaust system
  • Ignition system
  • Transmission
  • Clutch
  • Mechanical gearbox
  • Automatic gearbox
  • Drive shafts
  • Chassis, running gear
  • Car suspension
  • Steering
  • Brake system
  • Body and interior
  • Exterior (external elements)
  • Interior (internal elements)
  • Doors, locks and windows
  • Restoration and repair
  • Electrical equipment
  • Equipment and devices
  • Headlights and lighting
  • Power devices
  • Heating and ventilation
  • Electrical circuits
RenaultBook.ru © 2018–2026 | Mobile version | News and articles | Sitemap: EN BG BY UA RS HR RO PL SK HU | Administration | Site search | Bookmark
Duster 1 (2009-2017) | Fluence 1 (2009-2020, petrol) | Kangoo 1 (1997-2007) | Laguna 2 (2001-2007) | Logan 1 (2004-2012, petrol) | Logan 2 (2012-2020) | Megane 1 (1995-2002) | Megan 2 (2002-2009, petrol) | Sandero 1 (2007-2012, petrol) | Scenic 1 (1996-2003) | Symbol 1 (1999-2008, petrol) | Symbol 2 (2008-2013, petrol) | Renault 19 (1988-1996) | Espace I and II (1984-1996) | Espace III (1996-2002) | Clio 1 (1990-1998) |
We want your visit to be comfortable 😌 and use cookies 🍪 to do so.