
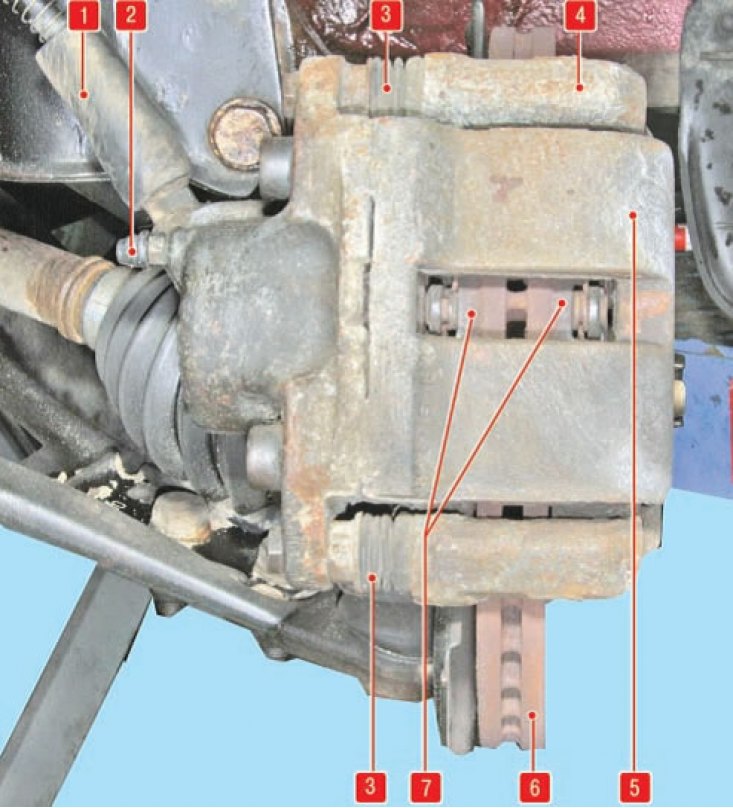
Front wheel brake: 1 - brake hose; 2 - air release valve; 3 - caliper guide pin (covered with a protective cover); 4 - guide pads; 5 - brake caliper; 6 - brake disc; 7 - brake pads
Tightening torques:
- Wheel bolt - 90 Nm
- Caliper guide bolt - 40 Nm
Attention! Replace brake pads only in pairs at the same time on both wheels with pads of the specified brands.
New brake pads are run in after 180–230 km, at which time the efficiency of the brakes is somewhat reduced. During the running-in of the pads, it is not recommended to abruptly and continuously brake to a complete stop.
To speed up the process of running in new pads to the disc, it is recommended to brake the car several times from a speed of 80 to 40 km / h, carefully pressing the brake pedal. Between such braking, maintain an interval of time until the brake mechanism has completely cooled down.

Figure 7.1. Turning out the guide pins on the brake mechanism of the front wheels: 1 - guide pin; 2 - protective cover
Removing
- raise the front of the car and place supports under the body;
- remove the wheel from the desired side;
- disconnect the pad wear sensor connector;
- pull the caliper towards you, thus moving the piston inside the brake cylinder;
- unscrew the guide pin bolts with two wrenches, do not clean the guide pins;
- remove the brake guide caliper and tie it away from the work area without pulling on the brake hose;
- remove the brake pads;
- inspect the brake pads: compare the thickness of the pads with the minimum allowable value, the friction lining should wear evenly, without distortion. In case of oiling, the friction lining is subject to unconditional rejection, since it is impossible to remove the oil that has impregnated the lining. Eliminate the cause of oil getting into the brake mechanism. If one pad is replaced, all four pads on both wheels must be replaced;
- to decide on the suitability of the brake pads, clean them with a wire brush, paying attention to the cleanliness of the friction lining grooves. Clean the pad seats in the guide bracket and caliper. The guide pins should move easily in the caliper bushings, inspect the protective covers of the guide pins and make sure they are intact;
- check the integrity of the brake piston boot. Make sure that there is no fluid leakage in the piston-cylinder pair;
- make sure that the brake disc does not have stepped, uneven wear, and its thickness does not go beyond the allowable values;
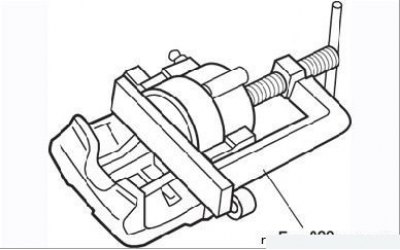
Figure 7.2. Recessing the piston into the caliper using Fre. 823

Figure 7.5. Installation of anti-creak springs (insert)
- install brake pads and anti-creak springs in the caliper (see Figure 7.5). In the case of installing new pads, the piston must be sunk into the caliper flush with its surface. For this purpose, use the tool Fre. 823 (Figure 7.2). In the absence of a fixture, you can use a clamp or suitable wooden blocks as levers. Do not overfill the expansion tank - remove excess liquid with a syringe or rubber bulb in time. The pads are installed towards the brake disc with friction linings. The block with the wear sensor is installed from the inside;
- reinstall the brake guide caliper and lower guide pin after applying Loctite Frenbloc to the threads;
- press the brake caliper and install the upper guide pin, having previously applied Loctite Frenbloc to the threads;
- tighten the guide pins with new bolts to the required torque, starting from the bottom pin;
- connect the connector to the brake pad wear sensor, correctly laying the wiring;
- press the brake pedal several times to bring the piston into working position;
- repeat all the above operations for the brake mechanism of the other wheel;
- lower the car and check the fluid level in the expansion tank.