
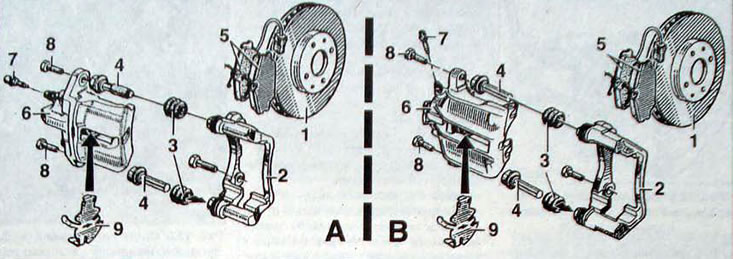
Pic. 12.1. Front brake caliper:A - cars with gasoline engines; B - cars with diesel engines; 1 - brake disc; 2 - caliper holder; 3 - protective cover; 4 - guide pin; 8 - 5 - brake pads; 6 - caliper; 7 - bleeder fitting; 8 - guide pin fastening bolt; 9 - anti-bounce plate.
Attention
- Be sure to replace all pads on one axle of your vehicle, even if only one pad is worn. If the brake pads are to be reinstalled, they must be marked before removal.
- To clean brake mechanisms, use only special brake cleaner.
Removal
- Apply the parking brake and block the rear wheels with chocks.
- Loosen the front wheel nuts. Raise the front of the car and place it on supports. Remove the front wheel.
- Use a syringe to pump out the brake fluid from the reservoir.
- Disconnect the connector from the brake pad wear sensor.
- Move the piston inside the slave cylinder by sliding the floating caliper bracket outward with your hands
- Unscrew the lower caliper mounting bolt, while using the second wrench to hold the guide pin from turning. Do not remove the upper caliper bolt and the hollow brake hose bolt.
- Using two wrenches, unscrew the bolts securing the guide pins (pic. 12.2). Do not reuse these bolts.
- Remove the floating brake caliper bracket and secure it to the suspension spring to protect the brake hose from damage.
- Remove the anti-bounce plate
- Remove the brake pads.
- Do not press the brake pedal with the brake pads removed.
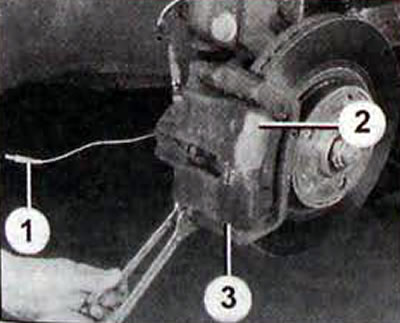
Pic. 12.2. Unscrewing the guide pin mounting bolt: 1 - wear sensor connector; 2 - caliper; 3 - caliper holder
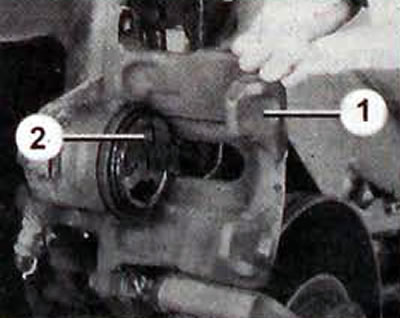
Pic. 12.3. Brake caliper deflection upward: 1 - caliper; 2 - anti-bounce plate
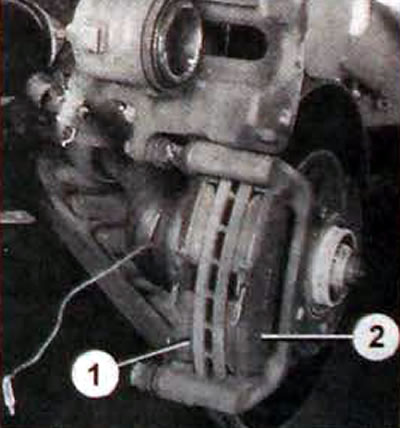
Pic. 12.4. Removing the anti-bounce plate and brake pads: 1 - internal brake pad; 2 - external brake pad
Examination
Before installing the brake pads, check:
- condition of the piston dust cover;
- condition of the guide pins and their protective covers (if necessary, lubricate the guide pins);
- no backlash;
- brake disc wear.
Installation
- Replace damaged parts.
- Using the Fre. 823 or G-clamp, press the piston into the caliper (pic. 12.5). When the piston is pushed in, brake fluid is forced out of the brake cylinder into the expansion tank, so constantly monitor the fluid level in the tank as well. if necessary, pump it out a little. You can also press the piston into the caliper using a wooden rod or the handle of a hammer. At the same time, make sure that the piston is not distorted and that the surfaces of the piston and the dust cover are not damaged.
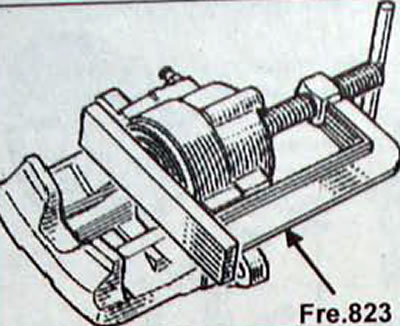
Pic. 12.5. Using the Fre. 823 for pressing the piston into the caliper
- Install new brake pads with springs, ensuring they are positioned correctly during installation. The block with the wire for the brake pad wear warning lamp is installed on the inside.
- Install the anti-bounce plate so that the arrow points toward the front of the vehicle.
- Install the brake caliper floating bracket and a new lower guide pin bolt.
- Press the brake caliper and install the upper guide pin bolt.
- Starting with the bottom bolt, tighten the guide pin bolts to the specified torque.
- Connect the brake pad wear indicator wire, making sure it is positioned correctly.
- Replace the brake pads on the second front wheel in the same way.
- Install the wheels and lower the car to the ground.
- Press the brake pedal several times to press the brake pads against the brake disc.
- Check the brake fluid level in the reservoir and top up if necessary.