
English Русский
Български
Беларускі
Український
Српски
Hrvatski
Română
Polski
Slovenský
Magyar
Bookmark Contacts Articles Sitemap
Company vehicles Peugeot Company vehicles Opel Company vehicles Skoda Company vehicles Land Rover Company vehicles Mitsubishi Company vehicles Volkswagen Company vehicles Honda
RenaultBook.ru


Duster   Fluence   Kangoo   Laguna   Logan   Megane   Sandero   Scenic   Symbol   Clio   Other
Renault 19 (1988-1996) Espace I and II (1984-1996) Espace III (1996-2002)

Replacing rear drum brake pads (Renault Espace III)

  • Main
  • Renault
  • Espace III (1996-2002)
  • Chassis, running gear
  • Brake system
  • Replacing rear drum brake pads
0
Contents: Removal 🠛 Installation 🠛
Note: Always replace all pads on one axle of the vehicle, even if only one pad is worn. If brake pads are to be reinstalled, they must be marked before removal.


Removal


  • Loosen the parking brake cable tension near the compensator
  • Remove the hub cap using tools Rou. 943 and Emb. 880
  • Loosen the hub mounting nut
  • Remove the hub and brake drum assembly, using a piece of cloth to protect the inner bearing ring
  • Use brake shoe pliers to remove the upper brake shoe tension spring (1. Fig. 12.12).
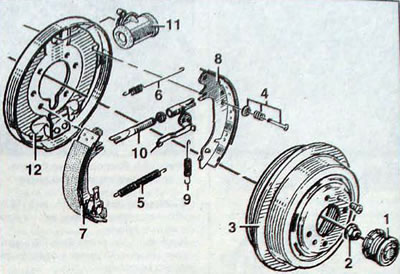
Fig. 12.11. Elements of a drum brake: 1 - cap; 2 - hub mounting nut; 3 - brake drum; 4 - brake pad…

Fig. 12.11. Elements of a drum brake: 1 - cap; 2 - hub mounting nut; 3 - brake drum; 4 - brake pad support unit against lateral movement; 5 - lower tension spring; 6 - upper tension spring;7 - brake shoe; 8 - brake shoe; 9 - spring; 10 - brake shoe clearance adjustment mechanism (expansion bar); 11 - working brake cylinder; 12 - brake shield
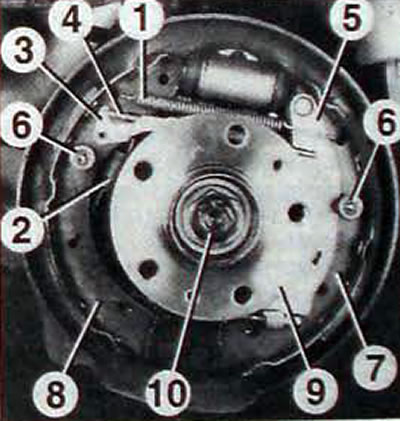

Fig. 12.12. Elements of the rear drum brake mechanism: 1 - upper tension spring; 2 - automatic…

Fig. 12.12. Elements of the rear drum brake mechanism: 1 - upper tension spring; 2 - automatic clearance adjustment spring; 3 - adjustment lever; 4 - brake shoe clearance adjustment mechanism (expansion bar); 5 - parking brake lever; 6 - brake shoe support unit against lateral movement; 7 - brake shoe; 8 - brake shoe; 9 - hub; 10 - hub mounting nut


  • Using pliers Fre. 573-01, disconnect the parking brake cable.
  • Remove the adjusting lever tension spring and adjusting lever (3).
  • Press, turn a quarter turn and remove the side brake shoe retainers (6).
  • Remove the spacer adjustment bar.
  • If there is no ABS sensor, remove the brake pads by crossing them over the journal to clear the lower tension spring from under the support pin bracket.
  • If you have an ABS sensor, cross the brake pads on the trunnion, use a screwdriver to disconnect the tension spring from one pad, and then disconnect it from the other pad.

Installation


  • Use brake cleaner to remove dust from the brake drum and shoes.
  • If there is no ABS sensor, attach the lower spring hooks to the brake pads, cross the brake pads over the journal, place the lower tension spring behind the support pin bracket and install the brake pads.
  • If you have an ABS sensor, place the lower tension spring behind the support pin bracket, attach the tension spring to one of the pads, cross the pads, then attach the tension spring to the second pad and install the brake pads.
  • Install the adjusting spacer bar, then insert the side brake shoe clamps into place, press and rotate a quarter turn, install the upper return spring, the adjusting lever tension spring and the adjusting lever. Using the Fre 573 pliers, attach the parking brake cable and install the lever with the stop against the brake shoe.
  • Make sure the ends of the upper and lower tension springs are correctly positioned on the brake shoes.
  • Using a screwdriver, turn the ratchet wheel of the spacer bar to adjust the position of the brake pads so that their diameter is 228 mm.
  • Install the hub and brake drum assembly, but do not tighten the hub mounting nut.
  • With the engine running, press the brake pedal several times to center the brake pads.
  • Turn the brake drum, it should rotate easily, barely touching the brake shoes. Otherwise, turn the ratchet wheel of the spacer bar in one direction or another.
  • Adjust the parking brake.
  • Gradually tighten the parking brake cables on the compensator so that the hand brake shoe levers begin to move when the parking brake lever is raised to a position between the first and second sector teeth and remain free when the lever is installed on the second sector tooth.
  • Install the brake drums and tighten the nuts to the specified torque.
  • Install the hub caps, filling them with grease if necessary.
  • Install the plugs on the brake shoe backing plates.

Original publication on the portal (www.Renaultbook.ru)
This article is available on: russian, bulgarian, belarusian, ukrainian, serbian, croatian, romanian, polish, slovak, hungarian
Article has been reviewed by editor: Trofimova Anastasia
Share with friends:
Previous
Espace III: Brake system
Next

Rear drum brake slave cylinder
Brake drums
Front brake discs
Repair of the front brake caliper
Floating calipers for front brake mechanisms
Replacing rear disc brake pads
Floating rear brake caliper brackets
Rear brake discs
Master brake cylinder
Vacuum brake booster
Other articles on other Renault models

➽ Replacing rear brake pads Renault Fluence 1 (2009-2020, petrol)
➽ Replacing the brake pads of the rear wheel brake mechanism Renault Logan 1 (2004-2012, petrol)
➽ Replacing the rear brake pads Renault Megane 1 (1995-2002)
➽ Replacing the brake pads of the rear wheel brake mechanism Renault Sandero 1 (2007-2012, petrol)
➽ Rear brake drum Renault Duster 1 (2009-2017)
Link to this article in different formats
Reviews and comments of visitors
No comments yet


Add two numbers 16 + 46


Renault 19 (1988-1996) 
  • General information
  • Maintenance
  • Power unit
  • Engine repair
  • Exhaust system
  • Cooling system
  • Supply system
  • Single-point injection
  • Multi-point injection
  • Diesel injection system
  • Transmission
  • Clutch
  • Car gearbox
  • Chassis, running gear
  • Car suspension
  • Steering
  • Brake system
  • Wheels and tires
  • Body and interior
  • Exterior (external elements)
  • Interior (internal elements)
  • Heating and ventilation
  • Electrical equipment
  • Equipment and devices
  • Headlights and lighting
  • Ignition system
  • Power devices
  • Electrical circuits
Espace I and II (1984-1996) 
  • General information
  • Introduction to the guide
  • Troubleshooting
  • Power unit
  • Engine repair
  • Cooling system
  • Carburetor fuel system
  • Injection fuel system
  • Diesel fuel system
  • Ignition system
  • Transmission
  • Clutch
  • Car gearbox
  • Drive shafts
  • Chassis, running gear
  • Brake system
  • Steering
  • Front suspension
  • Rear suspension
  • Body and interior
  • Exterior (external elements)
  • Interior (internal elements)
  • Doors, locks and windows
  • Electrical equipment
  • Equipment and devices
  • Electrical circuits
Espace III (1996-2002) 
  • General information
  • Introduction to the manual
  • User manual
  • Power unit
  • Petrol engines F3R
  • Petrol engines Z7X
  • Diesel engines G8T
  • Diesel engines G9T
  • Transmission
  • Clutch
  • Mechanical gearbox
  • Automatic gearbox
  • Drive shafts
  • Chassis, running gear
  • Steering
  • Front suspension
  • Rear suspension
  • Brake system
  • Body and interior
  • Exterior (external elements)
  • Interior (internal elements)
  • Doors, locks and windows
  • Heating and ventilation
  • Electrical equipment
  • Equipment and instruments
  • Power devices
  • Electrical circuits
RenaultBook.ru © 2018–2026 | Mobile version | News and articles | Sitemap: EN BG BY UA RS HR RO PL SK HU | Administration | Site search | Bookmark
Duster 1 (2009-2017) | Fluence 1 (2009-2020, petrol) | Kangoo 1 (1997-2007) | Laguna 2 (2001-2007) | Logan 1 (2004-2012, petrol) | Logan 2 (2012-2020) | Megane 1 (1995-2002) | Megan 2 (2002-2009, petrol) | Sandero 1 (2007-2012, petrol) | Scenic 1 (1996-2003) | Symbol 1 (1999-2008, petrol) | Symbol 2 (2008-2013, petrol) | Renault 19 (1988-1996) | Espace I and II (1984-1996) | Espace III (1996-2002) | Clio 1 (1990-1998) |
We want your visit to be comfortable 😌 and use cookies 🍪 to do so.