



Contents: Removal 🠛 Installation 🠛
Removal
- Disconnect the wires from the battery terminals and remove the battery from the vehicle.
- Remove the brake master cylinder from the brake booster and use a plastic clamp to secure the reservoir to the brake master cylinder.
- Disconnect the vacuum hose from the brake booster.
In the car's interior
- Remove the pin and disconnect the push rod from the brake pedal.
Cars with F engine
Under the car
- Disconnect 2 clips on the vacuum booster bracket and 1 clip on the shock absorber spring cup and release the wiring harness.
- Unscrew nuts 1,2 and 3 (fig. 12.19) brake booster mounts.
In the engine compartment
- Remove the air filter assembly.
- Disconnect the clutch cable from the engine bracket and remove the clamp. Route the cable behind the brake booster.
- If necessary, to access the nut 4 (fig. 12.19) brake booster mounts, release the heater radiator hoses from the clamps and move them to the side.
- Using the Fre. 1396 ratchet head, loosen the nut 4 (fig. 12.19) brake booster mounts.
- Remove the brake booster.
Cars with Z engine
Under the car
- Disconnect 2 clips on the vacuum booster bracket and 1 clip on the shock absorber spring cup and release the wiring harness.
- To access the vacuum booster mounting nuts, remove the exhaust pipes from the exhaust manifold to the catalytic converter and the exhaust pipe heat shield. Disconnect the connector from the vehicle speed sensor located on the gearbox.
- Unscrew nuts 1, 2 and 3 (Fig. 19) securing the brake booster.
In the engine compartment
- Remove the air filter cover and filter element, then insert a piece of cloth into the air duct hole.
- Remove the bracket on the throttle assembly that holds the throttle cable housing stop
- If necessary, to access the nut 4 (fig. 12.19) brake booster mounts, release the heater radiator hoses from the clamps and move them to the side.
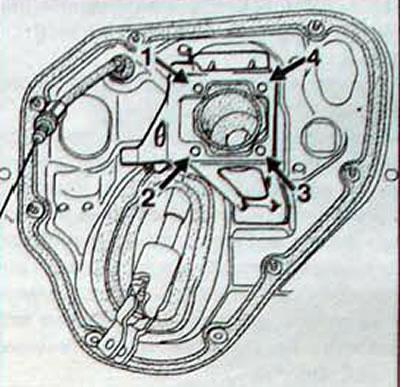
Fig. 12.19. Location of brake booster mounting nuts
- Using the Fre. 1396 ratchet head, loosen the nut 4 (fig. 12.19) brake booster mounts.
- Remove the brake booster.
Cars with G engine
Under the car
- Disconnect 2 clips on the vacuum booster bracket and 1 clip on the shock absorber spring cup and release the wiring harness.
- Unscrew nuts 1.2 and 3 (fig. 12.19) brake booster mounts.
In the engine compartment
- Remove the air cleaner assembly, the air supply line to the exhaust manifold and the air outlet line from the turbocharger.
- If necessary, to access the nut 4 (fig. 12.19) brake booster mounts, release the heater radiator hoses from the clamps and move them to the side.
- Using the Fre. 1396 ratchet head, loosen the nut 4 (fig. 12.19) brake booster mounts.
- Remove the brake booster.
Installation
- Before installing the master cylinder, check the distance to the pushrod "X", which should be 22.3 mm. If necessary, adjust the protrusion by turning the adjusting bolt.
- Check the length of the rod "U", which for Z-G8T engines should be 193.5 mm, and for F engines - 198.5 mm (fig. 12.18). To adjust and set the required length of the rod, rotate the fork at its end.
- Before installing the vacuum booster studs into the bracket, check that the corrugated boot is positioned correctly.
- Install the master cylinder.
- If the master cylinder was removed, bleed the brake system
- Check the brake booster for leaks.
- Connect a pressure gauge with an extension tube and a T-piece between the brake booster and the vacuum source (vacuum pump on diesel vehicles and intake manifold on petrol vehicles).
- Start the engine and let it idle for one minute.
- Use a clamp to pinch the flexible vacuum hose at location "A" (fig. 12.20) and turn off the engine.
- If in 15 s the vacuum decreases by more than 33 mbar from the initial value:
- check the condition of the gasket between the master cylinder and the brake booster;
- check the brake booster one-way valve and replace it if necessary;
- check the diaphragm and, if necessary, replace the brake booster.
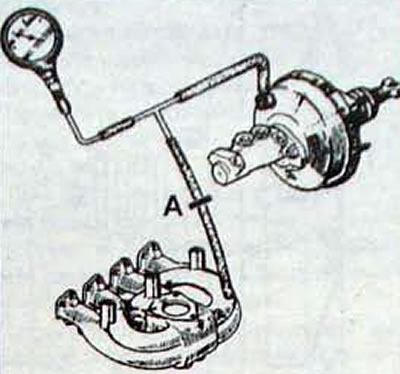
Fig. 12.20. Checking the tightness of the brake booster: A - the place where the flexible vacuum hose is pinched