English Русский
Български
Беларускі
Український
Српски
Hrvatski
Română
Polski
Slovenský
Magyar
Bookmark Contacts Articles Sitemap
Company vehicles Peugeot Company vehicles Opel Company vehicles Skoda Company vehicles Land Rover Company vehicles Mitsubishi Company vehicles Volkswagen Company vehicles Honda
RenaultBook.ru


Duster   Fluence   Kangoo   Laguna   Logan   Megane   Sandero   Scenic   Symbol   Clio   Other
Kangoo 1 (1997-2007)

Vacuum brake booster (Renault Kangoo 1)

  • Main
  • Kangoo
  • Kangoo 1 (1997-2007)
  • Chassis, running gear
  • Brake system
  • Vacuum brake booster
0
Contents: Special tools and equipment required 🠛 Tightening torques, Nm 🠛 Removal 🠛 Installation 🠛 Checking for leaks 🠛 Replacing the air filter 🠛 Replacing the check valve 🠛

Special tools and equipment required


  • Mot. 453-01 Hose clamp.
  • Vacuum pump.

Tightening torques, Nm


  • Vacuum booster mounting nut 18.
  • Nut for fastening the vacuum booster to the front shield 23.

The vacuum booster cannot be repaired. It is allowed to perform work related to the air filter and check valve.

Removal


1. Disconnect the wires from the battery and remove it.

2. Remove the brake master cylinder (follow the method described earlier).

3. Remove the battery heat shield (4 bolts, 1 nut).

4. Remove the two expansion tank mounting nuts and move it towards the engine.

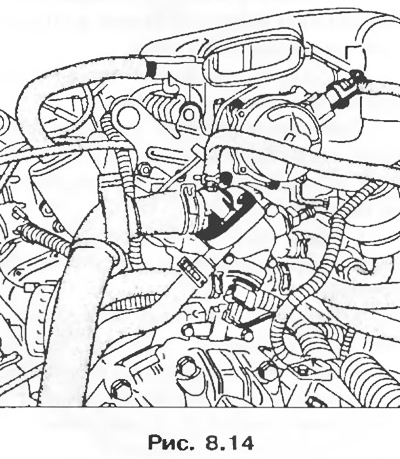
5. Disconnect the vacuum tube from the vacuum booster.

6. Remove from the passenger compartment:
  • finger A from the fork connecting the brake pedal to the push rod, moving the clamp;
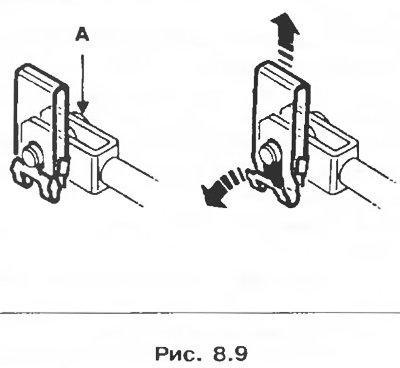
finger A from the fork connecting the brake pedal to the push rod, moving the clamp;

  • four nuts securing the vacuum booster;
  • vacuum booster.

vacuum booster.


Installation


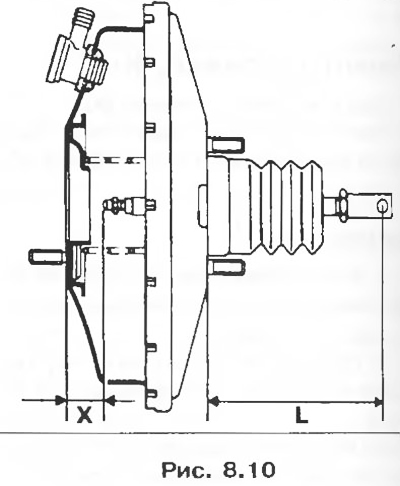
1. Before installation, check the dimensions: L = 104.8 mm and X = 22.3 mm.
1. Before installation, check the dimensions: L = 104.8 mm and X = 22.3 mm.


2. Installation is carried out in the reverse order of removal.

3. Remove air from the hydraulic circuit.

Checking for leaks


Caution! When checking the vacuum booster for leaks, ensure the required tightness between the vacuum booster and the master cylinder. If there are leaks, replace the sealing ring A.


The tightness of the vacuum booster is checked on a vehicle with a hydraulic circuit in working condition.

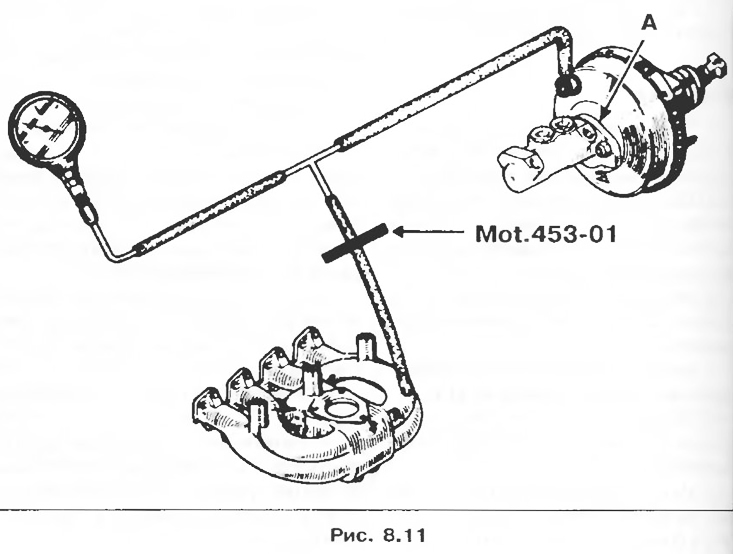
1. Connect a vacuum pump between the vacuum booster and the vacuum source (intake manifold) using a tee and the shortest possible tube.
1. Connect a vacuum pump between the vacuum booster and the vacuum source (intake manifold) using a…


2. Let the engine idle for one minute.

3. Clamp the tube between the tee and the vacuum source.


4. Turn off the engine.

5. If the vacuum drops by more than 33 mbar (25 mm Hg.) within 15 seconds, then there is a leak located:
  • or in the check valve (replace it);
  • or in the piston diaphragm (replace the vacuum booster).

6. If the vacuum booster is not working, the braking system will work, but the force applied to the pedal to achieve deceleration, as with the booster working, will be much greater.

Replacing the air filter


Replacing the air filter


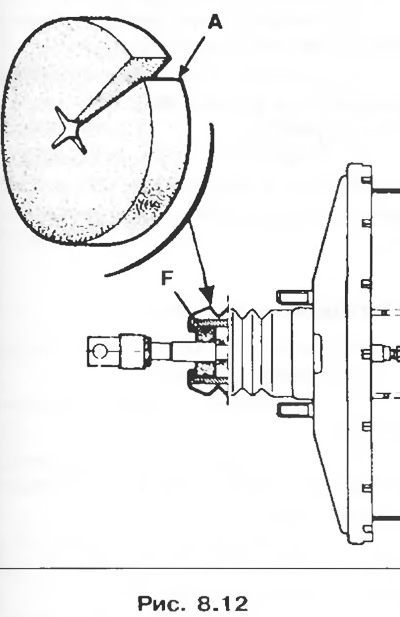
1. To replace the air filter F, it is not necessary to remove the vacuum booster.

2. Remove the dirty filter from the bottom of the pedal mounting bracket using a screwdriver or a metal hook.

3. Cut the new filter in area A and install it around the push rod.

4. Then press it into place, making sure that the filter completely fills the hole, thereby preventing unfiltered air from entering the vacuum booster.

Replacing the check valve


1. The operation can be performed on a vehicle.

2. Disconnect the vacuum tube from the vacuum booster.

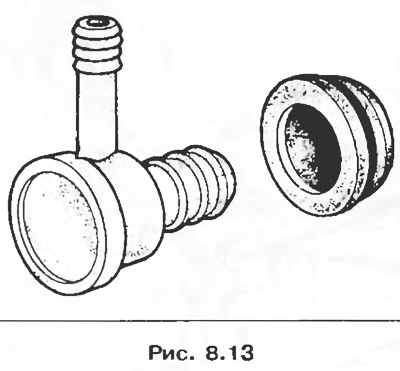
3. Pull the check valve out by rotating it to remove it from the rubber sealing washer.
3. Pull the check valve out by rotating it to remove it from the rubber sealing washer.


4. Check the condition of the rubber sealing washer and check valve.


5. Replace faulty parts.

6. Install the unit back into place.
This article is available on: russian, bulgarian, belarusian, ukrainian, serbian, croatian, romanian, polish, slovak, hungarian
Article has been reviewed by editor: Fedoseev Denis
Share with friends:
Previous
Kangoo 1: Brake system
Next

Master brake cylinder
Brake discs
Front disc brakes
Brake pads
Brake shoes (drum brake)
Vacuum pump (diesel engine)
Brake hoses
Brake force regulator
Parking brake system
Anti-lock braking system
Other articles on other Renault models

➽ Vacuum brake booster Renault Duster 1 (2009-2017)
➽ Vacuum brake booster Renault Fluence 1 (2009-2020, petrol)
➽ Installing a vacuum brake booster Renault Laguna 2 (2001-2007)
➽ Brake booster vacuum — check Renault Scenic 1 (1996-2003)
➽ Vacuum brake booster — removal and installation Renault Symbol 2 (2008-2013, petrol)
Link to this article in different formats
Reviews and comments of visitors
No comments yet


Add two numbers 15 + 10


Kangoo 1 (1997-2007) 
  • General information
  • User manual
  • Maintenance
  • Power unit
  • Petrol engine D7F
  • Petrol engine E7J
  • Diesel engine F8Q
  • Transmission
  • Clutch
  • Car gearbox
  • Drive shafts
  • Chassis, running gear
  • Car suspension
  • Steering
  • Brake system
  • Body and interior
  • Exterior and interior
  • Doors, locks and windows
  • Electrical equipment
  • Equipment and devices
  • Electrical circuits
RenaultBook.ru © 2018–2026 | Mobile version | News and articles | Sitemap: EN BG BY UA RS HR RO PL SK HU | Administration | Site search | Bookmark
Duster 1 (2009-2017) | Fluence 1 (2009-2020, petrol) | Kangoo 1 (1997-2007) | Laguna 2 (2001-2007) | Logan 1 (2004-2012, petrol) | Logan 2 (2012-2020) | Megane 1 (1995-2002) | Megan 2 (2002-2009, petrol) | Sandero 1 (2007-2012, petrol) | Scenic 1 (1996-2003) | Symbol 1 (1999-2008, petrol) | Symbol 2 (2008-2013, petrol) | Renault 19 (1988-1996) | Espace I and II (1984-1996) | Espace III (1996-2002) | Clio 1 (1990-1998) |
We want your visit to be comfortable 😌 and use cookies 🍪 to do so.