
English Русский
Български
Беларускі
Український
Српски
Hrvatski
Română
Polski
Slovenský
Magyar
Bookmark Contacts Articles Sitemap
Company vehicles Peugeot Company vehicles Opel Company vehicles Skoda Company vehicles Land Rover Company vehicles Mitsubishi Company vehicles Volkswagen Company vehicles Honda
RenaultBook.ru


Duster   Fluence   Kangoo   Laguna   Logan   Megane   Sandero   Scenic   Symbol   Clio   Other
Symbol 1 (1999-2008, petrol) Symbol 2 (2008-2013, petrol)

ABS hydraulic unit — removal and installation (Renault Symbol 2)

  • Main
  • Symbol
  • Symbol 2 (2008-2013, petrol)
  • Chassis, running gear
  • Brake system
  • ABS hydraulic unit — removal and installation
0
Contents: Removal 🠛 Installation 🠛

Removal


  • place the vehicle on a lift or raise the front of the vehicle and place supports under the body;
  • disconnect the negative battery cable;
  • remove the right front wheel;
  • take measures against brake fluid leakage by placing a plastic circle under the expansion tank cap or clamping the hose to the master brake cylinder;
  • in the engine compartment, disconnect the large contact connector from the hydraulic unit;
  • unscrew the two mounting bolts and remove the "ground" wires;
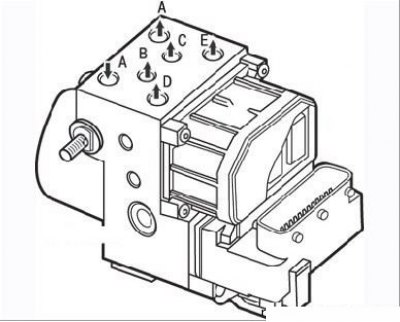
Figure 7.35. Connecting pipelines to the hydraulic unit: A – input from the master cylinder; B –…

Figure 7.35. Connecting pipelines to the hydraulic unit: A – input from the master cylinder; B – rear left wheel; C – rear right wheel; D – front right wheel; E – front left wheel

  • wipe the area around the tube connections. Remember how the tubes are connected to the unit so that you can install them correctly during assembly: the tubes and the inputs to the unit are color-coded (Figure 7.35). Loosen the nuts of the connections and carefully remove the tubes. Isolate the tubes from dirt penetration into the system. Immediately wash away any spilled liquid;
  • unscrew the upper bolt of the hydraulic unit bracket;
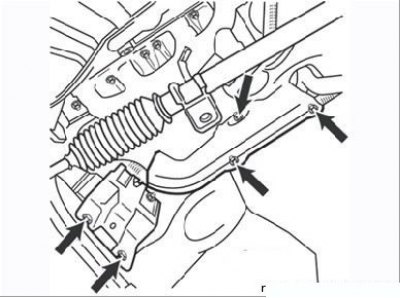
Figure 7.36. Two bolts for fastening the hydraulic unit bracket (arrows on the left) and three…

Figure 7.36. Two bolts for fastening the hydraulic unit bracket (arrows on the left) and three bolts for fastening the heat-insulating shield (arrows on the right)


  • working from underneath the vehicle, disconnect the exhaust pipe, three exhaust manifold heat shield mounting bolts (Figure 7.36) and two lower bolts securing the hydraulic unit bracket;
  • remove the hydraulic unit through the wheel arch niche.

Attention! Repair of the hydraulic unit is possible only at a specialized station.


Installation


The installation of the hydraulic unit is carried out in the reverse order of removal, and do the following:
  • tighten the block mounting nuts securely;
  • install the tubes according to the marks made;
  • tighten the nuts of the tube connections to the prescribed torques;
  • make sure the wires are routed correctly and connect the connector;
  • before connecting the wire to the battery, bleed the system as described above.

Note: The ECU is built into the valve body and therefore cannot be replaced separately.
This article is available on: russian, bulgarian, belarusian, ukrainian, serbian, croatian, romanian, polish, slovak, hungarian
Article has been reviewed by editor: Kupriyanov Sergey
Share with friends:
Previous
Symbol 2: Brake system
Next

Anti-lock braking system ABS
Bleeding the brake system
Brake light switch
Replacing the handbrake cable
Adjusting the handbrake
Front wheel sensor — removal and installation
Rear wheel sensor — removal and installation
Front Wheel Toothed Ring — Removal and Installation
Brake force compensator
Other articles on other Renault models

➽ Brake line between the hydraulic unit and the master cylinder Renault Duster 1 (2009-2017)
➽ Removal and installation of the hydraulic unit — removal Renault Fluence 1 (2009-2020, petrol)
➽ Removal and installation the ABS hydraulic unit Renault Kangoo 1 (1997-2007)
➽ Removal and installation of the hydraulic unit of the MK 60… Renault Laguna 2 (2001-2007)
➽ Removal and installation the hydraulic unit Renault Megan 2 (2002-2009, petrol)
Link to this article in different formats
Reviews and comments of visitors
No comments yet


Add two numbers 45 + 37


Symbol 2 (2008-2013, petrol) 
  • General information
  • User manual
  • Maintenance
  • Power unit
  • Engine repair
  • Cooling system
  • Fuel system
  • Exhaust system
  • Ignition system
  • Transmission
  • Clutch
  • Mechanical gearbox
  • Automatic gearbox
  • Drive shafts
  • Chassis, running gear
  • Front suspension
  • Rear suspension
  • Steering
  • Brake system
  • Body and interior
  • Exterior (external elements)
  • Interior (internal elements)
  • Doors, locks and windows
  • Heating and ventilation
  • Electrical equipment
  • Equipment and devices
  • Headlights and lighting
  • Power devices
  • Electrical circuits
Symbol 1 (1999-2008, petrol) 
  • General information
  • User manual
  • Car care
  • Maintenance
  • Power unit
  • Engine repair
  • Cooling and lubrication system
  • Supply system
  • Exhaust system
  • Ignition system
  • Transmission
  • Clutch
  • Mechanical gearbox
  • Automatic gearbox
  • Drive shafts
  • Chassis, running gear
  • Car suspension
  • Steering
  • Brake system
  • Body and interior
  • Exterior (external elements)
  • Interior (internal elements)
  • Doors, locks and windows
  • Restoration and repair
  • Electrical equipment
  • Equipment and devices
  • Headlights and lighting
  • Power devices
  • Heating and ventilation
  • Electrical circuits
RenaultBook.ru © 2018–2026 | Mobile version | News and articles | Sitemap: EN BG BY UA RS HR RO PL SK HU | Administration | Site search | Bookmark
Duster 1 (2009-2017) | Fluence 1 (2009-2020, petrol) | Kangoo 1 (1997-2007) | Laguna 2 (2001-2007) | Logan 1 (2004-2012, petrol) | Logan 2 (2012-2020) | Megane 1 (1995-2002) | Megan 2 (2002-2009, petrol) | Sandero 1 (2007-2012, petrol) | Scenic 1 (1996-2003) | Symbol 1 (1999-2008, petrol) | Symbol 2 (2008-2013, petrol) | Renault 19 (1988-1996) | Espace I and II (1984-1996) | Espace III (1996-2002) | Clio 1 (1990-1998) |
We want your visit to be comfortable 😌 and use cookies 🍪 to do so.