
English Русский
Български
Беларускі
Український
Српски
Hrvatski
Română
Polski
Slovenský
Magyar
Bookmark Contacts Articles Sitemap
Company vehicles Peugeot Company vehicles Opel Company vehicles Skoda Company vehicles Land Rover Company vehicles Mitsubishi Company vehicles Volkswagen Company vehicles Honda
RenaultBook.ru


Duster   Fluence   Kangoo   Laguna   Logan   Megane   Sandero   Scenic   Symbol   Clio   Other
Symbol 1 (1999-2008, petrol) Symbol 2 (2008-2013, petrol)

Front wheel sensor — removal and installation (Renault Symbol 2)

  • Main
  • Symbol
  • Symbol 2 (2008-2013, petrol)
  • Chassis, running gear
  • Brake system
  • Front wheel sensor — removal and installation
0
Contents: Removal 🠛 Installation 🠛

Removal


  • lift the wheel from the desired side and remove it;
  • in the engine compartment, disconnect the sensor wiring from the mount installed on the shock absorber strut;
  • disconnect the contact connector and remove the wiring seal on the wheel mudguard;
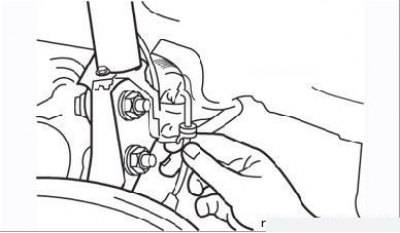
Figure 7.37. Front wheel sensor wiring in the wheel arch

Figure 7.37. Front wheel sensor wiring in the wheel arch

  • pull the wire under the wheel arch and remove the wiring from the bracket mounted on the suspension strut (Figure 7.37);
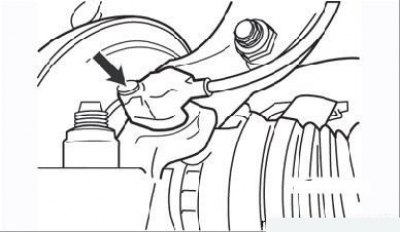
Figure 7.38. Front wheel sensor mounting bolt (arrow)

Figure 7.38. Front wheel sensor mounting bolt (arrow)


This note was copied from the resource RenaultBook.ru
  • unscrew the bolt securing the sensor to the steering knuckle (Figure 7.38);
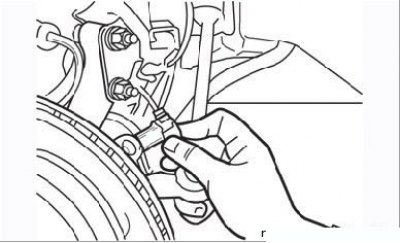
Figure 7.39. Removing the front wheel sensor

Figure 7.39. Removing the front wheel sensor


  • remove the sensor together with the wiring from the steering knuckle (Figure 7.39);
  • measure the resistance of the sensor, which should be approximately 1.2 kOhm.

Installation


  • apply universal grease to the end of the sensor;
  • clean the mating surfaces of the sensor and steering knuckle;
  • install the sensor into the hole by hand, without using a hammer. Screw in and tighten the sensor mounting bolt to the specified torque;
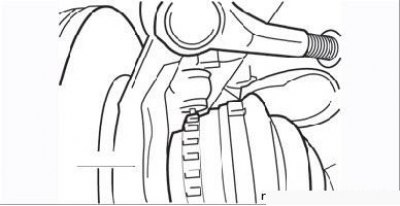
Figure 7.40. Measuring the gap between the gear wheel and the sensor

Figure 7.40. Measuring the gap between the gear wheel and the sensor

  • measure the gap between the toothed ring and the sensor, which should be 0.10–0.19 mm (Figure 7.40). Adjust the gap using suitable washers;
  • perform the remaining operations in the reverse order of removal.
This article is available on: russian, bulgarian, belarusian, ukrainian, serbian, croatian, romanian, polish, slovak, hungarian
Article has been reviewed by editor: Kupriyanov Sergey
Share with friends:
Previous
Symbol 2: Brake system
Next

ABS hydraulic unit — removal and installation
Anti-lock braking system ABS
Bleeding the brake system
Brake light switch
Replacing the handbrake cable
Rear wheel sensor — removal and installation
Front Wheel Toothed Ring — Removal and Installation
Brake force compensator
Other articles on other Renault models

➽ Front wheel speed sensor Renault Duster 1 (2009-2017)
➽ Front wheel speed sensor Renault Fluence 1 (2009-2020, petrol)
➽ Removal and installation the front wheel sensor Renault Logan 2 (2012-2020)
➽ Front Wheel Speed Sensor Renault Espace III (1996-2002)
➽ Calibration of the steering wheel angle sensor Renault Laguna 2 (2001-2007)
Link to this article in different formats
Reviews and comments of visitors
No comments yet


Add two numbers 28 + 30


Symbol 2 (2008-2013, petrol) 
  • General information
  • User manual
  • Maintenance
  • Power unit
  • Engine repair
  • Cooling system
  • Fuel system
  • Exhaust system
  • Ignition system
  • Transmission
  • Clutch
  • Mechanical gearbox
  • Automatic gearbox
  • Drive shafts
  • Chassis, running gear
  • Front suspension
  • Rear suspension
  • Steering
  • Brake system
  • Body and interior
  • Exterior (external elements)
  • Interior (internal elements)
  • Doors, locks and windows
  • Heating and ventilation
  • Electrical equipment
  • Equipment and devices
  • Headlights and lighting
  • Power devices
  • Electrical circuits
Symbol 1 (1999-2008, petrol) 
  • General information
  • User manual
  • Car care
  • Maintenance
  • Power unit
  • Engine repair
  • Cooling and lubrication system
  • Supply system
  • Exhaust system
  • Ignition system
  • Transmission
  • Clutch
  • Mechanical gearbox
  • Automatic gearbox
  • Drive shafts
  • Chassis, running gear
  • Car suspension
  • Steering
  • Brake system
  • Body and interior
  • Exterior (external elements)
  • Interior (internal elements)
  • Doors, locks and windows
  • Restoration and repair
  • Electrical equipment
  • Equipment and devices
  • Headlights and lighting
  • Power devices
  • Heating and ventilation
  • Electrical circuits
RenaultBook.ru © 2018–2026 | Mobile version | News and articles | Sitemap: EN BG BY UA RS HR RO PL SK HU | Administration | Site search | Bookmark
Duster 1 (2009-2017) | Fluence 1 (2009-2020, petrol) | Kangoo 1 (1997-2007) | Laguna 2 (2001-2007) | Logan 1 (2004-2012, petrol) | Logan 2 (2012-2020) | Megane 1 (1995-2002) | Megan 2 (2002-2009, petrol) | Sandero 1 (2007-2012, petrol) | Scenic 1 (1996-2003) | Symbol 1 (1999-2008, petrol) | Symbol 2 (2008-2013, petrol) | Renault 19 (1988-1996) | Espace I and II (1984-1996) | Espace III (1996-2002) | Clio 1 (1990-1998) |
We want your visit to be comfortable 😌 and use cookies 🍪 to do so.