
English Русский
Български
Беларускі
Український
Српски
Hrvatski
Română
Polski
Slovenský
Magyar
Bookmark Contacts Articles Sitemap
Company vehicles Peugeot Company vehicles Opel Company vehicles Skoda Company vehicles Land Rover Company vehicles Mitsubishi Company vehicles Volkswagen Company vehicles Honda
RenaultBook.ru


Duster   Fluence   Kangoo   Laguna   Logan   Megane   Sandero   Scenic   Symbol   Clio   Other
Logan 1 (2004-2012, petrol) Logan 2 (2012-2020)

Exhaust manifold of the K7M engine (1.6 l, 8 valves) (Renault Logan 2)

  • Main
  • Logan
  • Logan 2 (2012-2020)
  • Power unit
  • Intake and exhaust system
  • Exhaust manifold of the K7M engine (1.6 l, 8 valves)
0

Removal and installation the exhaust manifold with the catalytic converter assembly


Note: The exhaust manifold is integrated with the catalytic converter, so the exhaust manifold can only be removed as an assembly with the catalytic converter.


Attention:
  • The catalytic converter contains ceramic fibers placed in a closed block. Drilling or cutting the catalytic converter is prohibited.
  • Use glasses with side protection and cut-resistant gloves for work.


Removal the exhaust manifold with the catalytic converter assembly


1. Place the vehicle on a two-post lift.

2. Disconnect the negative battery terminal.

3. Remove the air intake duct.

4. Loosen the mounting bolts and remove the engine protective pan.

5. Remove the oxygen sensors.

6. Loosen the bolts (1) and remove the catalytic converter heat shield.
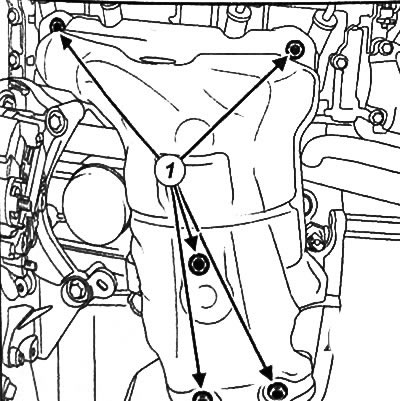
6. Loosen the bolts (1) and remove the catalytic converter heat shield.


7. Unscrew the nuts (2) of the exhaust pipe on the catalytic converter.
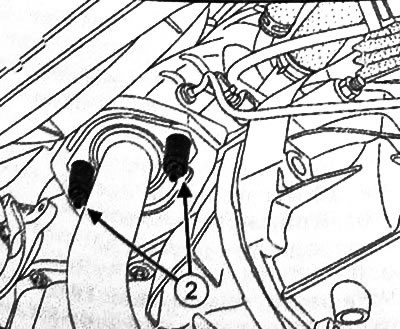
7. Unscrew the nuts (2) of the exhaust pipe on the catalytic converter.


8. Unscrew the nuts securing the exhaust manifold with the catalytic converter assembly to the cylinder head.
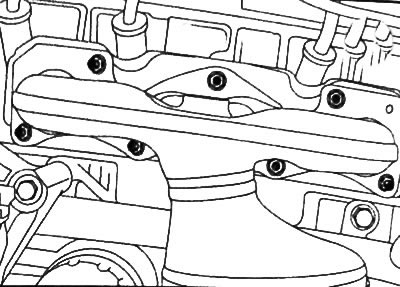


8. Unscrew the nuts securing the exhaust manifold with the catalytic converter assembly to the…


9. Loosen the nuts (3) of the catalytic converter bracket
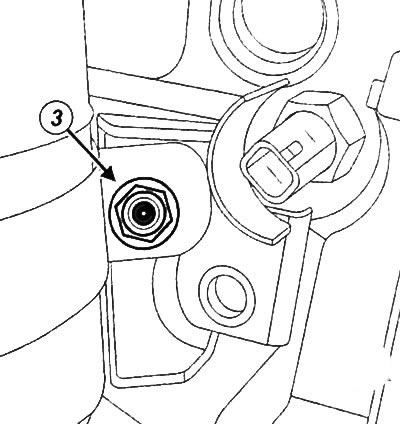
9. Loosen the nuts (3) of the catalytic converter bracket


10. Remove the catalytic converter bracket (4).
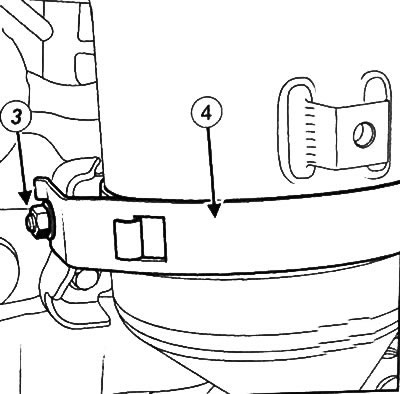
10. Remove the catalytic converter bracket (4).


11. Remove the exhaust manifold with the catalytic converter assembly.

12. Remove the exhaust manifold gasket.

Installing the exhaust manifold with catalytic converter assembly


Caution: To ensure proper sealing, contact surfaces must be clean, dry and free of grease (keep fingerprints away).


1. Using fine-grained sandpaper, clean the contact surfaces of the cylinder head and exhaust manifold (if reused), expansion chamber, catalytic converter (if reused).

2. Using a cleaning agent and a clean cloth, clean and degrease the contact surfaces of the cylinder head and exhaust manifold (if reused), expansion chamber, catalytic converter (if reused).

Note:
  • If the threaded studs were loose during removal, apply a high-strength locking compound to their threads and tighten to a torque of 9 Nm.
  • Tightening torque of exhaust pipe threaded studs: 7 Nm.


Caution: To avoid overheating of surrounding components, be careful not to damage the heat shields (do not tear, bend, stretch, etc.). If the heat shield is damaged in any way, it must be replaced with a new one.


3. Install a new exhaust manifold gasket.

Caution: Be sure to replace the exhaust manifold gasket with a new one.


4. Install the exhaust manifold with the catalytic converter assembly.

5. Tighten the exhaust manifold and catalytic converter assembly mounting nuts in the sequence shown in the figure to a torque of 25 N·m.
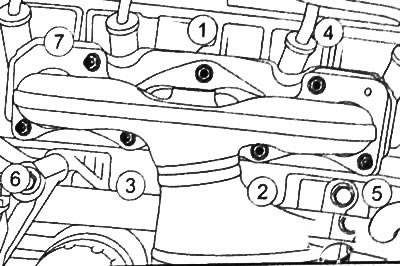
5. Tighten the exhaust manifold and catalytic converter assembly mounting nuts in the sequence…


6. Install a new exhaust pipe sealing ring.


7. Tighten the exhaust pipe and catalytic converter bracket nuts to 21 N·m.

8. Install the heat shield.

9. Tighten the catalytic converter heat shield bolts to 12 Nm.

10. Ensure that all exhaust pipe heat shields are in place and installed correctly.

11. Check for contact between the exhaust pipe and the underbody.

12. Check the tightness of the exhaust pipe.

13. Install oxygen sensors.

14. Install the engine protective pan.

15. Remove the air intake duct.

16. Connect the negative battery terminal.
This article is available on: russian, bulgarian, belarusian, ukrainian, serbian, croatian, romanian, polish, slovak, hungarian
Article has been reviewed by editor: Petrovsky Roman
Share with friends:
Previous
Logan 2: Intake and exhaust system
Next

Exhaust manifold of the D4F engine (1.2 l)
Car turbocharger
Air Intercooler (intercooler)
Intercooler exhaust air duct
Intercooler air intake duct
Exhaust manifold of the K4M engine (1.6 l, 16 valves)
Exhaust manifold of the K9K engine (1.5 l, diesel)
Exhaust pipe
Repair of a non-separable exhaust pipe
Catalytic converter for diesel engine K9K
Other articles on other Renault models

➽ Installation of camshaft seals for intake and exhaust valves of… Renault Fluence 1 (2009-2020, petrol)
➽ Exhaust manifold Renault Duster 1 (2009-2017)
➽ Exhaust manifold Renault Kangoo 1 (1997-2007)
➽ Removal and installation the rear exhaust manifold (LX7 engines) Renault Laguna 2 (2001-2007)
➽ Removal and installation the intake manifold and exhaust manifold Renault Megane 1 (1995-2002)
Link to this article in different formats
Reviews and comments of visitors
No comments yet


Add two numbers 13 + 23


Logan 2 (2012-2020) 
  • General information
  • Faults en route
  • Daily checks
  • Governing bodies
  • Maintenance
  • Power unit
  • Petrol engines 1.2 l
  • Petrol engines 1.6 l
  • Diesel engines 1.5 l
  • Cooling system
  • Lubrication system
  • Power and control system
  • Intake and exhaust system
  • Engine electrical equipment
  • Transmission
  • Clutch
  • Car gearbox
  • Drive shafts
  • Chassis, running gear
  • Suspension and wheels
  • Brake system
  • Steering
  • Body and interior
  • Exterior (external elements)
  • Interior (internal elements)
  • Safety system
  • Heating and air conditioning
  • Electrical equipment
  • Equipment and devices
  • Wiring diagrams (sedan)
  • Wiring diagrams (wagon)
Logan 1 (2004-2012, petrol) 
  • General information
  • Vehicle device
  • User manual
  • Faults en route
  • Daily maintenance
  • First maintenance
  • Second maintenance
  • Driver tips
  • Power unit
  • Engine repair
  • Lubrication system
  • Cooling system
  • Power and exhaust system
  • Transmission
  • Clutch
  • Car gearbox
  • Drive shafts
  • Chassis, running gear
  • Front suspension
  • Rear suspension
  • Steering
  • Brake system
  • Wheels and tires
  • Body and interior
  • Exterior (external elements)
  • Interior (internal elements)
  • Doors, locks and windows
  • Body Care
  • Electrical equipment
  • Equipment and devices
  • Headlights and lighting
  • Power devices
  • Electrical circuits
RenaultBook.ru © 2018–2026 | Mobile version | News and articles | Sitemap: EN BG BY UA RS HR RO PL SK HU | Administration | Site search | Bookmark
Duster 1 (2009-2017) | Fluence 1 (2009-2020, petrol) | Kangoo 1 (1997-2007) | Laguna 2 (2001-2007) | Logan 1 (2004-2012, petrol) | Logan 2 (2012-2020) | Megane 1 (1995-2002) | Megan 2 (2002-2009, petrol) | Sandero 1 (2007-2012, petrol) | Scenic 1 (1996-2003) | Symbol 1 (1999-2008, petrol) | Symbol 2 (2008-2013, petrol) | Renault 19 (1988-1996) | Espace I and II (1984-1996) | Espace III (1996-2002) | Clio 1 (1990-1998) |
We want your visit to be comfortable 😌 and use cookies 🍪 to do so.