
Gland from the side of the drive belt
1. Remove the crankshaft gear as described in Section Removal, inspection and installation of the gear wheel of the toothed drive belt and the tension mechanism.
2. Note the correct location of the old oil seal, then use a screwdriver to remove it from the casing. Do not damage the surface of the crankshaft, spacer or seal housing.
Note. On some models it may be necessary to remove the lower inner toothed belt cover. In this case, remove the countershaft gear/roller and the idler pulley itself (refer to section Removal, inspection and installation of the gear wheel of the toothed drive belt and the tension mechanism), and then unscrew the cover.
3. Clean the gland housing and remove any nicks or burrs with sandpaper that may be causing damage to the gland. On late F3R 750 and F3R 751 engines that have a separate spacer at the end of the crankshaft, remove the spacer - if it is worn where the old oil seal touched, turn it around and reinstall it so the new oil seal is touching the unworn area. If the spacer is excessively worn, replace it.
4. Lubricate the sealing lips of a new oil seal and place it on the end of the shaft with the closed side facing out. Press the stuffing box into the casing by hand, then use a socket or a metal pipe to hammer it in to the previously marked depth - work very carefully so as not to damage the lips of the stuffing box. If the shaft surface has been heavily worn out, drive the new oil seal a little deeper into the housing so that the sealing lip touches the unworked area of the shaft. On engines with a separate spacer, lubricate it, then slide it over the crankshaft and carefully insert it into the oil seal.
5. Where necessary, install the lower inner drive belt cover and install the intermediate pulley and gear/roller as described in Section Removal, inspection and installation of the gear wheel of the toothed drive belt and the tension mechanism.
6. Install the crankshaft gear as described in Section Removal, inspection and installation of the gear wheel of the toothed drive belt and the tension mechanism and a new toothed drive belt as described in Section Removal, inspection and installation of a toothed drive belt.
Oil seal housing on the drive belt side
1. Remove the toothed drive belt as described in Section Removal, inspection and installation of a toothed drive belt, with crankshaft gear and intermediate shaft or intermediate pulley, refer to Section Removal, inspection and installation of the gear wheel of the toothed drive belt and the tension mechanism. Remove the segment key from the slot in the crankshaft, then unscrew the lower inner drive belt cover from the cylinder block.
2. Turn away bolts of fastening of a casing of an epiploon to the pallet.
3. Remove the mounting bolts and carefully separate the gland housing, marking the dowel pins near the bottom two bolt holes. If the pan gasket is damaged (F3R engines), the pan must be removed and the gasket replaced. On engines without an intermediate shaft, note the presence of the oil pump drive chain guide and two dowel pins. Check that the guide is fit for further use and replace it if there is any doubt about the condition. On late model F3R 750 and F3R 751 engines, also note the presence of a separate spacer at the end of the crankshaft.
4. The stuffing box should be changed every time the casing is removed. Note the location of the old oil seal, then use a screwdriver to remove it and wipe the bearing surface. Lubricate the outer edge of the new oil seal and insert it into the casing with the closed side facing out. Lay the casing on a block of wood, then use a head or metal pipe to drive the gland into place.
5. When installing, clean the mating surfaces of the casing, pan, and block of sealant. Make sure the chain guide is (where applicable) correctly installed and the dowel pins are in place in the housing.
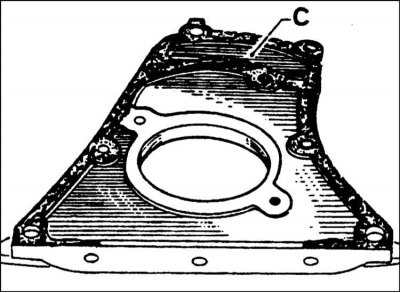
6. Apply a bead of sealant with a diameter of 0.6 - 1.0 mm (Renault recommends CAF 4/60 THIXO or Rhodorseal 5661) on the casing gasket surface, around the inside edges of the bolt holes, and on the threads of two bolts (closest to the omentum). Make sure that the sealant plugs the oil passage at the top end of the casing (refer to accompanying illustration). Install the casing on the cylinder block in the sump, tightening the bolts evenly.
7. Install separate spacer (where applicable) as described in paragraph 4 (BELT SIDE OIL SEAL) higher. On all engines, install the slotted key into the slot in the crankshaft, then install the lower inner drive belt cover and securely tighten the mounting bolts.
8. Install the crankshaft and countershaft gears or idler pulley. Then install a new toothed drive belt, refer to Sections Removal, inspection and installation of the gear wheel of the toothed drive belt and the tension mechanism and Removal, inspection and installation of a toothed drive belt.
Oil seal on flywheel/drive plate side
1. To replace the left crankshaft oil seal, the transmission must be removed from the engine compartment so that the clutch can be removed (where applicable) and a flywheel/drive disk - address to the Head Transmission and Chapter Clutch. Remove the flywheel/drive disk as described in Section Engine/transmission mounts - inspection and replacement current Chapter.
2. Remove the old oil seal with a screwdriver.
3. Inspect the oil seal contact surface on the crankshaft. If it is rough or grooved in the area where the oil seal touched, the new oil seal will need to be installed at a slightly shallower depth.
4. Wipe the seal contact surface, then dip the new seal in oil and slide it over the crankshaft with the closed side facing out.
5. Using a metal tube, hammer in the stuffing box to the marked depth.
6. Install flywheel/drive disc, refer to Section Engine/transmission mounts - inspection and replacement current Chapter. Establish coupling as it is described in the Head Clutch, then install the transmission assembly and attach it to the engine as described in the relevant Part of the Chapter.