
Note. This procedure will require a winch to lift the engine. Use a new pan gasket or suitable sealant when installing.
Removing
F3R engines
1. Disconnect the ground cable from the battery (contact the head Engine electrical equipment).
2. Drain the engine oil, then install and tighten the drain plug using a new washer.
3. Jack up the front of the vehicle and place on axle stands. Where available, remove the lower engine cover.
4. Remove the cover from the right engine mount.
5. Use a winch to support the weight of the engine/transmission.
6. Remove the bolts securing the muffler/converter downpipe to the exhaust manifold. Separate the downpipe and support it.
7. Remove the flywheel/drive plate reinforcing bracket. Note that one of the bolts secures the rear mount bracket to the transmission and that a socket wrench is required to loosen the bolts that hold the bracket to the engine.
8. Turn away the holders fastening a tube of a hydraulic system of a steering with the amplifier to the right side of a stretcher.
9. Remove the nut securing the right engine mount upper bracket to the motion limiter/rubber cushion assembly on the body.
10. Raise the engine just enough to provide enough room to remove the pan. Remember that the drive shafts and the remaining engine mounts remain connected.
11. Remove the bolts securing the sump to the cylinder block, but leave two diagonally opposite bolts until you separate the sump from the cylinder block.
12. Using a spatula, separate the pallet from the base of the cylinder block. Do not use a screwdriver as it may damage the contact surfaces.
13. Turn away two remained bolts and lower the pallet. Remove gasket where present.
14. Clear the block of cylinders and the pallet of the rests of laying or hermetic and wipe them dry.
F7R engines
Note. Use suitable sealant when installing (Renault recommends Rhodorseal 5661).
1. Disconnect the ground cable from the battery (contact the head Engine electrical equipment).
Attention! If the radio in your car is coded, make sure you know the code before disconnecting the battery.
2. Drain the engine oil, then install and tighten the drain plug using a new washer.
3. Jack up the front of the vehicle and place on axle stands. Where available, remove the lower engine cover.
4. Remove both front wheels and liners from the wheel arches.
5. Turn away fastenings of a stretcher to a body from each party of the car.
6. Set the steering gear to position "directly". Working in the engine compartment, slide back the rubber o-ring, then unscrew and remove the eccentric bolt that secures the steering column base to the steering mechanism, and separate the steering column (contact the head Suspension and steering) from the steering gear.
Attention! On models with an airbag, it is important not to damage the airbag rotary switch below the steering wheel.
7. Remove beeps (contact the head Onboard electrical equipment).
8. Remove the bolts securing the muffler/converter downpipe to the exhaust manifold. Separate the downpipe and support it.
9. Turn away the holders fastening a tube of a hydraulic system of a steering with the amplifier to a stretcher.
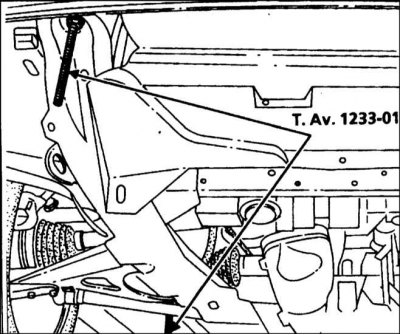
10. Unscrew one bolt securing the subframe to the bottom, noticing the location of the spacers and washers, then install one Renault special tool No. T.Av.1233-01 B instead, wrap the rod in the bottom and tighten the nut and washer from the back of the subframe (refer to accompanying illustration). Repeat this procedure with the remaining bolts. If the specified Renault tools are not available, four threaded rods can be used (10 mm on one end, 12 mm on the other).
11. Carefully and evenly unscrew the nuts at the corners of the subframe so that it drops 55 - 60 mm.
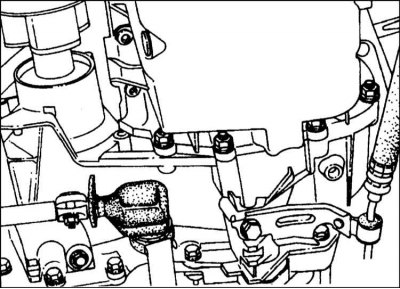
12. Turn away four nuts of fastening of transmission to the engine on the pallet, then turn away racks (refer to accompanying illustration).
13. Turn away bolts fastening the pallet to the block of cylinders, but leave two diagonally opposite until the pallet will not be disconnected from the block of cylinders.
14. Using a spatula, separate the pallet from the base of the cylinder block. Do not use a screwdriver as it may damage the contact surfaces.
15. Turn away two remained bolts and lower the pallet.
16. Clear the block of cylinders and the pallet from hermetic and wipe them dry.
Installation
F3R engines
1. Clean the mating surfaces of the sump and cylinder block.
2. Where necessary, place a new gasket on the sump or apply Rhodorseal 5661 to the surface of the sump.
3. If a gasket is not used, it is important to position the sump so that it does not have to be moved again after the sealant has touched the cylinder block. Long bolts or pins can be used as guides.
4. To prevent oil from dripping from the oil pump and cylinder block, wipe these areas before installing the sump.
5. Press the pallet to the block of cylinders, then insert bolts and gradually tighten them given in Specifications effort.
6. Lower the engine, then install and tighten the right engine mount nut.
7. Establish holders for a tube of a hydraulic system of a steering with the amplifier.
8. Install the flywheel/drive plate reinforcing bracket and tighten the mounting bolts.
9. Install the muffler/converter downpipe and tighten the bolts.
10. Disconnect winch and install cover on right engine mount.
11. Connect the battery, then lower the vehicle to the ground.
12. Fill the engine with fresh oil.
F7R engines
1. Clean the mating surfaces of the sump and cylinder block.
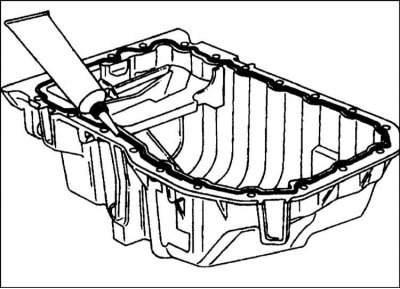
2. Apply a bead of sealant 1mm wide (Renault recommends Rhodorseal 5661) on the matching surface of the sump, moreover, the sealant must be applied on the outside of the sump groove (refer to accompanying illustration).
3. It is important to position the sump so that it does not have to be moved again after the sealant touches the cylinder block. Long bolts or pins can be used as guides. To prevent oil from dripping from the oil pump and cylinder block, wipe these areas before installing the sump.
4. Press the pallet to the block of cylinders and insert two diagonally opposite bolts. Tighten these bolts, then screw the four struts into the clutch housing. Tighten the racks, install a nut with a washer on them.
5. Install the remaining pan bolts. Gradually tighten all bolts in a diagonal sequence as shown in Specifications force, then tighten the four nuts securing the transmission to the engine.
6. Raise the subframe towards the bottom, evenly tightening the nuts on each rod. When the subframe is pressed against the bottom, one by one remove the tool and install the bolts of its fastening to the bottom. Tighten all four bolts to the specified torque specifications (contact the head Suspension and steering).
7. Fix a tube of a hydraulic system of a steering with the amplifier holders on a stretcher and tighten bolts.
8. Attach the muffler/converter downpipe and tighten the bolts.
9. Set the beeps (contact the head Onboard electrical equipment).
10. Refer to the Head Suspension and steering and attach the steering column to the steering gear. Install the eccentric bolt and tighten it to the Specifications effort.
11. Establish fastenings of a subframe to a body and reliably tighten bolts.
12. Install the wheel arch liners and engine undershield, if equipped.
13. Install the front wheels and lower the vehicle to the ground. Tighten the wheel bolts to Specifications effort.
14. Connect the mass cable to the battery.
15. Fill the engine with oil.