
English Русский
Български
Беларускі
Український
Српски
Hrvatski
Română
Polski
Slovenský
Magyar
Bookmark Contacts Articles Sitemap
Company vehicles Peugeot Company vehicles Opel Company vehicles Skoda Company vehicles Land Rover Company vehicles Mitsubishi Company vehicles Volkswagen Company vehicles Honda
RenaultBook.ru


Duster   Fluence   Kangoo   Laguna   Logan   Megane   Sandero   Scenic   Symbol   Clio   Other
Megane 1 (1995-2002) Megan 2 (2002-2009, petrol)

Removal, inspection and installation of drive belt gears and tensioner mechanism (Renault Megane 1)

  • Main
  • Megane
  • Megane 1 (1995-2002)
  • Power unit
  • Petrol engines 2.0 l
  • Removal, inspection and installation of drive belt gears and tensioner mechanism
0
Contents: Removal 🠛 Inspection 🠛 Installation 🠛
Note: Use a new timing belt when installing.


Removal


1. Remove the toothed drive belt as described in Section Removal, inspection and installation of the toothed drive belt.

Camshaft gear
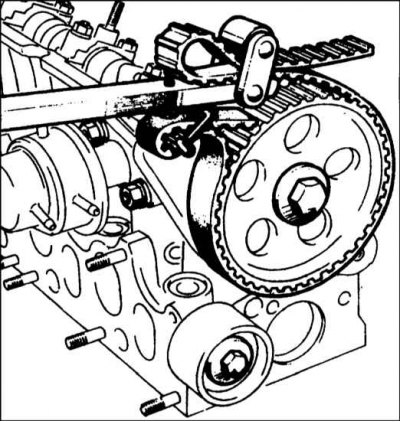


Camshaft gear


1. Loosen the pulley mounting bolt and remove the bolt and washer. You will need a special tool to prevent the pulley from rotating. If you do not have any of the Renault special tools mentioned here, you can make a suitable replacement as follows: Take two steel plates (long and short) and three pairs of nuts and bolts; one nut and bolt will be the pivot of the forked grip, and the other two pairs of nuts and bolts are screwed onto the ends of the "fork". They should fit into the holes in the pulley. The pulley can also be held using an old toothed drive belt and pliers (refer to the accompanying illustration).

2. Remove the retaining bolt, pull the pulley off and remove the woodruff key - note that on later model engines the woodruff key is part of the pulley. Inspect the seal for oil leaks and replace it if necessary as described in Section Replacing camshaft seals.


Intermediate shaft gear


1. On engines with an intermediate shaft (refer to Specifications), remove the timing belt bolt while holding the pulley with an old timing belt and pliers, then remove the pulley. Note that on some engines the woodruff key is part of the pulley. On engines without a countershaft (refer to Specifications), unscrew the bolt and remove the pulley.

Crankshaft gear


1. By unscrewing the crankshaft pulley bolt and removing the pulley and toothed drive belt as described above, the toothed wheel can be removed from the crankshaft journal (refer to the accompanying illustration). If necessary, remove the woodruff key from the slot in the crankshaft. Inspect the oil seal for oil leaks and, if necessary, replace it as described in Section Replacing crankshaft seals.

Tensioner pulley


1. Loosen the large nut and mounting bolt and remove the tensioner assembly.

Text published on the website (www.RENAULTBOOK.ru)

Intermediate pulley


1. Loosen the bolts securing the intermediate pulley shield to the cylinder block and remove the pulley assembly.

Inspection


1. Inspect the gear teeth for nicks and other damage. The teeth are wear-resistant and should not wear out over the life of the engine.

2. Rotate the tensioner and idler pulley by hand and check that they rotate freely. Do not attempt to clean them with solvent as it may enter the bearings. If there is wear, replace the tensioner and/or idler pulley as necessary.

Installation


Camshaft gear


1. Insert the woodruff key into the slot in the camshaft, install the pulley, make sure that the woodruff key enters the slot.


2. Install the pulley mounting bolt and tighten it to the specified torque Specifications effort.

3. Install the new timing belt as described in Section Removal, inspection and installation of the toothed drive belt.

Intermediate shaft gear


1. On engines with an intermediate shaft (refer to Specifications), install the segment key (where is available) onto the shaft, place the gear wheel. Install the gear wheel mounting bolt and tighten it to the specified Specifications effort.

2. On engines without an intermediate shaft (refer to Specifications), install the roller and tighten the mounting bolt securely.

3. Install the new timing belt as described in Section Removal, inspection and installation of the toothed drive belt.

Crankshaft gear


1. Install the woodruff key into the slot in the crankshaft and install the pulley.

2. Install the new timing belt as described in Section Removal, inspection and installation of the toothed drive belt.

Tensioner pulley


1. Install the tensioner on the rack and tighten the mounting nut and bolt.

2. Install the new timing belt as described in Section Removal, inspection and installation of the toothed drive belt.

Intermediate pulley


1. Install the idler pulley onto the cylinder block and tighten the mounting bolts securely.

2. Install the new timing belt as described in Section Removal, inspection and installation of the toothed drive belt.
This article is available on: russian, bulgarian, belarusian, ukrainian, serbian, croatian, romanian, polish, slovak, hungarian
Article has been reviewed by editor: Fedoseev Denis
Share with friends:
Previous
Megane 1: Petrol engines 2.0 l
Next

Removal, inspection and installation of the toothed drive belt
Checking and adjusting valve clearances (F3R engines)
Top Dead Center (TDC) Position for Piston #1
Description of compression test
Repair of gasoline engines in the engine compartment
Replacing camshaft seals
Replacing the intermediate shaft seal
Removal, inspection and installation of camshaft(s) and tappets
Removal, inspection and installation of the cylinder head
Removal and installation the pallet
Other articles on other Renault models

➽ Drive Belt Sprockets and Tensioner Mechanism — removal and… Renault Clio 1 (1990-1998)
➽ Gas distribution mechanism drive belt Renault Kangoo 1 (1997-2007)
➽ Removal the timing belt of the gas distribution mechanism drive Renault Logan 2 (2012-2020)
➽ Timing belt for gas distribution mechanism drive Renault Espace III (1996-2002)
➽ Auxiliary equipment drive belt (engine with heater) Renault Duster 1 (2009-2017)
Link to this article in different formats
Reviews and comments of visitors
No comments yet


Add two numbers 21 + 50


Megan 2 (2002-2009, petrol) 
  • User manual
  • Introduction to manual
  • Controls and instruments
  • Salon equipment
  • Operation and driving
  • Maintenance and care
  • Power unit
  • Engine repair
  • Fuel system
  • Injection system
  • Intake and exhaust system
  • Starting and charging system
  • Cooling system
  • Decreased toxicity
  • Transmission
  • Clutch
  • Mechanical gearbox
  • Automatic gearbox
  • Wheel drive mechanism
  • Chassis, running gear
  • Suspension and wheels
  • Steering
  • Brake system
  • Body and interior
  • Exterior (external elements)
  • Interior (internal elements)
  • Doors, locks and windows
  • Heating and air conditioning
  • Electrical equipment
  • Equipment and devices
  • Headlights and lighting
  • Electrical circuits
Megane 1 (1995-2002) 
  • General information
  • User manual
  • Maintenance
  • Power unit
  • Petrol engines 1.4/1.6 l
  • Petrol engines 2.0 l
  • Diesel engines 1.9 l
  • Overhaul of engines
  • Cooling system
  • Fuel system (petrol)
  • Fuel system (diesel)
  • Decreased toxicity
  • Charge and launch systems
  • Ignition system (petrol)
  • Preheat system (diesel)
  • Transmission
  • Clutch
  • Mechanical gearbox
  • Automatic gearbox
  • Drive shafts
  • Chassis, running gear
  • Brake system
  • Car suspension
  • Steering
  • Body and interior
  • Exterior (external elements)
  • Interior (internal elements)
  • Doors, locks and windows
  • Electrical equipment
  • Equipment and devices
  • Electrical circuits
RenaultBook.ru © 2018–2026 | Mobile version | News and articles | Sitemap: EN BG BY UA RS HR RO PL SK HU | Administration | Site search | Bookmark
Duster 1 (2009-2017) | Fluence 1 (2009-2020, petrol) | Kangoo 1 (1997-2007) | Laguna 2 (2001-2007) | Logan 1 (2004-2012, petrol) | Logan 2 (2012-2020) | Megane 1 (1995-2002) | Megan 2 (2002-2009, petrol) | Sandero 1 (2007-2012, petrol) | Scenic 1 (1996-2003) | Symbol 1 (1999-2008, petrol) | Symbol 2 (2008-2013, petrol) | Renault 19 (1988-1996) | Espace I and II (1984-1996) | Espace III (1996-2002) | Clio 1 (1990-1998) |
We want your visit to be comfortable 😌 and use cookies 🍪 to do so.