
English Русский
Български
Беларускі
Український
Српски
Hrvatski
Română
Polski
Slovenský
Magyar
Bookmark Contacts Articles Sitemap
Company vehicles Peugeot Company vehicles Opel Company vehicles Skoda Company vehicles Land Rover Company vehicles Mitsubishi Company vehicles Volkswagen Company vehicles Honda
RenaultBook.ru


Duster   Fluence   Kangoo   Laguna   Logan   Megane   Sandero   Scenic   Symbol   Clio   Other
Megane 1 (1995-2002) Megan 2 (2002-2009, petrol)

Checking and replacing front wheel hub bearings (Renault Megane 1)

  • Main
  • Megane
  • Megane 1 (1995-2002)
  • Chassis, running gear
  • Car suspension
  • Checking and replacing front wheel hub bearings
0
Contents: Examination 🠛 Replacement 🠛
Note: The double row roller bearing is lubricated and sealed and does not require maintenance. Do not remove the bearing unless absolutely necessary, as this will damage it. Do not overtighten the drive shaft nut in an attempt to "adjust" the bearing.


Note: A press will be required to overhaul the unit; if this is not available, use a large bench vise and suitable shims (type of large nests). The inner bearing rings are pressed onto the hub; if they remain on the hub after the latter has been removed from the steering knuckle, a suitable bearing puller will be required.


Examination


1. To check the front wheel bearing for wear, measure the hub side play. Set the micrometer so that its probe rests on the outside of the hub flange. The play should not exceed 0.05 mm. If it is not, the bearings are excessively worn and should be replaced.

Replacement


1. Remove the steering knuckle assembly as described in Section Removal and installation the front steering knuckle assembly, then unscrew the screws securing the brake disc protective cover and remove the cover from the hub.

2. Clamp the steering knuckle securely in a vice. Using a suitable spacer, press the hub out of the bearing. If the inner bearing race remains on the hub, remove it using a suitable bearing puller.

3. Remove the bearing retaining ring from the inside of the steering knuckle assembly.

4. Where necessary, install the inner race into its working position and support the inner surface of the steering knuckle. Using a suitable spacer sleeve (it should rest only on the inner ring of the bearing), push the bearing assembly out of the steering knuckle.


5. Thoroughly clean the hub and knuckle, removing all traces of dirt and grease. File down any burrs or rough spots that might interfere with assembly. Inspect components for cracks, other damage, or signs of wear, and replace if necessary. As noted above, the bearing and snap ring should be replaced each time they are removed. Purchase a bearing replacement repair kit that includes the bearing, snap ring, and drive shaft nut and washer.

6. When assembling, make sure (if possible), that the new bearing is filled with grease. Apply a thin layer of oil to the outer ring of the bearing and the contact surface of the hub.

7. Before installing the new bearing, remove the plastic covers that protect the seals, but leave the inner plastic sleeve in place to hold the inner races together.

8. Support the steering knuckle securely and place the bearing on it. Slide the bearing into position, ensuring that it is not tilted. Use a suitable spacer sleeve that rests on the outer race only.

9. Once the bearing is installed, secure it with a new retaining ring and remove the plastic bushing. Apply a small amount of grease to the sealing lips of the oil seal.
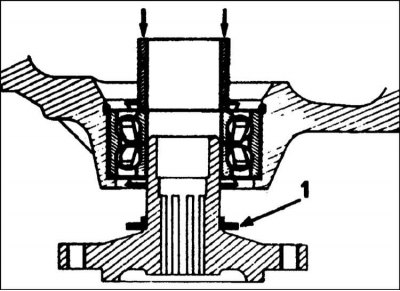
9. Once the bearing is installed, secure it with a new retaining ring and remove the plastic…


10. Turn the hub upside down and securely place it on stands. Place the steering knuckle on the hub and slide it into position using the spacer sleeve that rests on the inner bearing race (refer to the accompanying illustration). Make sure the hub rotates freely and wipe off any excess oil.


11. Install the brake disc protective cover onto the steering knuckle and tighten the mounting screws.

[Original version on our portal: renaultbook.ru]

12. Install the steering knuckle assembly (Section Removal and installation the front steering knuckle assembly).
This article is available on: russian, bulgarian, belarusian, ukrainian, serbian, croatian, romanian, polish, slovak, hungarian
Article has been reviewed by editor: Fedoseev Denis
Share with friends:
Previous
Megane 1: Car suspension
Next

Removal and installation the front steering knuckle assembly
Suspension and steering specifications
Removal and installation the front pillar
Front pillar overhaul
Removal and installation the front anti-roll bar
Removal, overhaul and installation of the lower arm of the front…
Removal and installation the ball joint of the lower arm of the front…
Other articles on other Renault models

➽ Principle of checking the front wheel alignment angles Renault Laguna 2 (2001-2007)
➽ Checking the front wheel drive protective covers Renault Logan 1 (2004-2012, petrol)
➽ Checking the front wheel drive protective covers Renault Sandero 1 (2007-2012, petrol)
➽ Checking the front wheel alignment angles (60,000 km) Renault Symbol 1 (1999-2008, petrol)
➽ Principle of checking the front wheel alignment angles Renault Espace III (1996-2002)
Link to this article in different formats
Reviews and comments of visitors
No comments yet


Add two numbers 45 + 49


Megan 2 (2002-2009, petrol) 
  • User manual
  • Introduction to manual
  • Controls and instruments
  • Salon equipment
  • Operation and driving
  • Maintenance and care
  • Power unit
  • Engine repair
  • Fuel system
  • Injection system
  • Intake and exhaust system
  • Starting and charging system
  • Cooling system
  • Decreased toxicity
  • Transmission
  • Clutch
  • Mechanical gearbox
  • Automatic gearbox
  • Wheel drive mechanism
  • Chassis, running gear
  • Suspension and wheels
  • Steering
  • Brake system
  • Body and interior
  • Exterior (external elements)
  • Interior (internal elements)
  • Doors, locks and windows
  • Heating and air conditioning
  • Electrical equipment
  • Equipment and devices
  • Headlights and lighting
  • Electrical circuits
Megane 1 (1995-2002) 
  • General information
  • User manual
  • Maintenance
  • Power unit
  • Petrol engines 1.4/1.6 l
  • Petrol engines 2.0 l
  • Diesel engines 1.9 l
  • Overhaul of engines
  • Cooling system
  • Fuel system (petrol)
  • Fuel system (diesel)
  • Decreased toxicity
  • Charge and launch systems
  • Ignition system (petrol)
  • Preheat system (diesel)
  • Transmission
  • Clutch
  • Mechanical gearbox
  • Automatic gearbox
  • Drive shafts
  • Chassis, running gear
  • Brake system
  • Car suspension
  • Steering
  • Body and interior
  • Exterior (external elements)
  • Interior (internal elements)
  • Doors, locks and windows
  • Electrical equipment
  • Equipment and devices
  • Electrical circuits
RenaultBook.ru © 2018–2026 | Mobile version | News and articles | Sitemap: EN BG BY UA RS HR RO PL SK HU | Administration | Site search | Bookmark
Duster 1 (2009-2017) | Fluence 1 (2009-2020, petrol) | Kangoo 1 (1997-2007) | Laguna 2 (2001-2007) | Logan 1 (2004-2012, petrol) | Logan 2 (2012-2020) | Megane 1 (1995-2002) | Megan 2 (2002-2009, petrol) | Sandero 1 (2007-2012, petrol) | Scenic 1 (1996-2003) | Symbol 1 (1999-2008, petrol) | Symbol 2 (2008-2013, petrol) | Renault 19 (1988-1996) | Espace I and II (1984-1996) | Espace III (1996-2002) | Clio 1 (1990-1998) |
We want your visit to be comfortable 😌 and use cookies 🍪 to do so.