



Contents: Precautionary measures 🠛 Preliminary checks 🠛 General power supply check 🠛 Checking sensors, solenoids and wires 🠛 Checking fuel system sensors when…🠛 Checking the fuel system power…🠛 Camshaft Position Sensor 🠛
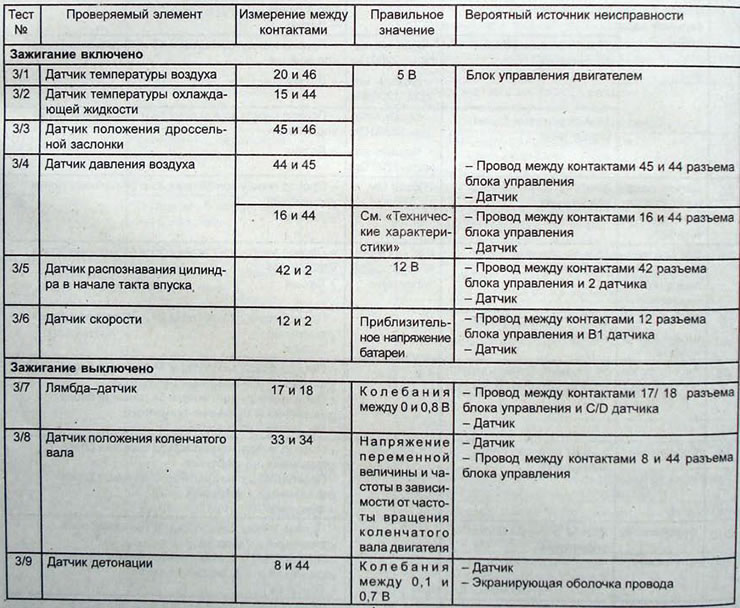
The following diatotic tests apply only to vehicles equipped with the Siemens Fenix 5 injection system. The electrical characteristics of the injection system components are listed below and can be measured with a digital multimeter. Basic electronic skills are required to perform the test.
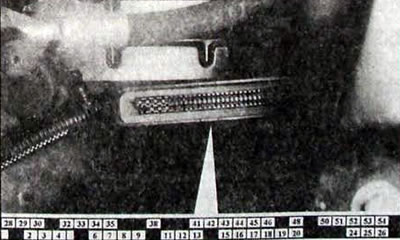
Fig. 1.15. Identification of control unit connector contacts
- Before starting the diagnostic check, it is necessary to perform a preliminary check.
- The test can only be performed if you know how the fuel injection system works.
- Diagnostic testing should begin with an analysis of the symptoms of the malfunction.
Precautionary measures
- While the engine is running, do not disconnect the wires from the battery terminals or the connector from the control unit.
- Dry the car after painting at a temperature of no more than 80°C, and the drying time should not exceed 20 minutes.
- When disconnecting electrical connectors, be sure to check the condition of their contacts, fasteners and the presence of seals.
Preliminary checks
- Check the condition of the engine starting circuit: battery, power wires and starter.
- Check the fuel system: tightness of pipeline connections, cleanliness and correct installation of the fuel filter, as well as the presence of fuel in the fuel tank.
- Check the crankcase ventilation hoses for contamination and pinching.
- Check the fuel hoses for contamination and kinks.
- Check the air supply system: integrity and absence of damage to air pipes, tightness of connection points, cleanliness of the air filter and its correct fit, as well as the reliability of tightening the clamps
- Check the adjustment of the accelerator cable: smoothness of the cable movement and complete opening of the throttle valve from the initial position.
- Check the tightness of the brake booster and the condition of the check valve.
- Make sure the engine mechanicals are in good condition, the valve timing is correct and the cylinder head gasket is tight.
- Check the condition of the exhaust system: tightness of the elements and their connections.
- Check the condition and interelectrode gap of the spark plugs.
Caution: If no malfunction is found after completing the following checks, but the symptoms are still present, replace the engine control unit.
General power supply check
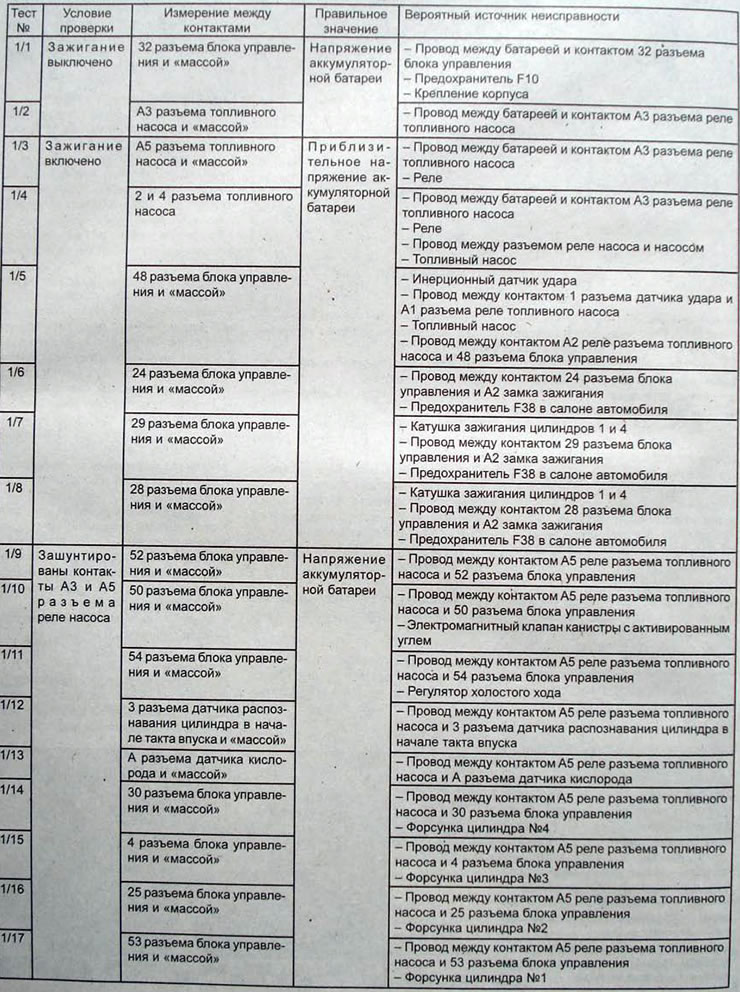
This test consists of ensuring that the fuel injection system is electrically powered and must be carried out with the connector connected to the engine control unit.
Checking sensors, solenoids and wires
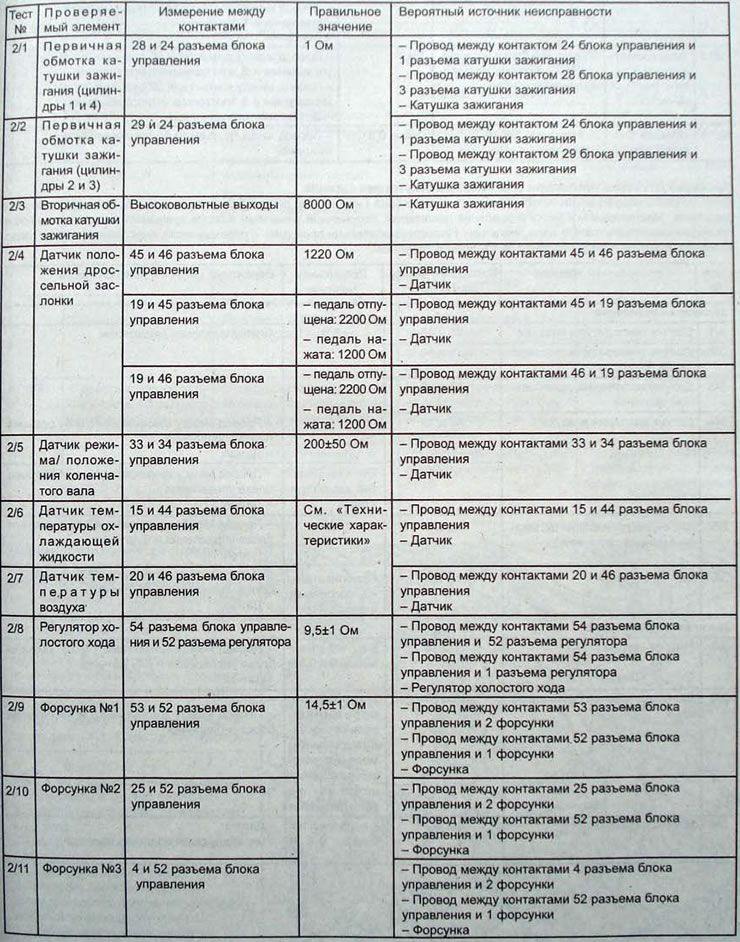
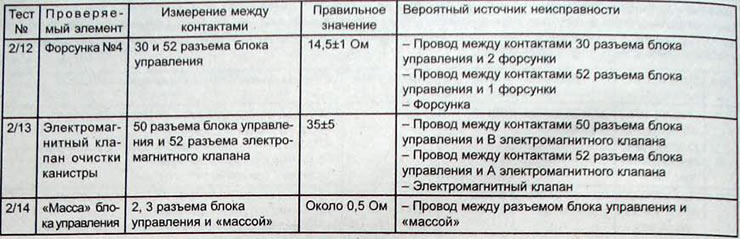
This check consists of checking the condition of the peripheral devices of the fuel injection system, which must be carried out with the connector connected to the engine control unit. When checking, all connectors of peripheral devices must be connected to them.
Checking fuel system sensors when there is no signal
This check consists of checking the supply voltage or the sensor signal, which must be carried out with the connector connected to the engine control unit, the ignition on and after a time delay or after cranking the engine. It is advisable to carry out the check with an adapter connected in series between the engine control unit and the connector.
Checking the fuel system power supply circuit
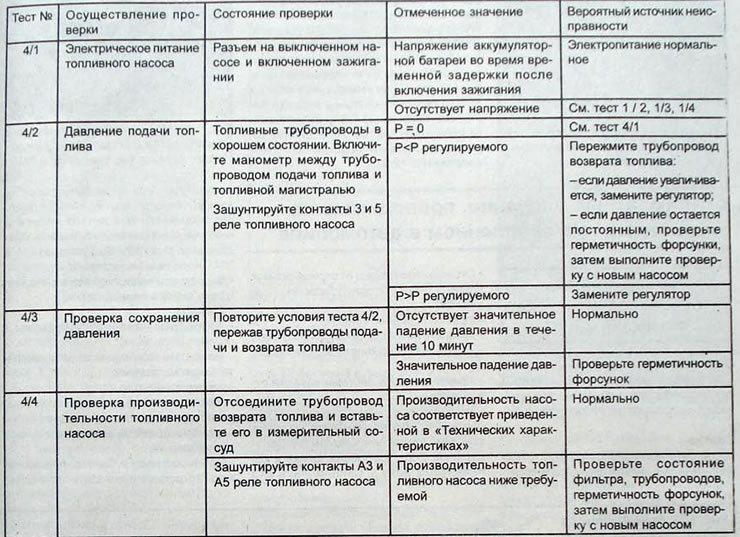
This control consists of checking the condition of the various elements that make up the fuel injection system.
Camshaft Position Sensor
The camshaft position sensor is located at the end of the camshaft and is secured to the cylinder head with three bolts (Fig. 1.16). The sensor is located opposite a target with a 180° sector secured to the end of the camshaft. When the target sector passes in front of the sensor, the injection system control unit receives a 12 V signal from the sensor. When the target sector is not in front of the sensor, the injection system control unit receives a 0 V signal.
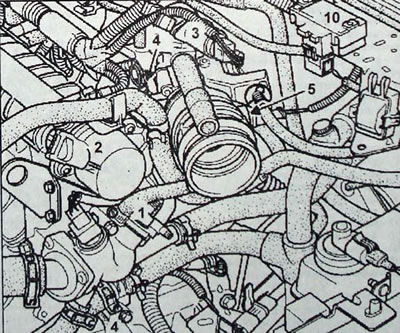
Fig. 1.16. Location of fuel injection system components: 1 - coolant temperature sensor; 2 - camshaft position sensor; 3 - electromagnetic idle speed control valve; 4 - throttle position potentiometer (not adjustable); 5 - air temperature sensor; 6 - absolute pressure sensor
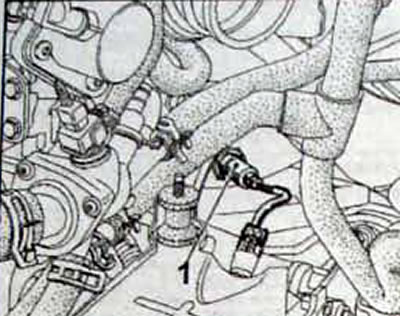
Fig. 1.17. Location of the oxygen sensor (1)
The camshaft position sensor is supplied with 12 V. A voltage of 5 V is supplied to the sensor from the injection system control unit via channel 2. Depending on the position of the target sector, the sensor interrupts the circuit and closes 5 V to ground, while a voltage of 0 V is supplied to the injection system control unit. Or it leaves the circuit open, while a voltage of 12 V is supplied to the injection system control unit.